The Mamiya 645 1000S was not my first medium format camera. I dabbled with a Lubitel 166 followed by a Mamiya C3 both of which are 6×6 format, and aside from technical issues with both cameras, the main reason that I then bought the Mamiya 645 was my real struggle with the square format.
I have always shot 35mm film and my eye has been sort of trained in the landscape/portrait aspect ratio. My first couple of rolls with those 6×6 format cameras left me feeling my composition was lacking and the 645 format seemed to be a better fit for me.
After reading as much as I could about various 645 format cameras it boiled down to either the Bronica ETRS or the Mamiya 645 as a fit for my budget.

This was back in 2012. I purchased the camera with a waist level finder and 80mm f/2.8 lens for £249. I’ve since added an AE (metering) prism finder, which also makes shooting portraits much easier.
There were pros and cons with both cameras but I went for the Mamiya 645 1000S mainly for the 1000/sec top shutter speed and to be honest I loved the look and feel, which is a big reason why I like to shoot with one camera over another. Here’s what I cover in this article:
Camera layout
Front
Here you can see the shutter release with lock (bottom left, turn to the red dot to lock the shutter), and the small black the DoF preview lever just above it, which you push up to stop down lens.
On the right (not shown from this angle) is the lens mount release an delayed shutter release lever. When activated, this gives you up to a 10 second delay before the shutter fires.

Left
The left side of the camera has the lens release button (middle left), delayed shutter release and shutter speed dial.
60x on the dial is the focal plane shutter flash sync setting and beside that is a red dot, which is used to set the camera to Aperture Priority mode when the metered finder is installed as pictured. Two PC flash sync ports are present towards the rear of the body.
The small silver nubbin at the rear of the camera is one of two strap lugs, the other is on the right hand side of the camera.

Right
Things are a little busier on this side of the body. From top to bottom we have the prism finder ISO setting and on/off switch. The top shutter button sits at the front of the body and the frame counter near the rear.
Moving down, the small red nib above the “M” on the silver camera label, is the battery check button. Press this down and check the light above the shutter speed selector on the left side of the camera. Next is the wind-on lever, which dominates the middle of the panel.

The bottom left of the image above shows the multi exposure lever: flip it forwards, take a frame and then wind on to cock the shutter. The film does not advance and the dial does not auto-return so make sure you return it to the vertical position otherwise it will stay in multi exposure mode.
Bottom right shows the “M.U.” (Mirror Up) button. Push the lever down to lock up the mirror when vibration is possible with low shutter speeds. The mirror will stay up even after the frame has been taken, so remember to flip it back up to return the mirror.
Finally, the right of the image shows the DoF preview lever (by the film crank handle) and the shutter release button (with lock).
Rear
Film door opening mechanism and film memo holder. Slide the door switch in the direction of the arrow while depressing the film memo plate to release the film door.
As the AE Prism finder is installed, you can also see the finder release button, which you press to remove it.


Top
You can see the focus screen with the waist level finder installed. With the AE Prism finder installed, the camera is topped with a hot shoe.
From this angle you can also see the top shutter button and battery check button on the right, and battery check light / shutter speed selector dial on the left.

Bottom
The bottom of the camera gives access to the battery chamber door and standard tripod socket.
Shutter sound
Loading film
The gallery below describes the process for loading the camera with film. Click on an image to enlarge, then click on the navigation arrows / swipe, or use the cursor keys on your keyboard to navigate through the steps.


Here are the basic steps again:
- First, release the film door by sliding the door release switch in the direction of the arrow, while depressing the film memo plate.
- With the door open, squeeze the buttons on both sides of “120” label, then pull out cassette.
- Place a new film roll in the top position.
- Place empty film spool in the lower position (shown empty), the silver spool holder on left folds down. Making sure the INSIDE of the backing paper is pointing out, unwind backing paper around the back of cassette and insert leader into the empty spool.
- Manually turn the take-up spool until the START mark/arrows on the film aligns with the red START mark on the film holder.
- Reinstall the loaded film holder, making sure it clicks into place.
- Close the film door and slide in your film reminder…done!
Finally, wind-on the film using the film crank until it stops winding and the counter is at frame 1.
Finders
Using the waist level finder is great on the Mamiya 645 1000S. It is very bright and easy to focus but the advantage of the 645 format (over 6×6), is to be able to shoot in portrait aspect, which is almost impossible with a waist level finder unless on a tripod.
My first purchase was a prism finder followed by Mamiya’a AE (Auto Exposure) prism finder. For me, this addition turned the camera into a walk about point and shoot.
The ability to be able to turn the camera into portrait orientation and shoot easily gives more options. As the the finder is metered, to a certain extent you can simply focus and shoot just like an SLR.
Focusing and shooting
To aid focus camera has split prism focus screen installed as standard. It’s just like most SLRs so focussing is very straight forward – especially with such a bright screen. There are several other first-party focus screens available.
The camera has two shutter release buttons, which you can use depending on your preference. One is on the top right of the camera and one on the bottom left of the front of the camera. The second button has a standard screw for a cable release.
If using the AE prism finder, you can set the camera into full Aperture Priority mode. To do this set the shutter dial to the red dot between 1000/s and B, match the prism’s ISO to match your film, then switch the meter on.
With finder off, or the AE prism switched off, you simply set the shutter speed dial and lens aperture to that of your meter (or guess!), and shoot as normal.
It’s worth saying that you can set exposure compensation by changing the ISO if using the metered prism.
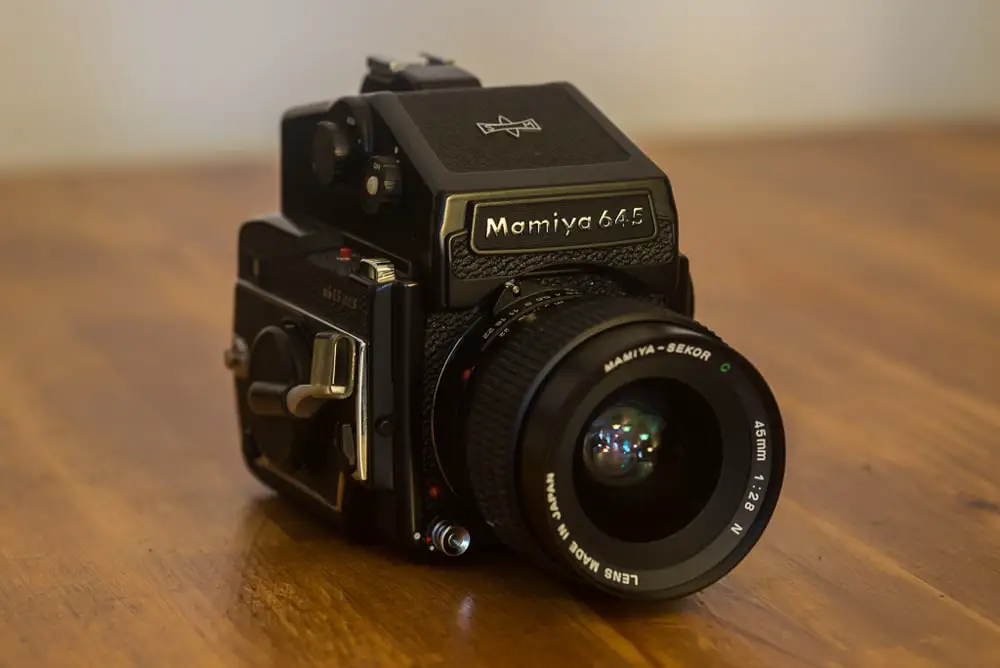
Lens system
My kit came with the normal “kit lens”, an 80mm f/2.8, which equates to a 50mm equivalent focal length on 35mm film.
I have since added the 150mm f/4 and the brilliant 45mm f/2.8 lenses to my system, which are equivalent to 90mm and 28mm respectively on 35mm film.
The 150mm is great for head shots and gives lovely background separation and bokeh but the 45/2.8 is probably my best addition so far. You see, I shoot quite a few landscapes and while the 80mm has generally worked fine for that, the extra field of view that the 45/2.8 lens makes landscape shooting far easier. The lens also has the added bonus of being able to focus as close as 45cm.
Pros and cons
The camera is well built and solid…mainly metal but not too heavy to carry around, especially with the 80mm f/2.8 which is quite a compact lens. The buttons are all in the places you need them so you don’t need to take your eye from the finder.
The prism finder makes it an easy camera to use for someone new to medium format, as the image is the correct way around just like an SLR. When in aperture priority mode, shutter speeds are shown in the finder window.
Using the waist level finder gives more of an old school medium format feel, and is is probably the most enjoyable way to shoot this camera – albeit in full manual mode but I am used to that with my Leica M2.
One of the only negatives I can throw at the 1000S is the lack of an interchangeable film back. The newer Mamiya 645 Pro does but the thing that drew me to the older 1000S was what to me is a superior build and feel, as opposed to the plastic feel of the Pro model.
That said I have shot this camera for years and to be honest I have never really needed to switch out films while shooting so there have been no problems.
Another sort-of negative is the mirror slap, which makes hand holding at 1/60 second or less very hard, especially with the 80mm and 150mm lenses but I have successfully shot the 45mm at 1/15 sec. The camera does have a mirror lockup function, so if you don’t have a tripod with you it is just as easy to frame, lockup the mirror and shoot.
If you are into shooting flash then the downside is the flash sync speed of 1/60 sec is a bit of a pain unless you are shooting in the studio and not outside trying to overpower the sun. One thing to bear in mind is that some Mamiya lenses come with leaf shutters in the lens which will reduce this limitation.
Sample photos
I’ve included some sample photographs below. They were taken on a Mixture of ILFORD Delta 400 Professional, ILFORD HP5 PLUS, ILFORD FP4 PLUS, Kodak Ektar 100, Fuji Reala, Fuji Provia 100F (RDP III) and Fuji Velvia 100F (RVP100F). Click on any of the images to view them as full screen.


Summary and conclusion
The slight negative points above really pale into insignificance for me when I scan in the negatives/slides that come out of this lovely, lovely camera.
The quality of the lenses are first class and compared to 35mm, the DoF and sharpness is gorgeous. The 645 aspect ratio also makes composition much easier for me.
I have since bought quite a few other medium format cameras, the Bronica SQ-Ai, Mamiya C330, Yashica Mat 124G – all square format – and I would like to think that my square composition skills have improved but whenever I want to shoot some 120 film my go-to camera is usually the Mamiya 645 1000S.
~ Tim Dobbs
| Manufacturer | Mamiya Camera Co.,Ltd. (Tokyo, Japan) |
| Camera name | Mamiya 645 1000S |
| Camera type | Single Lens Reflex |
| Film format | 120/220 rollfilm |
| Image format | 6×4.5cm |
| Manufacture dates | 1975-87 |
| Viewfinder | 100% coverage Fresnel matte screen, with centered microprism with a fine focusing collar SLR pentaprism, type FH, with hot-shoe connections; Interchangeable with metered and waist level finders |
| Lens mount | M645 bayonet mount |
| Lenses | Ranging from 35mm fisheye to 1000mm mirror lens and zoom lenses. 20+ in total. |
| Shutter | Focal plane Electronically controlled (cloth) B, 8 sec – 1/000 sec Some lenses include leaf shutter |
| Additional functions | Mirror lockup Multiple exposure |
| Accessories | AE (TTL) Pentaprism Waist Level Viewfinder Focusing chimney 5x interchangeable focus screens |
| Metering | With AE (TTL) prism EV 2.5 – 19 ASA 12 – 3200 |
| Flash | 2x PC socekts: X and FP; Flash sync 1/60 sec. (red on the speed dial) |
| Power | 6v Silver oxide, alkaline (476A or 4LR44) |
| Weight | 1.58KG (with lens) |
| Dimensions (appx) | Body only: 180mm x 110mm x 95mm Body + Standard prism + 150/4 lens 180mm x 140mm x 170mm |
Share your knowledge, story or project
The transfer of knowledge across the film photography community is the heart of EMULSIVE. You can add your support by contributing your thoughts, work, experiences and ideas to inspire the hundreds of thousands of people who read these pages each month. Check out the submission guide here.
If you like what you’re reading you can also help this passion project by heading over to the EMULSIVE Patreon page and contributing as little as a dollar a month. There’s also print and apparel over at Society 6, currently showcasing over two dozen t-shirt designs and over a dozen unique photographs available for purchase.


12 responses to “Camera review: Mamiya 645 1000S”
Thanks Tim for the excellent review and excellent + pictures. This gives me hope that I can revive my ever-expanding, but rarely used Mamiya 645 1000s !
This is one of my all-time favorite cameras, and certainly the first one in my collection that I reach for when I want to shoot medium format. Thanks for the great review!
I’ve recently unearthed my old 645J, stuck a battery in it and it’s good to go.
Reading the article made me want to shoot it again. I’ve never bought Mamiya lenses for it, I just use some Russian and Zeiss glass with an adaptor, since I don’t have a metering prism anyway, so manual set-up is as good as anything.
What I’ve noticed is that nearly all of the Mamiya prisms for sale now have the silvering wrecked in a broad strip by the adhesive of the sticky tape that the factory used to fix them into position. A real flaw in manufacture, there.
Do you have a recommended flash setup for the Mamiya?
I’m trying to figure what to buy in my first setup. Currently looking at the Metz Mecablitz 50-5..
Any help would be appreciated!
Great article! I have had my Mamiya 645 1000S since the early ’80’s. Great for location and in-studio shoots. Awesome camera. Still love shooting film!
I have the Mamiya Pro and it’s a metal camera that has a very nice solid feeling of quaity. It doesn’t feel plasticty at all. It’s more lke a Nikon F2 that has some plastic coated metal parts. I’d go for the Pro or the Pro TL, if I was in the market for this 6×4.5 system. The optics are excellent and unlike my 6×6 or 6×9 medium format cameras, I can get 16 shots on a 120 roll.
I have this camera and I have never used it. My husband only use it a very few times. Maybe I can learn how to use it.
Great information we are considering this camera as we have the Mamyia RZ67II for studio.
Thanks!
@timdobbsphoto Nice review Tim. Looks/sounds like a great camera.
@timdobbsphoto Well done Tim! I’m quite fond of this camera as well and all my DDJ shots to come this… https://t.co/swLQJLyv4N
Very nice article, I agree with all your points.
I have it and a few lenses… the 35mm , 45mm (came before I found a 35…), 80mm F/1.9, 120 macro (crazy close-up portraits) and 150mm. And they are all good. Scans or prints make me forget the weight of the beast (compared to my Fuji x100).
Another thing that I like, is the way you can make long exposures : remove the battery, click the shutter button (any shutter speed), and when you want to stop, push the red battery-test button. Useful trick in cold temperatures.
(If you use a cable release on B, you could drain the battery)
Thanks for the review !
Thanks for the long exposure tip ……