In high school, I bought myself a Minolta Maxxum 3000i with some off-brand lenses. It worked great as a point and shoot on drugstore Fuji film. As I recall, there was no option to control aperture or shutter.
In the early 2000s I started taking photography slightly more seriously and I bought myself a Nikon N80 (I did say slightly) with a G series lens. It worked for what I knew at the time and I slowly started to collect better glass (lots of primes and an amazing 105mm macro). But my output wasn’t all that much better.
Then I took the camera off the P setting and the world opened up.
Searching through eBay at around that time for more lenses (because one can never have enough), I came across a Mamiya C330 TLR. With my questionable logic being “when your images are less than awe inspiring it must be the camera that needs replacing”, I bid and won. The C330 is a brick of a camera with bellows and interchangeable lenses – a rarity in TLR cameras – and a parallax/exposure indicator bar.
I collected a series of lenses for it but was never really comfortable with the camera. In retrospect it may have been the well-used Weston exposure meter more than the camera. The Mamiya got sold on and my shooting went dormant.
My next purchase was a Nikon digital SLR (DX format, waste of a sensor IMHO). At which point I came to the conclusion that an iPhone does the same thing as a digital SLR only in a more accessible manner. And that camera went away to be replaced by my long time personal holy grail, a Hasselblad 500C/M.
Before I get into that, here’s what’s covered in this article:
Getting the Hasselblad 500C/M
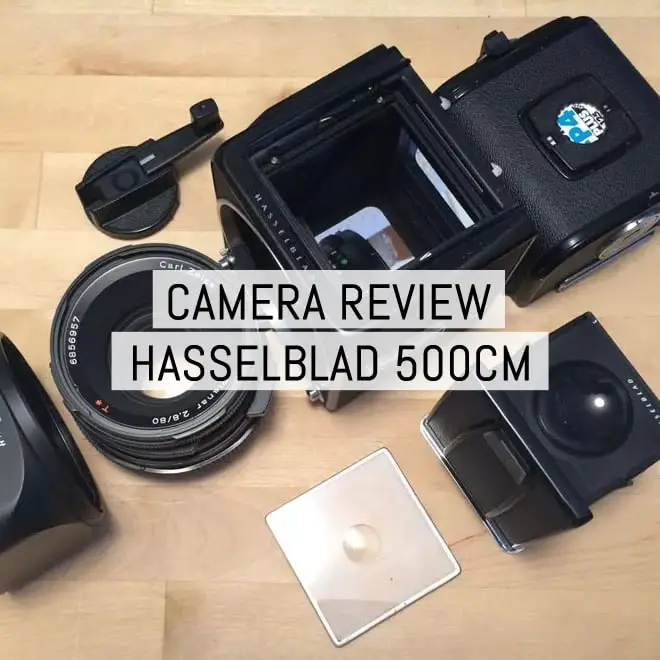
The kit I bought was a well used but not destroyed 500C/M with one film back, a waist level finder and the stock 80mm f/2.8 lens. It immediately went out for a CLA and a month or so of waiting later, it reappeared on my doorstep in a state of functional perfection.

The Hasselblad 500 series is a modular camera system. The basic 500C/M setup starts with the 500C/M body, an 80mm f/2.8 Planar Zeiss lens with T* coating, an A12 film back, waist level finder and ground glass focus screen.
The 500 c/m is the “modified” version of the original 500C, the main difference between the “C” and “C/M” is the fact that the focus screen can be easily switched out for one of many different versions by the user without requiring the help of a technician.
The basic system (with A12 film magazine), produces 12 6×6 negatives on 120 roll film. There are magazines available for 220 film, 70mm film and Polaroid sheets, we well as image format support for 6×4.5 (portrait and landscape), and the 4x4cm “super slide”.
Scandinavian pedigree
Sweden. It came from Sweden and that makes it awesome, like Volvo and SAAB.
Hasselblad had previously created the 1000F and 1600F series prior. These used different lens mounts and focal plane shutters, as opposed to an in-lens Compur shutter. During the life of the 500 series, Hasselblad also created the 2000 and 200 series cameras, which provided in body focal plane shutters and compatibility with 500 series lenses. Some later models in the 200 series also provided auto exposure and aperture priority when used with specific lenses.
Focal plane Hasselblad bodies are generally considered delicate and the common wisdom happens to be these are beautiful paperweights but utter rubbish if used in the real world.
[EMULSIVE: as a Hasselblad 2000 series user, I respectfully disagree but this is an opinion piece.]

Hasselblad’s numbering convention refers to the fastest achievable shutter speed. The 500 series, with a 1/500 maximum shutter speed, amounted to a clean sheet redesign of the focal plane bodies, which over their various iterations provided top shutter speeds of 1/1000th, 1/1600th and 1/2000th of a second.
A word on lenses
The genius of the 500 series isn’t really the Hasselblad bits but the Zeiss lenses. The standard 80mm f/2.8 lens equates to roughly 50mm on 35mm film. It is a short, relatively light and amazingly sharp lens.

Surrounding the 80mm are seven (official) lenses choices – more on that later. My own kit includes the 50 f/4 and 150 f/4 lenses to compliment the 80 f/2.8. Both of these lenses are physically longer and a fair bit heavier. The 50mm is surprisingly heavy, but my frame of reference is Nikkor D lens which at 50mm is a featherweight lens.
The Zeiss lenses are German through and through, constructed of glass (leaded until the late 90s/early 2000s) and aluminum, with minimal plastic and rubber bits. There are three series of lenses compatible with the 500 series, with some mid-series developments.

C, CF, CFi and CFE lenses explained
C lenses
The “C” lenses are the oldest. These have a 50mm filter mount, use series 8 filters (Hasselblad B50), and have lovely knurled focusing rings. The “C” lenses of an interlocked design, to set the shutter and aperture you will need to slide a release forward, set the EV and then decide on whichever takes priority for you, aperture or shutter speed.
Other niceties on the “C” lenses are a built in timer (of roughly 9 seconds) and a PC sync for flash. These lenses also allow stop down prior to shutter release to preview depth of field. These lenses are old and servicing is becoming more challenging as shutter parts become more scarce. I have one as a paperweight. A beautiful, heavy paperweight.
CF lenses
Next came the “CF” lenses. These have a ~60mm filter mount accepting a Hasselblad B60 bayonet filter. Optically identical to the C lenses, new versions updated the shutter, did away with the on-by-default aperture/shutter speed interlock, and removed the timer.

The barrel is still marked for EV, shutter and aperture. All lenses are still manually set.
The CF lens interlock is now user activated: set the EV value and then press the interlock button and turn the dial in order to set which ever piece is more important to you at the time, shutter or aperture. The PC sync remains for the flash and flash sync is available at all shutter speeds from 1/500 to 1 second. Stop down for preview is still available on these lenses. These lenses seem to be pretty well supported for service with good parts availability.

Both the C and CF lenses include a bulb setting and provide a locked-out F or B setting for the 2000 and 200 series. There are other features on the barrels that I don’t pay much attention to, such depth of field indicators and IR focusing marks.
It’s worth mentioning that lens markings are engraved on C lenses and printed on the CF and later variants.
CFi and CFE lenses
After the CF lens came the FLE (floating lens element) variants and later still came the CFi and CFE lens versions. I have no experience with either but the FLEs may be superior in focusing – seem to be overly complicated in operation. The CFE adds electronic outputs to pass exposure information to bodies with TTL metering.

I have never noticed any vignetting or fall off at the edges when using my CF lenses. The image comes across as clear corner-to-corner. I also have yet to experience flares (I may be lucky so far) or sunspots in images. The only image I have that made me wonder was when I used the 60/80mm hood on the 50mm and had a cool effect all around the outside – operator error, not system error.
Focusing screens
The focusing screens on the C/M are interchangeable. Most reviews will tell you only buy a camera with the acute-matte or acute- matte D screen installed.
The acute-matte D is pricey on its own, but never having one is sort of like only ever having had Hershey chocolate – it may be crap when compared to Scharffen Berger but in isolation it is fine.
Whatever screen comes on the camera is probably going to work just fine.

My Hasselblad kit
In the bag, I carry the 500C/M body with an A12 magazine, 80mm f/2.8 CF lens with Bay 60 daylight filter and waist level finder.
I also carry the weight of the 50mm CF and 150mm CF lenses, lens hood, two more A12 backs, an accessory-rail-mountable spirit level, tripod mount, black and white color filters and neutral density filters.
My filters are 62mm (screw on with an adapter ring). If I didn’t already own a set of 62mm filters I would have gone to 67mm.


The body of the camera is straightforward from a user’s perspective. There is a removable winding knob/crank, mirror lock up control and “state” indicator on one side, and an accessory rail on the other. Lens release and shutter release are on the front with the lens mount and a magazine mount on the back.
Inside you can see the mirror and the rear baffle in its down position. There are some cams and gears visible on the inside edges of the body.
The body also has Hasselblad specific lugs to mount a strap. I have a thicker webbing strap. The thin leather one that came with the camera seemed questionably flimsy.

The waist level finder on my particular camera is a pop-up unit with a magnifying pop-up screen. It is pretty straight forward and no-frills unit. It is also user replaceable with different waist level finders, prisms and chimney finders.
The film back or magazine attaches to the rear of the body with two hooks and a catch. Pro hint: always slide the catch hook open when mounting, don’t click-force the back on. The back has a separate winding knob and it’s own “state” indicator.
Together with the body state indicator, it is possible to tell if the body and film back are both ready to shoot (they show a white or red/orange state, describing a ready-to-shoot or uncocked state).
The back of my film magazines have a pocket for the film box flap to go into and an ISO indicator ring. On later magazines, a dark slide holder was added.

The lens slides in and rotates to mount with a slight click. With that the camera is ready to go.
So what’s missing? An exposure meter. That’s what’s missing.
An exposure meter is available as a replacement of the body winding knob. I have seen one once for sale. It will give you a general reading but if you use any semblance of the zone system you will want something better.
I currently use an iPhone app for metering but am lusting after a Pentax Spotmeter V. There are also viewfinder prisms available (45 and 90 degree), with built-in exposure meters but from recollection, these are pricey and don’t match the spot metering or matrix metering available separately.
Also missing from the camera are any batteries. Everything is manual.
Using the camera
Going from the Nikon N80 to the Hasselblad requires a significant slow down in the thinking of using the camera. The Nikon allows P, A, S and M operation options. The Hasselblad is M all the time.
The first thing I think about when getting ready is whether I should use the tripod. The camera itself is heavy but not unbearably weighty (like a Mamiya RB67). The basic set up with the 80mm is pretty well-balanced handheld. When hand holding the camera the body sits in the left hand with the index finger landing on the shutter release. The right hand wraps around the lens to adjust shutter, focus and aperture.
If I think the available light is going to require a slow shutter the tripod comes out. Next I roughly compose the shot. Is what I want in the frame? Is it sort of in focus?
Then out comes the iPhone to get a meter reading. Take the reading and adjust the shutter and aperture on the lens. Retake the reading just to be sure. Do an exposure calculation in my head depending on the film, the goal of the image and available light (I like night exposures and lots of reciprocity failure calculations). Adjust the exposure again. Remove the dark slide and put it somewhere it won’t get lost.

Then I go back and refocus the lens, double check with the magnifying screen, click the mirror up if I think about it, get the timer ready if it is a long exposure and finally click the shutter open. The shutter also has a lock to hold the shutter open when using the bulb setting. I was using a remote release; the shutter lock is far more convenient.
Once the image is exposed the body winder is turned one full revolution and a few things happen that make using the system less burdensome then it could be. The mirror is lowered, the film is advanced one frame and the lens shutter is cocked, the indicators on the body and film magazine go from a red/orange dot to a white dot.
Those indicators must always be in sync.
The most frustrating thing about the camera is when they don’t sync and I am trying to remember which piece needs to be wound/cock/exposed to get them back in tune.
I follow what seems to be standard practice, and recommended by the user manual, and leave the camera in the cocked state at all times.
The CLA
When I got my kit I knew I would be far happier if it was all set up and back to where it should be. Light seals wear over time and things get out of whack. The body and 80mm I have is from 1986 with the 50mm lens from 1982.
The biggest issue I had was on my second film magazine, as it wasn’t fully advancing each frame. I thought the magazines were relatively straightforward and not much could go wrong. That is a fallacy.
Behind every panel of the body and a good part of the magazine are cams, gears and mechanical switches. The outside appearance of simplicity hides the finely manufactured innards.
Once everything works the way it should the camera really gets out of the way and lets you record the image you want. The only piece I haven’t sent out for service yet is my 150mm CF lens. I have a 150mm C that did. I am relatively sure the only reason I sent off to a CLA was I had already sent the engineer a whole camera, a second back and the 50mm.
Limitations
For me this is not the camera for ripping through frames or for action unless you have tons of light, fast film and a few backs. Being 6×6 a roll of 120 yields twelve negatives. The Nikon does a better job at grabbing those random moments of action with its automatic everything, 36 negatives per roll and how ever many frames per second.
The lenses, as good as they are, do not focus very close. There are extension tubes available. They require an adjustment to the exposure. There is also a 120mm macro lens that focuses closer. I don’t have that lens and from recollection, it is relatively expensive.

The shutters on all the lenses max at 1/500th. In a world of 1/8000th second, shutters they are slow. Neutral density filters and wise choice of film go along way to remedy that limitation.
Weight can be a factor. Especially when carrying the whole kit. I have a dedicated f-Stop bag with an insert just for this camera. It still gets cumbersome after a few hours. If just carrying the standard camera set-up on a neck strap it sits perfectly against my back when slung around my neck and under one arm. Then the limitation is how much film rolls or film magazines you can carry comfortably.
When using the waist level finder, the ground glass image is reversed. Moving the camera right moves the image left. After a year or so this has become second nature, though.
What makes the Hasselblad my favorite camera to use
It makes me think before each shot about composition and not about the camera. Like Apple’s old tagline “It just works”, the 500C/M just works. The standard set-up gives enough options to be usable without giving so many options as to be bewildering.
There are no bracketing options, no ISO settings to fuss with, no program to select, no built in timers (except the C lenses).

The film backs can be swapped mid-roll and I cannot stress how much I love this aspect of the camera. Other manufacturers do it also but the Hasselblad has the whole operation thought out. The state indicators are genius.
If the dark slide isn’t inserted the back won’t release from the body. Each back has its own dedicated dark slide. The two film backs in the bag are safe and secure from accidental exposure, unless I do something stupid. There are no protrusions from the backs in the bag. They sit dark slide to dark slide perfectly. Having three backs (and I do want more) lets me load Ilford Pan F, FP4+ and HP5. Those three films cover almost every situation I could encounter, although currently the Pan F has been replaced by Fuji Velvia 50.

If I wanted to do this with the Nikon I would have a stack of bodies that would all need CLAs and body caps at more cost. Although to be fair I can buy a decent Nikon body (FM, FE, N80) for about the same as a decent Hasselblad A12 film back.
My film backs provide medium format in a square aspect ratio – 6×6. No tilting of the camera to get a portrait, no second guessing if maybe I should have done this to get that in the shot. I get what I want in the image and crop out the extra later.
The big winner though is that if I didn’t set something up right then the camera isn’t going to second guess me and do it. There won’t be random refocusing, bracketed negatives or delayed flashes. If I misread the meter or screw up a calculation it is on me, not the camera.
The camera makes me be a better photographer.
Add-ons, accoutrements and more things to buy
There is a pistol grip available for the camera, which attaches to the tripod mount (imagine an old 8mm cine camera). There is also a left-hand grip, which includes a cold shoe for flash and a shutter release button.
Extension tubes are available in a variety of lengths from 8mm to 56mm. They open up close focusing but require slightly more brain power when setting the exposure.
Lenses, lenses, lenses. There are 30mm fisheye, 40mm, 50mm, 60mm, 80mm. 100mm, 120mm (macro), 150mm, 180mm, 250mm and 350mm lens options available for the 500 series. Personally, I find the three lenses I have cover enough of what I shoot to be more than adequate. I drool over the 120 and the 30 but then remember for the money I can buy a lot of other things, like a better enlarger and stacks of photo paper.
There are also optional focusing controls for the lenses and focus grips to make it easier. Some of the focusing rings rotate 320 degrees though and the shutter release and lens release can get in the way of the knobs and tension set screws.

There is a spirit level that mounts on the body accessory rail. My tripod seemed to have divorced all its levels and with the head on the tripod, the camera could be completely wonky but the tripod perfectly level. The spirit level on the body takes care of misaligning the horizon.
Exposure meters. As mentioned before there is a winding knob exposure meter. The winding knob on the C/M body is modular. Push a button, rotate and it falls off. The exposure meter replaces the winding knob entirely and still functions as a winding knob too. The metering is general field of view and not spot metering. Almost any iPhone app can do a better job.
Prisms for days. There are 45 and 90 degree prisms with and without metering, there’s also a chimney finder, and other waist level finders (all with correction lens options). You name it and it may exist. Meters and finders come from both Hasselblad and Kiev (compatible with the KIEV 88CM and Hasselblad system).
I still prefer the Hasselblad waist level finder. Something about holding the camera up to my face seems wrong.
Summary
Coming from 35mm and a cumbersome TLR the Hasselblad does a few things differently. It won’t do any thinking for you. If you make an error, it won’t tell you. It won’t try to be a better camera than you are a photographer. It is a great passenger but you better be driving.

When you ask it to do something it does it with a thud (that mirror swinging around is huge). At the same time, it does force you to work at a slower pace. It forces you to double check settings, to think about the exposure, to concentrate on what it is you want to capture. It is not the perfect camera but it does so many things right and does enough other things flawlessly that it is a joy to use.
Would I like it better with Nikon’s metering system? Maybe. Would a P setting be welcome? Perhaps. Would a self winder be nice? Possibly (there are models with them, but then batteries!). Would a hot shoe flash be beneficial? Occasionally. Is any of that necessary?
Nope! As a camera, it is what it is and makes no apologies for its limitations.
~ Tim
Hasselblad 500C/M technical specifications
| Camera name | Hasselblad 500C/M |
| Camera type | Single Lens Reflex |
| Format | 120 / 220 rollfilm, 70mm reel, pack film. |
| Manufacturer | Victor Hasselblad AB |
| Manufacture dates | 1970-1994 |
| Viewfinder coverage | 100% |
| Shutter | In lens leaf shutter Mechanical B, 1 sec – 1/500 sec |
| Lenses | Official lenses range from 30mm fisheye to 350mm |
| Accessories | Metered and unmetered prism finders (40 and 90 degree) 2x Waist level finder (with optional diopter adjustment) Focusing chimney finder 6×6, 6×4.5, 4.5×6 and 4×4 film backs 120/220/70mm/pack film options Metered winding knob Accessory level spirit level Accessory level cold shoe Pistol grip Left handed grip |
| Metering | EV 4 – 19 ASA 6 – 6400 (with metered prism) |
| Flash | X-Sync PC connection |
| Power | None |
| Weight | Body only: 600g Body with 80mm: 1.5kg Body with 50mm: 1.7kg |
| Dimensions (appx) | Body only: 170mm x 109mm x 104mm |
Share your knowledge, story or project
The transfer of knowledge across the film photography community is the heart of EMULSIVE. You can add your support by contributing your thoughts, work, experiences and ideas to inspire the hundreds of thousands of people who read these pages each month. Check out the submission guide here.
If you like what you’re reading you can also help this passion project by heading over to the EMULSIVE Patreon page and contributing as little as a dollar a month. There’s also print and apparel over at Society 6, currently showcasing over two dozen t-shirt designs and over a dozen unique photographs available for purchase.


26 responses to “Camera review: the Hasselblad 500C/M”
Have you lost a lot of money while trading on bitcoin, Forex trade, romance scam, Binary Option scam and other type of online scams ? Have you tried getting your money back or out from your account and were unable to place a withdrawal? Have you found yourself wading through excessively complicated terms which might seem impossible to meet, all because you traded with an unregulated broker? Do not panic, I have good news for you. I lost over $200k to an unregulated broker who stocked my trading capital and denied me access to my account. But thank God I have recovered all my lost funds, through the help of a certified recovery company ( Flash Reclaim Service ). if you need their assistance getting your money back, kindly get in contact with them via Flashreclaim at G MAIL c0m or Flashreclaim at Outlook c0m and they will guide you on effective steps to take and get back all your lost funds in just a couple of days do not fail to send your contact info so they can reach out quickly. I hope this review helps someone out there that needs it
Rolling with the ‘Blad for #FP4Party this week (just like week 1). Two backs loaded, hoping for some… https://t.co/NlPPxiEJba
Enjoyed reading this, thank you
Thank you Tim, I’m mostly a Nikon guy, but I’m getting a 503 CX with a 150 mm and a 50mm. I plan to develop the negatives, and then scan them before I finish the job with Photoshop… (gasp!). No electronics, no batteries, no lag when YOU decide to take the photo. I love the idea. I live in the Republic of Panama, and although I still have my darkroom equipment from over 40 years ago, it’s too difficult to develop the prints.
Sorry this took me so long to get back to…David Odess (www.david-odess.com) is where I had the service done. He does good work and seems fair and honest. His pricing on the website is a starting point though.
I feel like reviews like this one would be a lot more interesting if they did away with the technical details of the system. I seem to know them too well, and there’s a much more comprehensive and accurate set of articles on the subject on this very website.
Thanks for your comment, Sam. As ever, you are welcome to lead by example. I’d love to share your thoughts.
Inquiring about that CLA information as well. Great review.
Just wondering where you had your successful CLA done? I just received a 500c/m and am looking t do the same. Excellent article!
Wonderful review, Tim (oh it was 2016, so belated congrats!) This may upset some people (it upsets me when I think about it) but I bought mine about 2 years ago and I have put only 6 or 7 rolls through it since then. I love the images it makes – i’m always happy I took it out in hindsight… my problem is I sometimes can’t help but think of it, and treat it, like some priceless antique. I suppose I need to just get over my fear of dropping/breaking/losing it! :/
I do love that there’s so much affection for this camera. I’ve had random people come to talk to me about it twice out of only 3 times I took it out in public – one elderly gent who hadn’t seen one since he was much younger and was under the impression Kodak was long dead (even my fresh roll of Portra didn’t quite convince him!). Another guy was excitedly telling about some instant back someone was developing that would take the polaroid 600/Impossible instant film. I did mean to look into that actually, though seems a bit overkill to use that magnificent Zeiss lens on such a low res medium – still, could be fun.
One of the greatest and sexiest cameras ever.
Great review. I always enjoy it when younger photographers go back to classic kit to experience the d… https://t.co/5E7HCl0Vlq
Jordan Koziol in case youre looking for something to read today.
I definitely will!
Excellent article Tim. I like your no-nonsense approach. It made me want to dig out my 500c/m and use it again. I have the 80 and 120 lenses but have never found the 500 to be a very ergonomic design for hand holding. I suppose if I used it more often it would become second nature. I much prefer the Contax 645.
Regarding wide angle lenses, rather than buying one for the 500, I got a 903SWC which is not much more bulky than the 40mm, but has the fabulous Biogon 38/4.5
Good article but some proof-reading is needed. Mistakes such as “compliment” and “it’s” are irritating.
Great article.
I love my 500C and am waiting for some film to get back to me from the lab as I read this.
This piece by Tim sums up my feelings, I had used 500c and cm for many years but when my working life in photography finished I started out on the digital path and the film bodies were sold. Last week I purchased a standard 500 Classic kit and just holding the camera at the dealers seemed to release of sort of calming feeling in me, I am really looking forward to reacquainting myself with the ‘ thought mode ‘ required, my digital cameras are not causing me any problems other than the feeling that maybe the cameras are making me complacent. When using 5×4 film there is a great deal of thought of where to take the shot from, exposure decisions, have I stopped the lens down, checked dof, closed the shutter, inserted the dark slide, removed the sheath and then finally firing the shutter, remembering to reinsert the sheath ! An involving rewarding experience.
Used Hass kit for 15 years, it got hammered but never let me down. Wonderful lenses. My friend bought a 500cm the other day, I picked it up and felt immediately at home again. Well written piece.
I have owned the Hasselblad 2002 it was a great camera to use at a pro level the article written isn’t entirely accurate.
Love mine!
My dream camera!
Great to see that there are photographers who are still using the 500CM. It is a great camera that has served me well over years. Enjoy the Hasselblad!
As for me, I have started using films again after 11 years using DSLR. So, my Hasselblad 500CM is back in circulation and good thing that I did not sell it 11 years ago.
Here is what Hasselblad means to me.
H happy
A mateur photographer
S till
S hoots
E excellent
L andscape in
B lack & White using
L ight
A nd
D ark areas
Cheer,
Richard CYT
Mine’s sadly been mostly gathering dust since I lost access to a colour darkroom and I went fully digital, but I can’t bear to get rid of it. I run mine with the 60 and 150 CF lenses, and two A12s, usually one loaded with Portra 160, the other with Portra 400. I did have the PME-5 metering prism, and while it was pretty nice to have an onboard meter, I still prefered to just keep a Sekonic-L-308 in my pocket and I ended up selling the meter prism.
4
Good read. Trying to wrap head around the Saab and Volvo being awesome part, he’s obviously not dealt w/ their electronics….