It sounds very grand when you tell people that you are having a field camera made for you. I certainly felt grand and excited when I placed my order for an Intrepid 4×5 with blue bellows and lens board. Intrepid are a busy company based in Brighton, UK, so when I ordered in February 2018, delivery time was 6 to 8 weeks. More than enough time to figure out how to take large format photographs (again)
My first year at photo college in the 1970’s was studio-based using Gandolphi cameras, plus I used large format at work frequently over the years but I hadn’t used a 4×5 camera since 1995.
It should be like riding a bike…shouldn’t it?
First, some (re)learnings
I went back to my 1972 textbooks: the ILFORD Manual and Langford’s Basic Photography. These books contain chapters using large format cameras, with diagrams and photos explaining camera movements and technique. I highly recommend them both: excellent reading.
There are plenty of large format blogs full of useful information and instructional videos on the Intrepid site were essential viewing – see the resources section at the bottom of this article for full details.
If you’re not familiar with large format photography, exposure compensation for bellows extension has to be factored in as you focus closer than infinity, especially for close-up work. Add to this the requirement for calculating the reciprocity failure of film for longer than normal exposures, I created exposure compensation tables to be carried with the camera.
Checklist and purchases
With the camera ordered and (re)learnings in full swing, I made a checklist to cover everything else I would need to get out and shoot some film:
- A lens with shutter.
- Cable release.
- Exposure meter.
- Tripod.
- Double Dark Slide film holders.
- Focusing cloth.
- Film changing bag.
- Spirit level.
- Lens hood and magnifier to check focus on ground glass.
- Film and Processing
- Printing
That should cover everything.
Choosing my first lens
The Intrepid 4×5 will accept lenses from 65mm up to 300mm. I chose to use a 150mm (equivalent to 50mm in 35mm format). In the UK there is a large selection of used lenses at dealers and on eBay. These are mainly Schneider, rarely is there a Nikkor or Fujinon.
After some searching I found a 150mm f/5.6 Schneider Companon in a Compur Electronic 1 shutter at a dealer for a very reasonable price. This shutter and the Companon lens are quite a rarity. The Companon name is usually associated with enlarger lenses but Schneider put some into shutters for flat field copying and tabletop close up work – with the ability to shoot high-quality infinity photos as well (according to their literature).

The shutter is powered by a 3v lithium battery, the original 4.5v battery is no longer available. The big grey tube on the right of the lens is the battery holder, this plugs into the shutter. Shutter speeds run from 1/500 to 32secs, apertures are f/5.6 to f/45. I make use of an old 10” cable release to fire mine.
Exposure meter, tripod and film holders


Nice and simple: Sekonic Twinmate and Manfrotto 190XPRO Tripod with 056 pan/tilt head. My 5 DDS’s (Double Dark Slide) film holders will give me 10 shots. They are made by Fidelity and of various ages. All worked well after a clean-up.
Focusing cloth, changing bag and spirit level
Luckily there was a new Calumet focusing cloth, still sealed in its bag on eBay. It is black on one side and white on the other. Changing bags are easy to find and I got the largest one available.
A spirit level is essential to level the baseboard, especially before architectural photography. I mounted a cold flash shoe (off a Zenit B) on top of the rear standard so I could use my small bubble level.
Lens hood and screen magnifier (loupe)

My lens was made in 1971, so I see the use of a decent lens hood was important in case of possible flare caused by the early lens coating. The lens has a 48mm screw thread so I use a step up ring to the common size of 52mm to make life easier. An old Horseman 7x screen magnifier does the job of screen magnifier.
Film and Processing
What a choice of B/W films! Not so many in colour, though. Prices vary from 75p to £6.70 a sheet. The most expensive sheets are the Kodak range whether B/W or Colour, followed by Adox, Arista, Foma, Fuji, Ilford, Rollei, Washi (not in price order), with the cheapest being Foma.
My reckoning was that I would buy Fomapan 100 Classic, so that I could burn through it without too much expense. After the 1st shoot, I also tried some ILFORD FP4 PLUS.


I found a lab that offered B/W sheet film processing and high res scanning at a very reasonable price: Harman Labs (ILFORD). They will process the sheets in ILFOTEC DD-X and flatbed scan. They also provide a light-tight mailing box and all in all, it’s a very useful service!
If I require super high res scans I can go elsewhere to have the negatives canned by Flextight or a drum scanner. The Harman scans are more than good enough for my A3 prints and larger.
The Printing

I post process my scans in Adobe Photoshop and print to A3 using a Canon PRO-100 printer on Fotospeed Platinum Lustre paper. I have no access to analogue printing.
So there we have it, all purchasing done and for just £500, which quite frankly is as cheap as chips.
The camera arrived!

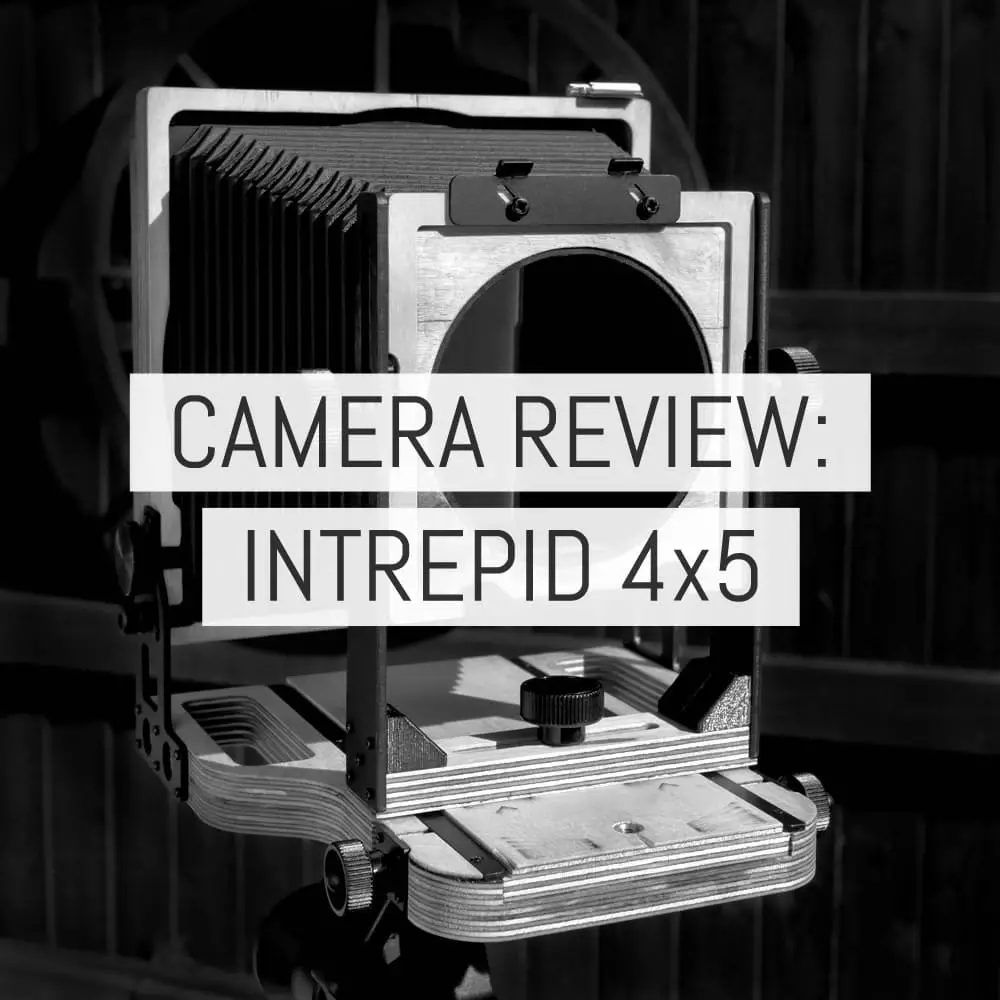
The Intrepid is made of thick birch plywood and aluminium, and weighs in at a mere 1kg. It’s smaller than you would think when looking at promotional photos and is compact when folded.
The front standard has movements in all directions, rise, fall, tilt, cross and swing. The rear standard movement provides downward tilt only. The camera is extremely easy to operate and the baseboard has etched swing marks to assist adjustments.


The rear standard has a ground glass focusing screen with an etched grid. It can cater for DDS’s, Polaroid and roll film backs. You can see the flash shoe and bubble level I mounted on the top left of the rear standard in the first picture of the gallery below.


The lens board is the same as those used on Linhof cameras. My large electronic shutter needed an oddball Compur 2 size hole in the board (52.5mm), so I ordered a Copal 1 size panel and enlarged the hole.
The shutter has a mounting collar which pushes the lens away from the panel by a few millimetres, making it easier to make adjustments.
Results
I had a cunning plan to take a series of images allowing me to use the movements, with some in close-up and. I took notes, so once I reviewed these images (and my cock-ups), I retook some of the same images on a second shoot, hopefully without cock-ups.
And yes, on the first shoot I cocked-up…often, however all but two images out of were usable if not technically perfect.
Here’s a breakdown of both shoots I did for this review.
The 1st shoot
Problems
- Too windy, the camera is light and will shake in a breeze.
- Didn’t have the rear standard upright.
- Image cut off at top corners due to having front standard too high.
- Two shots completely out of focus.
- Put the slide back into the DDS the wrong way.
- Didn’t use enough movements for full sharpness front to back of the photograph.
- Above caused shallow depth of field.
- Ended up binning 10 sheets because of the problems.
From the above evidence, I’d better not get back on a bike! However, there were positives from the 1st shoot:
Positives
- Exposures all correct, even interior close up images at 1 to 1!
- Compositions ok.
- Verticals were vertical.
- Most images were sharp but work needed (see problems).
Photos
Click/tap to view full screen.
, tilt front.")


Thoughts
The photos were all shot on Fomapan 100 Classic at EI 100. They don’t look too bad on a screen at a small size, however, when printed at A3 the problems are more apparent. The obelisk at the front of the Touchstones Museum is out of focus, the Fountain is out of focus, the top of the valves and front of the Amplifier circuit board are out of focus.
The 2nd shoot
For this shoot, I used ILFORD FP4 PLUS (at EI 100) for all retakes which, included a couple of the original exterior shots plus a new one and an interior close up photo. I also shot two of the exteriors on both FP4 PLUS and Fomapan 100 Classic for comparison.
I know diffraction can be an issue with small apertures on some lenses but the Schneider Companon’s definition at f/32 was excellent. In light of this, I chose f/32 for exteriors and f/45 for the close-ups to ensure front to back sharpness.
I hope to use larger apertures with experience, at the moment it’s the belt and braces approach. I felt much more confident on this 2nd shoot. I was now starting to enjoy myself.
Problems
- The Amplifier close up has lost some definition due to diffraction at f/45.
Positives
- Exposures all correct
- Compositions ok
- Verticals still vertical
- All images focused correctly
Photos
Click/tap to view full screen. I have also included full crops of the Touchstones Museum and the Co-op Museum in the gallery below.


")

")


Thoughts
I took these photos from slightly different positions to try and improve the compositions. Hopefully, you can see the improvements from the 1st shoot. Mostly everything is now in focus in the exteriors and the use of movements has helped.
I shot the amp circuit board from further away then cropped the neg and think f/45 may have been too much, as definition has been lost to diffraction. Still, it is overall, a big improvement and hike in confidence.
The Co-op Museum, Fountain and Touchstones Museum shots show exactly what I hoped to achieve, in focus and straight verticals. The Quire in Manchester Cathedral had a lot of black wood, fortunately, the lighting was fairly even throughout the Cathedral except for the organ pipes above the Quire, these were so bright that I decided to leave them out of my final shot (I cannot compensate for high brightness ranges with processing).
My A3 prints of these FP4 PLUS images are razor sharp at f/32 with extraordinary detail, showing that for £70 the Schneider Companon lens, in its electronic shutter, was a real bargain. The 100% crops will hopefully give you an idea of the resolution possible. Fomapan 100 Classic was a bit too grainy for me in Ilfotec DD-X, though with nice definition and contrast. My preference is for FP4 PLUS with it’s finer grain and smoother look.
Having read Tobias Key’s excellent piece on ‘Finding my do anything film’, I am tempted to try some HP5 PLUS to run alongside the FP4 PLUS.
Conclusions
I started this project with the idea of proving to myself that I could still manage to handle a large format camera after so many years away. I’ve enjoyed the re-learning process and had forgotten quite a lot, but most of it came back.
The Intrepid performed well, I soon became familiar with its operation. The only problem I found was the ease at which the front standard could swing, despite being tightly screwed down.
Richard Pickup had the same problem in his Shanghai travelogue. He notes that the Intrepid 8×10 has grip pads on the front standards bottom and this would be a useful mod for the 4×5 camera. I have now put grip tape on the bottom of mine and this completely solves the problem.
Use of the loupe to aid focusing proved to be essential, with an f/5.6 lens the screen can be quite dark. The 1st shoot taught me to carefully check all adjustments just before exposure.
The photos from my shoots produced images showing the high quality on A3 prints that can be achieved with large format negatives. I am still at the restart of my 4×5 photography and I have a long way to go, but I feel I have a good grounding for the future.
Perhaps I can now get back on that bike!
~ Phil
Share your knowledge, story or project
The transfer of knowledge across the film photography community is the heart of EMULSIVE. You can add your support by contributing your thoughts, work, experiences and ideas to inspire the hundreds of thousands of people who read these pages each month. Check out the submission guide here.
If you like what you’re reading you can also help this passion project by heading over to the EMULSIVE Patreon page and contributing as little as a dollar a month. There’s also print and apparel over at Society 6, currently showcasing over two dozen t-shirt designs and over a dozen unique photographs available for purchase.


9 responses to “Camera review: getting back on the bike with the Intrepid 4×5”
Nice review! I’m getting back into 4×5 again too. The reminders are helpful. I have all the pieces, just need to do it.
4×5 on a bike or metaphoric bike?
Great review. Love the interior cathedral shot. I noticed the chandeliers were ever so slightly motion blurred, I’m guessing the 5’30” exposure length captured the small movement from an invisible draft. Reciprocity failure times with Foma films are crazy! I shoot Fomapan 200 with my 4×5 Intrepid, it’s quite the adventure!
Thank YOU Nissim.
Really interesting review Phil, I’m yet to try out any large format but have been thinking of it for a while, especially since Intrepid’s aren’t that expensive. This is really useful to see what things I would need to be mindful of if I do take the plunge.
Thank you Ed. Glad it’s been useful.
Thank you Phil. Great review !
Hi Richard, thank you for your kind comments. Your alternative to a loupe sounds a better aid to focusing. I will look into getting some glasses.
Great review Phil, thank you. I especially enjoyed your careful critiques of your work. I’m sure this approach will stand you in good stead moving forwards.
I’m glad my comments on the 10×8 front standard helped. On another issue, I opted for some cheap +3 (or 4, I forget) glasses from a pound store in favour of a loupe. I was worried the loupe would be focussing on the surface of the ground glass and not the image. The glasses work well. Just a thought.