In June 2015 I was lucky enough to source a fresh 300ft short-end of Kodak’s 250D (Vision 3 5207) motion picture stock in 65mm format. You probably already know, I really, really like shooting this film in 35mm and it’s become my go-to color negative film stock in lieu of nearly everything else – my 250D review can be found here. I’d been looking for some for a while, so when the chance came to buy some, I jumped at the chance to give 120 bulk loading a try.
For those of you not familiar with buying motion picture film in bulk, short-ends are reels of film left at the end of a movie production. Sometimes they’ve been used for testing different lighting situations prior to committing to a shoot, sometimes they’re simply lengths of film from 400ft or 1000ft reels which were partially shot. There are also “re-cans”, which are reels which were loaded into a camera, or cassettes but were never used.
Readers with good memories should remember seeing a few shots from the various rolls I’ve bulk loaded in the past, as well as the various promises I’ve made that an article dealing with bulk loading this film is coming. Well, here it is.
Thanks to Diz, Dave Lam, Jon Wilkening and Ribnar for the recent nudge to get me going. Everything you see here is their fault.
Bulk loading 120 film – the premise
This article deals with preparing and bulk loading 65mm film as 120 rollfilm capable of being shot in any medium format camera, film back, or 120 rollfilm holder. It is intended to provide a starting point for those of you with an interest in trying your hand at rolling and shooting 65mm motion picture film for yourselves.
The process described here is equally applicable to bulk loading 70mm film as 120 or 220. Simply change the measurements to suit.
Speaking of 220, I’ve been asked a couple of times if it’s possible to bulk load 220 film using this method. The simple answer is “yes” but naturally, backing paper and film length measurements will be different. That said, it’s a simpler process and you’ll find a short overview at the foot of this page.
It should be noted that there are always better, or different ways to achieve what I have described below, so don’t take this as gospel and remember that your results will probably vary. Illustrations have been provided where possible but please reach out in the comments for further help, or clarification if needed.
Speaking of results here’s what we’re after:

You’ll notice that I haven’t cropped the perforations from my scans. I think they add character but each to their own.
Here we go.
Why would you want to do this?
Why not? This project stemmed from the idea of shooting medium format motion picture film. As there was no such publicly available product in mid-2015, this conversion/bulk load was the only reasonable option open to me to satisfy that particular craving.
Whilst it may well have been possible to use an adapted 70mm film back on my preferred camera in order to achieve the same goal without the mess you see below, details on the hardware I needed were and are scarce. So, to save myself the couple of hundred dollars I would have needed to spend on buying a complete 70mm film back setup, and in the name of learning something new, I decided to put on my thinking cap and give it my best shot.
Considerations for bulk loading 120 film
The measurements provided below are based current 120 format Fuji Velvia 50 (RVP50) and assume the use of a 6×6 film back. I’ve added notes where variations in vendor materials and standards are relevant and it goes without saying that you should double check your own materials before you begin.
Here’s what you’ll need to think about before beginning your bulk load but a word of warning, there are a lot of numbers here:
- 120 backing paper is ~1490mm long and 63mm wide. It varies minimally in length and weight from vendor to vendor.
- 120 film is ~780mm long and 61mm wide. 120 film can be up to ~830mm long but generally varies in length by -10mm and +30mm from vendor to vendor.
- Assuming a 57mm wide image and an average 6mm spacing between frames, we will need a minimum film length of 750mm.
- When bulk loading 120 film, the film should be rolled in such a way as to leave a 1mm “gutter” of backing paper on each side of the film in order to prevent light leaks and ensure even shots.
- Our 65mm film has perforations running on each side of the film and the perforations start ~2.5mm from each edge. in order to fit on our 120 spools and leave the gutter mentioned above, we need to trim 2mm from each edge of the film.
- Assuming our 6×6 film back winds vertically (top the bottom), this leaves us with a ~53mm wide useable image width from a ~57mm wide frame (after cropping). If your intended camera winds horizontally, this means a useable image height of ~53mm.
- Using a film length of 780mm for Fuji slide film, the film’s “leader” needs to be taped down ~430mm from the start end of the backing paper.
- As its end point, the film should leave ~280mm of bare backing paper. In all cameras, this tail needs to be wound and sealed off after the roll has been shot.
- The start and finish points of the film on the backing paper need to be identifiable in total darkness.
- The roll end-seal must be replaced when reusing discarded backing paper.
Some illustrations to describe these measurements and considerations:


Fig 02: 120 film and paper lengths
65mm film perforations for reference
Numbers aside, the most important factor is that — and this is a kicker — we need to start rolling from what I’ll be calling the SEAL end of the roll and tape it at the START end. In short, we’ll be rolling it backwards onto a spool and only taping the film down when we reach the beginning of the roll.
If you’ve ever developed your own 120 film, you’ll know that the film is taped to only one end of the backing paper, near the start of the roll. Why only one end and not both? The reason is the spooling effect, which can be best demonstrated if you take two strips of paper of equal length, lay them one on top of the other so they line up and tape one end together. Now place the taped end of your two strips on a cylindrical object and spool it on. With each rotation, the action of spooling the two overlapping strips will cause the upper strip to take a longer path, thus making it shorter on the spool. By the time you’ve reached the end, you’ll be left with the bottom strip sticking out.
At shorter lengths, this isn’t a huge issue but when we’re talking about ~850mm of film on ~1490mm of backing paper, things can get troublesome. Paper can fold, film can buckle and light leaks can be created – especially when we’re doing it all by hand in the dark.
Now that we’re aware of this and are willing to proceed, it’s time to get our materials (and a stiff drink).
Materials required
Naturally, we should start with the film either uncut in an original canister or already cut down to 850mm strips.
Hang on. Why 850mm when I just told you normal 120 film length was ~800mm? I’m not a machine, neither are you. I make mistakes and the extra length gives me a fudge factor, as you’ll see below. On a 400ft reel, those extra few centimetres will result in a loss of 12 rolls of film from a 400ft reel. 141 rolls vs. 153. Big deal.
Assuming that we’re starting with an uncut reel, we’ll also need the following :
Preparation materials (per roll)
- One 120 spool and backing paper scavenged from your last self-developed roll or begged from your local lab. If you plan on loading more than one roll, make sure they’re from the same stock, or vendor. More on that later.
- A good ruler, around 600mm long.
- Low to middling-adhesion masking tape/painters tape about 20-30mm wide, cut into to two 50mm lengths. One strip should have one end folded over to create a tab.
- An elastic band.
- A strip of self-adhesive paper approximately 15mm wide and 100mm long to use as roll seals. The adhesive side should be water/moisture activated (like an envelope, or postage stamp), or covered by a guard strip. Cut printer labels work quite well.
- I recommend you use Fuji backing paper, as you can substitute the above seal with double sided tape on an existing tag of paper.
- Two self-adhesive labels no bigger than 60mm on a side to label your newly bulk loaded film.
- A strip of 65mm film cut to 61mm wide and 850mm long for testing.
Bulk loading materials
- A (big) dark bag, dark box, dark tent or dark room…anything, as long as it’s dark.
- A film slicer capable of slicing the edges off the 65mm film and cutting it down to 61mm wide – you can buy these from eBay, or make them yourself with a couple of razors.
- Optional: a tray to help guide the film and backing paper while loading.
- An 850mm long, thin strip of leather, or non-abrasive string (not elastic), to be used to measure strips of film before cutting.
Got that? Take a deep breath and read on.
Preparation
First of all, we need to prepare our 120 spool and backing paper. I consider bulk loading less than five rolls in one sitting to be a waste of time. Especially considering that one roll will probably be wasted due to ineptitude, impatience or other factors. You should factor 10 minutes for each roll.
Take your 15mm x 100mm seal strip and stick it to the SEAL end of the roll (the end with the seal you make on a finished roll). Fold the newly made seal over onto itself, so it doesn’t extend past the lip of the backing paper. If you went with spent Fuji rolls, you can simply unfold the existing seal tab and stick your double-sided tape (guard strip intact), to the inside. As above, you should also fold this back when done.
Next, apply one self-adhesive label to the SEAL end of the roll, making sure that it doesn’t interfere with the seal you just made/resurrected. The label should have notes for your lab about the film stock and development process (C-41 or ECN). A second label should be applied to the start end of the roll. You can also make and apply the seal end label once the roll has been shot; your choice.
Prepare your backing paper by laying it on a flat surface, inner side facing up and weigh down each end. The instructions here assume the START end of the paper is on your left and the SEAL end is on your right. From the start end of the paper, mark a point at 430mm. From the seal end, mark a point at 280mm. Using Fuji Velvia 50 paper as my template, this gives us a total distance of 780mm between marks. The added bonus of using discarded slide film or color negative backing paper is that vendors should have already made these marks for you with white tape but it’s best to double check.
The first mark you made is where the film will be taped down, the second is where you need to begin rolling both paper and film together. As already stated a few times, these are the START and SEAL marks, respectively.
Let’s look at Figure 02 from earlier in this article again:
Fig 02: 120 film and paper lengths
65mm film perforations for reference
Take the two pieces of tape you prepared and place the one without the tab to the right of the SEAL mark that you made. Place the tabbed strip of tape just to the left of the START mark. The illustration above only shows the SEAL end piece of tape.
Now take the seal end of the paper and insert the small tab into the slit of your 120 spool. From here, make sure that that the seal tab you made is secure and begin rolling the paper onto the spool as tightly as possible. You must ensure that the darker (inner) side of the backing paper faces inwards.
Keep going until the paper is fully wound onto the spool and secure with an elastic band. Rinse and repeat until you have as many rolls as you want.
Time to start loading? Not yet.
First comes…
Practice
Assuming that you have a test strip of film ready, you should practice a bit before trying it for real in your dark bag/box/tent/room. Remember I said you need a big dark bag or tent? Here’s why:

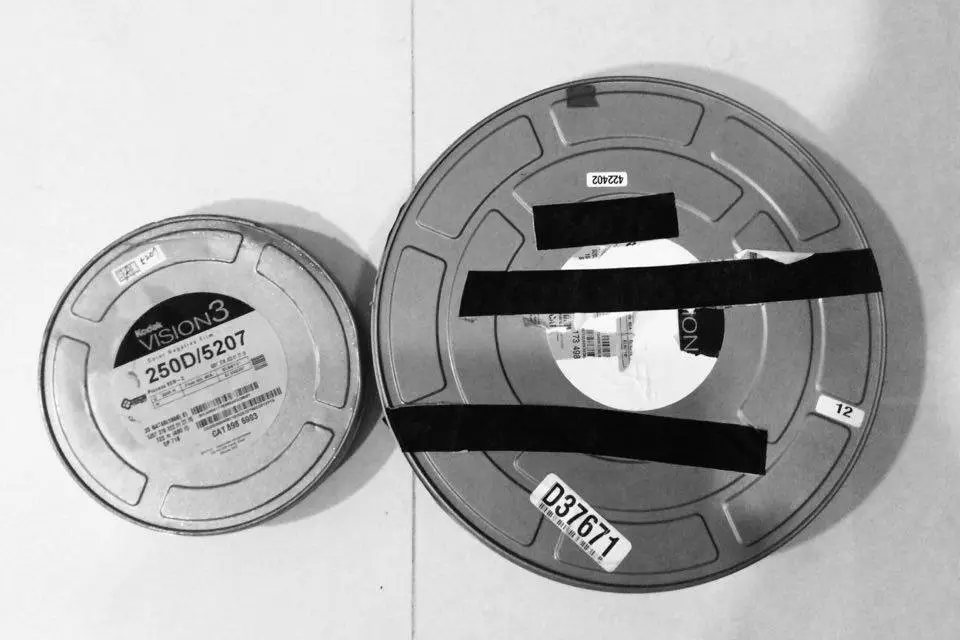
That 65mm can (right), is approximately 80mm tall and 288mm in diameter. It’s HUGE and dwarfs the standard 400ft 35mm can to the left. If you’re already used to handling 1000ft reels of 35mm film, it won’t be too much of a surprise but the extra height makes all the difference.
On to practice.
Making sure your pre-prepared roll has been unwound so that the SEAL mark has just come off the spool. Place the film (emulsion side up) over the SEAL mark tape. Your strip of film will be wide enough for you to place the strip well over the left-hand side of the tape (assuming you’re holding the seal in your left hand, that is!)
Speaking of the tape, try not to look at the roll when you place the film onto it. Use the texture of the tape to feel your way to where the film needs to be placed, as this will come in handy when the lights are out. If you want to be extra smart, you can line up the SEAL tape so it’s just about to be drawn into the spool and lightly wedge the film in there before starting your load.
With everything in place, carefully roll the backing paper and film onto the spool, while initially holding the film in place on the paper. Don’t apply too much pressure. As long as the paper is not loose, you’re safe.
Start rolling film and backing paper on, making sure that the film is as centered as possible on the paper. I do this by lightly pinching the edges of the paper and letting physics take care of the rest. Naturally, you don’t want to touch the emulsion side of the film, which should be facing inward toward the spool.
Note: When loading for real, I wear fresh, high thread count cotton gloves. Latex surgical gloves can also work but they don’t absorb any moisture in what can become a rather humid environment when using a dark bag or box.
With any luck, by the time you’ve wound on to the START mark, the film should be at or over the tabbed strip of tape…but not by too much. Lift the tab to peel the tape off and tape the film down. Ensure that half the tape covers the film and finish rolling the paper until you have what looks like an unexposed roll in your hand. If you jumped ahead earlier, then apply your label and secure with an elastic band.
You’re nearly done! Now to see the quality of your work by unravelling it.
With the roll unravelled, check the position of your film relative to the START and SEAL marks. If the film has shifted past the SEAL mark so that it’s further from the edge, then you need to adjust your starting position, re-roll and recheck. Keep repeating until you’re happy that that film will roll consistently tight with no gaps and allow you to comfortably cover both of the marks you made.
This is where a single vendor system works best. If you can, try to make sure your backing paper comes from the same vendor and is for the same stock. Differences between vendors can throw your careful hand rolling off easily, as can film stocks of different vintages.
Bulk loading your first roll of 120 film
In theory, if you have practised your method above, you shouldn’t have too many problems with bulk loading in the dark. Shouldn’t.
My advice would be to take your time and test, test, test, your method. Load the test strip and paper/spool in the dark a few times, then unroll and review in the light to see how you did. If your alignment is off, then try again and again until you get it right.
You should also test your dummy roll in a camera of your choice to make sure it goes through ok. If at any point you feel resistance when winding on, it means that you didn’t tape down the film well enough and it has started bunching up. Remove the film carefully, re-roll with a fresh test strip and try again.
So… What about the elephant in the room? How do you get your 65mm film down to 61mm wide and 850mm long?
First of all, the larger the space you have at your disposal for loading, the less chance you have to mess things up. 65mm cans are big and you need space to operate, as you saw in the image above.
This part of the process is entirely up to individual preference. I cut my film down to 850mm inside my dark box, preparing one strip, loading it and then making another. I also use a custom film slicer to slice off an extra millimetre or so from each side of my cut strips. It’s a small block made from pieces of cut plastic with two razor blades spaced at 61mm apart.
I put my film on the block, push a “lid” on to provide some pressure and then carefully pull the film through. It can be troublesome and I am in the process of designing and fabricating a gizmo to do the job automatically.
The guide below assumes you’re using a “pull-through” cutter similar to the one I’ve described:
- If previously cold stored, ensure the film has had a chance to get to room temperature. Remove the reel from its can and dark bag(s) and use the length of leather or string mentioned previously to measure off ~850mm. Cut the film and put the reel back in the bag and can.
- Insert the film into the slicer and pull through. Work slowly and use even pressure. If you don’t, you risk pulling the film through at an angle and wasting the strip.
- Then we follow the steps already outlined above:
- Grabbing the freshly cut film from its edges, place it over the SEAL mark on your backing paper.
- Apply pressure and roll with one hand whilst keeping the film aligned with the backing paper using the “pinch” method described above.
- Using an even pressure to spool the film and paper, make a note of the position of the end of the film strip relative to the START mark on your backing roll.
- If happy, tape into position and roll up, then seal the roll with an elastic band. If not, unroll and re-roll.
With the freshly loaded film sealed up with an elastic band, remove it from the dark environment, apply the label you made, find a camera and drop everything to load and shoot the film.
Now. Do it. Don’t wait.
You should be proud of what you’ve done, so get out and give it a test.
Developing your film
You now have 120 motion picture film that you can either develop at home (there’s an article coming on that cough-cough), or you can take it to any film lab that develops motion picture in either C-41, or ECN2 chemistry.
One point of note is that you can develop Kodak 250D as a black and white film. It’s wonderfully contrasty and has a lovely feel to it. More on that another time.
That’s really all there is to it.
Notes on bulk loading 220 film
220 backing paper comes in two parts. The START end is ~500mm long and the SEAL end is ~330mm long. Film is taped to each piece ~30mm from the square-cut end of each piece of backing paper. The film base is approximately 1680mm long.
One of the advantages of bulk loading 220 film is that we’re able to simply snip 120 backing paper down to size, then tape-spool-tape-spool. There are no huge alignment or film/paper gutter issues to get caught up with, it really is simpler than the 120 bulk loading method I’ve described here. If you have a 220 compatible film back or camera, I’d suggest you give it a shot!
Final thoughts
There’s not much more left to say. In my opinion, if you already bulk load 35mm film and want to give this a try, it’s a wonderful challenge and will test your patience and resolve. As an exercise in learning something new and dare I say it, getting closer to the medium you’ll be shooting on, it can’t be beaten unless you happen to be making your own emulsion or wet plates.
The results are absolutely worth the investment in time and resource to pull this off. Whilst there may well be a 120 format motion picture emulsion on the market very soon (I backed the recent Cinestill campaign myself), the difference results between unadulterated motion picture stock with intact remjet and current no-remjet options can be very wide indeed. The remjet isn’t only there to help protect the film as it runs through the motion picture camera, it also acts as an anti-halation layer.
If you’re going to shoot motion picture film, you might as well shoot the real thing.
Thanks for reading.
~ EM
Share your knowledge, story or project
The transfer of knowledge across the film photography community is the heart of EMULSIVE. You can add your support by contributing your thoughts, work, experiences and ideas to inspire the hundreds of thousands of people who read these pages each month. Check out the submission guide here.
If you like what you’re reading you can also help this passion project by heading over to the EMULSIVE Patreon page and contributing as little as a dollar a month. There’s also print and apparel over at Society 6, currently showcasing over two dozen t-shirt designs and over a dozen unique photographs available for purchase.


25 responses to “How to bulk load 120 or 220 film (using 65mm Kodak 250D 5207)”
Hi there, this looks to be very promising. Just from doing the math if you can scrape together the up front cost of a 500ft roll of vision 3 it seems to be around 60% savings over buying the same number of commercially spooled rolls of kodak 120 film by todays insane prices. What looks most interesting to me is spooling 220 rolls (and it makes me glad I saved those stainless 220 developing reels that I acquired in a bundle of darkroom equipment from a “Free stuff” classified listing). My only question is having never shot 220 and not having a reference point to go from do you know what the measurement is from the edge of the rectangular part of the backing paper to the “Start” line on 220 film? thanks for this article by the way!
To clarify my reason for asking. I want to cut down “recycled” 120 backing paper and use it for 220 so I assume I can reuse the end pieces for one roll and use the middle section to create at least one leader end for another roll. By my calculation based on the measurements you provided I should be able to get 3 220 leader ends per 120 backing paper with a small unusable length leftover. I just have no reference for where to draw in a start mark on the leader end that I’ll be cutting myself. Thanks in advance!
Maybe a better question would be is if the start mark is the same for both 120 and 220? I’m killing it here.
excellent, I will consider practicing before looking for a reel.
Thanks for the tutorial
You are most welcome, Abel! 🙏
Thank you for your in depth instructions on bulk loading 65mm film this way.
When you develop your film in C41, are you able to reuse your chemicals after you do a roll, or does the remjet start coming off in the developer & blix? Currently I am able to develop about 4-6 rolls of 120 Portra per 250ml of C41 chemicals.
You MUST remove the remjet backing first before developing, or you’ll ruin the entire roll and the batch of chemicals.
Buy some “ecn-2 prebath”, they’re not at all expensive.
1. 120/220 film width my vary. around 61.5mm. check yours out.
2. slitters: xkaes dot aol dot com can deliver for all sizes. not all in stock obviously. i had contact with the chinese private producer(no he doesnt sell directly. xkaes(usa) is global seller). this producer knows what to do. i have all kind of slitter to cut down 70mm to 120(61.5mm) and 35mm. one is double the other one-bladed(to avoid cutting inbetween perforations of 70mm perforated film when double-centered cutter is used. could damage machines. never used yet.
if we could have a filmslitter with filmholder that would be fine. Had contact with someone who had the idea of 120/35mm-version but he must be convinced to produce a 70-65 universal model.
btw: mercury works can deliver 70-120 spool(60 usd) which can be mounted(but neednt) into empty 70mm cartridges. I myself have a finished working idea of 70-61.5mm(doesnt matter if film is a bit smaller)shims on eigthter Kodak or Linhof-70mm spools. but one can work without possibly. Linhof-spools are thicker but have a genious slit for easy film-takeup. wheras Kodak has a clamp only no easy mounting film.
anyone used 65mm film in 70mm cartridges?
If you have the later 70mm magazine 100/200 from Hasselblad using 65mm is no problem, cut a maximum length of 170 cm for developing in a JOBO tank with adjust spiral. Of course you can use 15 Ft ore more but you need a special developing tank, I have only a second hand kinderman 70mm tank for 15 Ft 70mm that doesn’t work.
Great article, thanks! The very last bullet list, first sub-bullet: should it not be, grab the film a… https://t.co/MSRYrGn8fn
Truly, this is the kind of article that made my love this blog. A daring new idea, a practical plan a… https://t.co/CYYtVehmdQ
I remember reading this article when you first posted it and thinking I need this in my life. Still… https://t.co/0hS06SOx2E
an accompanying video on the process would be incredibly helpful.
Vista Vision!
Thanks for the write up.
I got three rolls of IR imagesetter film. Probably high contrast lith film 12 inches wide.
Although I have imagined a film slitter to get five 61mm strips from this, I was wondering if at first I could simply get a 6x83cm piece of glass, place on top of the film and cut around with an xacto knife. Test the film out.
Any thoughts? Am I missing something?
5
when I do leather work, I have a splitter that cuts strips off leather. Would something like that work?
so tell me, how to you cut an exact 2mm strip off each side?
The author tells how in the article: use a film slitter. Search for seller xkaes on Etsy, as pointed out by a previous commentator.
Very nice!
Very nice!
oh, I hadn’t read this in full before. good guide with all the measurements and well written explanation 🙂
I scored 2000ft of 200T probably from the same source you got it from, leftover stock from Mission Impossible? I definitely will be going the 220 route. I plan on using a IR cam in dark box but still need to get my film slither sorted out. I really want to be able to slit the whole roll in a go but am afraid of chunks of emulsion getting stuck…. Its an insane process but worth it in the end. Thanks for the write up!
…and thanks for the comment. I’ve yet to try 65mm 200T but love it in 35mm format. I’m currently exploring a “reel-to-reel” build to help spool the uncut film onto a fresh spool. If I succeed, I’ll be sure to post the results!
please share more of your ideas of “reel to reel” build. Thanks for this article, I was iffy about bulk loading 120, but now I will definitly try