In this article, I’ll be showing you how to very simply modify your Fuji medium format rangefinder to shoot wide-format 35mm film (aka make your own TEXPan). It doesn’t matter if you have the very first Fujica G690, the final Fuji GW690III Professional or any of the 12 other models of cameras that came in between, this quick mod will work on all of them.
The mod that will take you all of about 3 minutes once you have all the things you need and is 100% reversible (not that you’ll need to).
Here’s what I cover:
Why wide-format 35mm photography?
I’ve wanted to and have tried shooting wide-format 35mm panoramic photographs for years. The scale, the aspect ratio, the cinematic look…what’s not to like? I have an itch that won’t go away.
To date, I have:
- Used panoramic masks on 35mm with point and shoot cameras like the Ricoh R1 (~36x13mm).
- Shot 35mm film in my Hasselblads and TLRs (~35x56mm in portrait orientation).
- Modified a Holga 120 Pan to use a Schneider Angulon 90mm f/6.8 (~108x24mm with the 135 mask).
- Built a 6×17 camera to use a Schneider Super Angulon 90mm f/8 MC (no 35mm yet but I will find a way…)
I’ve considered and avoided Widepans, Horizons and Noblexes, which leaves only one, well, two choices for purpose-built 35mm wide-format photography:

Images courtesy of Japan Camera Hunter
I’ve thought about buying one or the other for a long time but even as far back as four years ago, I was still baulking at the idea of paying $800 for body and a couple of lenses. Given 2019’s prices, present-day me is giving dagger eyes to that idiot.
With that itch for wide-format 35mm obviously not going anywhere, at the end of 2018 I went back and resurrected an old idea: shoot 35mm film on either a Pentax 67 or Fuji GW690III/GSW690III. The former would allow me to use multiple lenses and has a dedicated 35mm panoramic kit but the latter offered a bigger negative and a lighter solution…even though there was no first-party panoramic kit for it.
Long story short, despite my adoration for being able to see the image being composed through the lens, I decided to go for the Fuji: more compact and a bigger negative.
(Truth be told, I’ll probably get a Pentax 67 at some point in the future.)
35mm wide-format negative sizes compared
Not all wide-format photography was created equal. Here’s how the negatives produced by the most popular 35mm wide-format options stack up against a “full frame” of 35mm (ordered by negative width and assuming a landscape orientation with sprocket holes masked).

Technically speaking then, the Pentax 67 would give me a 35mm negative image that’s bigger than the XPan / TX.
“But what about just shooting medium format film and cropping to size?” I hear you ask…
My take on this – and yours may differ – is that it’s cheating. I liken it to “doing it in post“. The challenge of shooting to a format and producing the result in-camera is a big part of learning and satisfaction in a job well done.
“But that’s still pre-cropping. You’re still shooting a lens designed for one format on another. Use an XPan.”
Let me stop you there. It’s worth noting that XPan/TX negatives are created by medium format lenses. These are systems which have image circles large enough to fill a 6×4.5 negative, if not larger, and like other medium format cameras, the height of the image projected onto the lens is cropped (cut off), while the width is captured. There you have it. If you’re shooting an XPan, all you’re doing is shooting small format with a medium format lens. You bloody heathen.
Right then, on to the build.
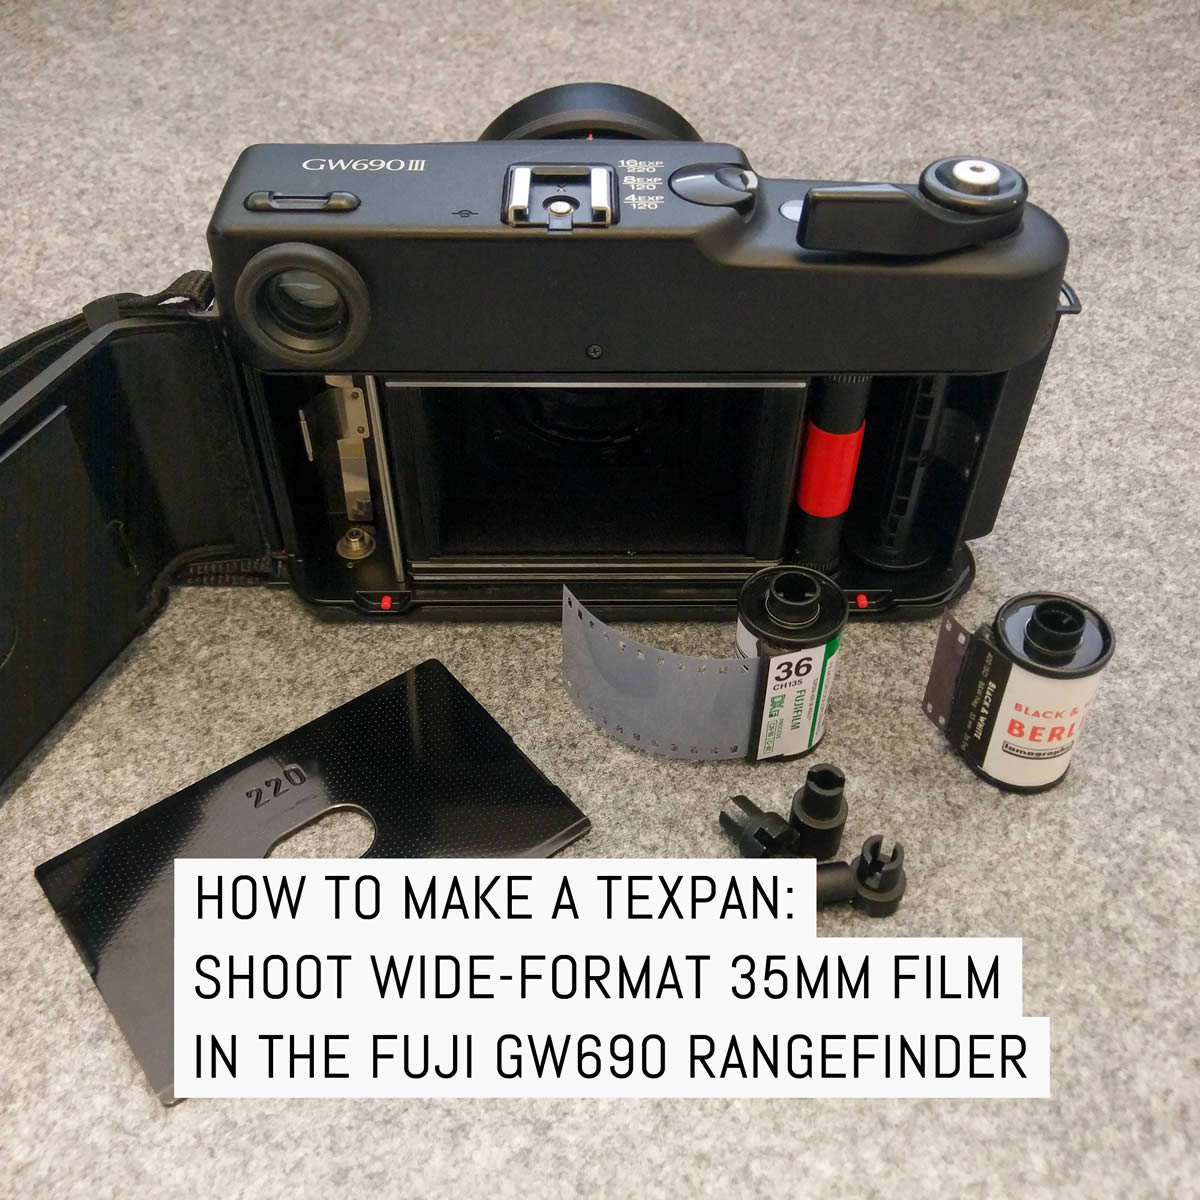
Making a TEXPan: what you need

This is your shopping list. You don’t really need the last two items on the list. Your call.
- A suitable medium format camera.
- One used 35mm film canister with a small tongue of film left sticking out (this is your take-up cannister).
- One unexposed roll of 35mm film (this is your supply cannister).
- Silicone tape (not electrical tape).
- Sellotape / Scotch Tape (1/2″ wide is ideal).
- 4x 135 to 120 adapters (two pairs).
- 120 backing paper or exposed 35mm film to make a “leader”.
- A 35mm film mask for your camera (optional).
- A film changing bag (optional).
IMPORTANT: If you develop film at home and pry open your 35mm canisters when you develop film, you can ask a local lab if they can give you a few spent 35mm canisters to use as your take-up canister. Just make sure that a small tongue of film is left protruding from them. Alternatively, sacrifice a roll of film and make your own.
If you have reloadable plastic 35mm canisters, they are essentially useless here. Your take-up canister will be put under much greater stress than normal and you honestly don’t want to risk it when such a simple solution exists.
To recap: recycle spent canisters from a lab or use a leader retriever when developing film at home instead of tearing open your canister.
Regarding items 8 and 9 on the shopping list, 35mm film mask will ensure the film sprockets are not exposed but if you shoot through them, you’ll be able to gain another 1mm or so in height when you crop your scans or print your negatives. The changing bag will help you save your final frame, although you could do what I do and just waste it (or make another shorter leader…)
The build
“Build” is too big a word for this. It’s a hack. Assuming you have the materials above, it’ll take about 1 minute to modify your camera and two more to prepare your film.
Here’s how to do it:
Step 1: Prepare your film
A normal roll of 135/36 film in this camera will yield 13/14 frames on the GW690III Professional. Because 35mm film has no paper leader like 120/220 film, you’ll waste about 1ft of film at the beginning of the roll (worth about three).
If we make our own leader, we can extend our film to take up to 16 frames (the max possible by the camera) and have some space left to wind film into the take-up canister.
To do this, first take the film you want to shoot (your supply canister) and snip off the curved part of the film leader giving you a square edge.

Next, you’ll need to make a new leader that’s roughly the same length as the paper leader on a roll of 120/220 film. Take a 20cm (8″) length of wasted/developed 35mm film or cut down some 120 backing paper to the height of 35mm film.
Getting the height right with the latter is IMPORTANT. It will make sure the take-up canister, leader and supply canister are properly aligned.
A NOTE ON ALIGNMENT: If your film, leader and take-up canister are not aligned, you suffer a good chance of the camera eating your film.
For simplicity, 35mm film makes a great choice for leader material but I’m demonstrating using paper and proving that not following my instructions can still yield a workable result.
Take your new leader and tape one end to the tongue of film sticking out of your take-up canister. Tape the other end to your supply canister.
When you’re done, wind the leader into the supply canister and go get your 135 to 120 film adapters.


The first image below shows two sets of 135 to 120 adapters (four pairs in total). I’ve used plastic/3D printed versions in the past but they will wear out over time. Your take-up canister is going to suffer quite a lot of winding stress, so bear that in mind.
")


Assuming you’ll be using metal adapters, each set will come in two pairs – one short and one long. The short adapter fits into the top of the cannister. The long one fits on the bottom. Camerahack sells a set of one pair of plastic adapters and a pre-cut paper leader in case you want to go down that route.
Whatever route you go down, when you’re done, set it all aside and go get your silicone tape or painter’s tape.
A NOTE ON A SECOND LEADER: For those of you out there who bulk load your own film, you have the option to add a second leader to the end of your film. It’s something that Diz and I discussed while putting this article together and will ensure that your last frame is definitely wound into your take-up canister. Play with the lengths but another 8cm/3inches of material should be added between the end of your supply canister film and the canister itself. Be aware that you will not likely be able to fully wind the second leader into your take-up canister. If you try it out, let me know how you get on in the comments below.
Step 2: Tape the film roller
Fuji rangefinders will not advance the shutter count or cock the shutter unless a roller is moved when the camera is wound on – normally by 120/220 film and paper. 35mm film is not wide enough so we need to give it some help.
The photo below shows what we’re trying to achieve and here’s a link to the silicone tape I used.

The tape will provide the friction necessary to move the roller as you wind on your film – simple and effective. Importantly, it’s self-fusing and will stick to itself but not your roller within 24 hours. Don’t worry if you make a mistake, slide a knife under the tape (thanks for this and the other tips, Diz!)
You will need to cut off a 4.5cm (about 2″) length of tape, peel it off its backing material and roll it onto the film roller. It’s quite thick, and that length will be enough to cover the circumference of the roller plus a bit more.
")
")
Step 3: Load your film
Load the film (with adapters installed) just as you would a normal roll of 120 film – supply side on the left and take-up on the right. Remember the note I made about aligning the film and leader? Take a peek at the right image below to see how it should not be done.
There’s a near-100% guarantee that the film will be chewed up by the camera.
")

The right image also shows an 80x24mm mask installed (they can be purchased from Taobao/eBay, etc.) It’s your call to use one or not. Unless the film you plan on using is especially curly, I don’t think it’ll be a problem. I got mine as a gift, which is surprising because most people have no idea what to get me for birthdays, etc. 🙂
With the film installed, turn your attention to the pressure plate on the inside of the film door. It’ll likely be set to “120” and we want to change it to “220” as per the pictures below. This to account for the film’s lack of backing paper (just like 220 film). Slide the plate to the right, flip it over and put it back.
")
")
")
Close the film door and set the film counter dial on the top of the camera to “16EXP / 220” as per the photo below. This will ensure that you’ll get as many shots from your roll of 36 exposure 35mm film as possible.

With the film loaded, pressure plate set and film counter set, wind the camera on until the wind-on lever locks up ready for frame one.
You’re ready to shoot.
Shooting the TEXPan – tips and gotchas
Close focus consideration
As with all rangefinder cameras, the viewfinder offset from the lens – what you see is different from what the lens captures. This offset isn’t a big deal when shooting subjects at infinity or in the middle distance but as you get closer, it becomes more pronounced.
Fuji GW690III I am using has built-in parallax correction – the finder’s framelines automatically adjust to show you what the camera will be shooting depending on how far away you are. This comes in very useful for framing for 35mm film.
")

The images above show how the viewfinder framelines change when you focus from infinity down to the camera’s 1m closest focus. The rangefinder patch in the center of the viewfinder does not move.
Framing for 35mm wide-format
My trick to frame at infinity is to use the left/right framelines along with the rangefinder patch (the gold dot in the middle) as a guide.
When focusing on closer objects – and when centering the image vertically is important, I will use the left/right framelines only.
Here are two photos which illustrate the difference between using the rangefinder patch and the framelines to center your image when close focusing the camera:


The top/bottom framelines come in useful for making sure the image is level (I’ll often align them with a reference point).
In short, as long as you remember that the rangefinder patch is not always the center of the film, you should be ok. Take a couple of test shots on your first roll so you have some examples for future self.
Resistance is futile
Once you’ve figured out framing, it’s a simple case of setting your exposure, pressing the shutter button and winding on each frame. As with 120/220 film, you will need to wind on one and a bit times. The “bit” changes depending on how much film the camera needs to wind on as it goes through the roll.
It’s natural to feel some resistance as you wind the camera on but if you feel anything that’s stopping you from making a full wind-on immediately after making an exposure, don’t force it.
Be patient.
Open the camera up inside a film changing bag or in a darkroom. Misaligned film might have caused it to have become torn, the take-up canister might have spun around a bit in the film bay, or you may have loaded a 27 exposure roll of film by accident (I’ve done that).
Experience will ultimately solve all these problems.
It’s all backwards
If you’re developing film directly from the take-up spool, it will come out in the “wrong” order. Something to bear in mind if you have a scanning workflow that might be affected by it. Ricoh GR and some Canon et al shooters will already be familiar with this.
If you are using the paper/film leader approach and will take your take-up canister to a lab to get developed, you really should let them know what to expect.
What to expect (results)
. Push processed 2⅔-stops. Fuji GW690III + EBC Fujinon 90mm f/3.5.")
")

")
. Push processed 1-stop. Fuji GW690III + EBC Fujinon 90mm f/3.5.")

. Push processed 1-stop. Fuji GW690III + EBC Fujinon 90mm f/3.5")

")
")
")
Final thoughts
It’s a quick, fun and totally reversible mod, so why not? 135 to 120 adapters are cheap and unless you’re terrible with scissors, there’s really no reason why you’d fail at modding the camera yourself.
In terms of the results, if you’re not a fan of wide-format 35mm photography, you’re probably not going to like them. From the perspective of image quality, the Fujinon lens on this particular model produces results that are just as great on “small format” 135 as they are on 120.
So the big question: has it scratched my wide-format 35mm itch?
HELL YES.

I love the results and although I’ve only had the camera for a few weeks at the time of writing, I cannot fault it for what it is. At 1.5kg (3 1/4lbs), it’s not a light camera and yes, it seems absurdly large when set next to a Leica-M but that camera has a certain charm about it and with the exception of the shutter/aperture settings, is absurdly ergonomic. To my hands at least.
Expect more in an upcoming review but for now, I’ll leave you be so you can go try the mod yourself. Drop me a line in the comments section below with any questions.
~ EM
Ps. TEXPan? For years (at least since the mid-1990’s), Fuji medium format rangefinders have been known as “Texas Leicas” – like their German cousins, they’re rangefinders and everything is bigger in Texas. Get it?
Considering this hack allows you to shoot 35mm film in a wide-format like the Hasselblad XPan, TEXPan seems a reasonable moniker.
Also, I stole it from Matt Parry. Cheers Matt.
Fuji GW690III Professional specifications
| Manufacturer | Fuji Photo Film Co., Ltd (Japan) |
| Camera name | Fuji GW690III Professional |
| Camera type | Medium format rangefinder camera |
| Format | 6x9cm (56x83mm) 120 half length roll film – 4 exposures 120 roll film – 8 exposures 220 roll film – 16 exposures |
| Manufacture dates | Fujica GW690 Professional (1978-1985) Fuji GW690II Professional (1985-1992) Fuji GW690III Professional (1992-2003) |
| Viewfinder | Double image rangefinder patch (parallax corrected) 95% coverage at 1m 92% coverage at infinity 0.75x magnification |
| Rangefinder | 59mm base line length (44.3mm effective) |
| Shutter | Copal #0 interlens shutter T, 1-1/500 sec + release lock |
| Lens | EBC Fujinon 90mm f/3.5 lens (5 elements in 5 groups) f/32 minimum aperture 1m closest focus Integrated lens hood 67mm filter thread |
| Accessories | Soft case Shoulder strap |
| Flash | X-Sync (hotshoe and sync contact) |
| Other | Shutter actuation count (underside) Spirit level (top plate) |
| Weight | 1,460g |
| Dimensions (appx) | 201mm x 119mm x 129mm (WxHxD) |
| User manual link | Download from butkus.org |
Share your knowledge, story or project
The transfer of knowledge across the film photography community is the heart of EMULSIVE. You can add your support by contributing your thoughts, work, experiences and ideas to inspire the hundreds of thousands of people who read these pages each month. Check out the submission guide here.
If you like what you’re reading you can also help this passion project by heading over to the EMULSIVE Patreon page and contributing as little as a dollar a month. There’s also print and apparel over at Society 6, currently showcasing over two dozen t-shirt designs and over a dozen unique photographs available for purchase.


35 responses to “How to make a TEXPan: shoot wide-format 35mm film in the Fuji GW690III rangefinder”
I know I’m a bit late to the conversation, but how many images do you get out of a 36 exposure roll with your method? Thanks
I have the original GSW690, I placed about 2 inches of painter tape on the counter roller, moved the film selector to 16 exp and changed the pressure plate to 120; but it does not move the frame counter out of the “S” mark.
Thanks! Curious: What’s your process for scanning the pan negatives? Do you stitch them, just by sliding the film a few times, or get it all in one go?
I use either my Epson V750 or Nikon 4000 depending on how masochistic I’m feeling at any given moment. Vuescan does a great job of scanning the wide negative with a couple of settings changes or a saved profile! Hope that helps! 🙏
How many times does the Film Advance Lever have to be operated before the next picture is taken?
What happens at the end of the film? Rewinding is not possible
Same as normal – 2x wind-ons. Regarding the end of the roll, if you use my empty 35mm canister + paper leader approach, the film is wound into the can and light-tight. Open and replace the film as you would normally.
I like the use of 35mm film, and I am curious if 120 film could be used by with a mask to make a vertical panorama?
Is there a way to alter the frame spacing / shutter winding to shoot vertical ‘half’ frames or similar with any of the texas leicas?
A lovely sentiment but practically speaking, changing the gearing to change the frame spacing is likely to be impossible/not worth the time investment. There was the “Voigtlander Bessa Folding Camera 6×3” which took vertical panos, as did the “Agfa Isolette L”, which was reviewed right here:
https://emulsive.org/reviews/camera-reviews/two-out-of-three-a-look-at-three-bellows-cameras-from-the-1950s-agfa-record-iii-voigtlander-perkeo-i-and-agfa-isolette
Hope that helped!
so I finally assembled the bits for this and took it out for a stroll…
I opted for a simpler way to handle the film: I taped the leader of a factory load to the spool of a bulk load canister, then wound the film in the bulk load for the supply side. My GW690 has the option of taking sheet or roll film and setting it to S for sheet means I get the film wound (two strokes for a fullwidth image) but I don’t get any frame counts. I’m used to that from my Olympus XA and XA2 so no matter. I didn’t realize this was an option at first (the 690 has a lot of stuff I am not used to) but it looks like this will be a pretty simple way to proceed. The film came out the supply canister without any trouble and I hope that is repeatable.
The 120-35mm adapters don’t fit bulk load canisters very easily so that will take some adjusting. As will framing and composition. I wonder about a small mask for the rangefinder window as a reminder of what will actually be in the frame. the tape I used is commonly known as rescue tape here the USA…I had some on hand and it works just fine.
For other enthusiasts who may want to try this…be mindful of the 135/120 adapters. Mine are an object lesson in the difference between measurement and fitment. The assembly is the same *size* as a 120 spool but the loose joining means the assembly wobbles and the canister can become misaligned, jamming the film winding process. Building a dedicated (ie, glued together) take up canister might work. Tape would never hold. Or longer/taller adapters that *fill the bay*, rather than just follow the size of a 120 spool.
I think my namesake above has the solution I will attempt…
“Re-roll 35mm onto a 120 spool complete with backing paper. You can guarantee your frame spacing will be correct and you can sue the roll in any medium format camera including those with a red viewing window in the back.”
Looks a 24exp roll fits inside 120 backing paper pretty well, so 8, maybe 9, exposures in 6×9 (depending in geared winding or visual).
Hey Em, I now apply the red tape like this nowadays. https://t.co/f2IXxe8eOH
Hi, i’ve understood, but where can i buy the element to add between the shutter and film? I can’t find anything online…thanks!
Probably that the name of the mask is “fieying” ???
You can also look for a 6×6 TLR kit such as the Yashica 635 which were ready made for 120 to 35mm interchange, although admit that a 6×6 TLR lens doesn’t give you that wide a view; but it makes it much more convenient than Rollei kit adapted TLRs, which always seem to have one piece missing. I’m also lucky to have a home made 35mm with 6×9 50mm medium format lens made by the late great “Razzledog” of Oz, which he sold to me shortly before he passed on.
This is wonderful. I’m looking to do this conversion, however I’m wondering what you thought about the GSW690 vs the GW690 as a panoramic 35mm shooter, in terms of the lenses the cameras come with. Do you wish you had something wider than the 90mm on the GW690?
Great article. I did the modification and like the results except for ghosting effects around the sprocket holes during exposure. There are lighter areas below the dark sprocket holes than in between them. Only see it when the top of the picture is very light, like the sky on a cloudy day.
Do anyone know how to get rid of that?
Use a mask!
Where can i buy a mask 24×80?
Hi EM,
many thanks for this great article!
I am actually doing something similar with 6×7.
I get panorama pictures on 135 film with my Bronica GS-1 and 220 film back without mask. The results are pretty amazing.
Would you please indicate the final image size you get on film with the 6×9 mask?
Mask seller says 24x66mm which is much sorter than the 24x83mm one gets without mask.
In my opinion the benefits of the masks are an even focal plane on film and no sprockets if you don´t like them.
Greets from Munich
Ignacio
Thanks for the great article. I have my “Tex Pan” loaded with HP5 and am ready to go. One difficulty I did encounter was rolling the red tape onto the 6×9 roller……It kept getting balled up, instead of wrapping around as I rotated the roller. I resolved the problem with a small piece of Scotch tape, easily removed, once I managed to get the red tape around the roller.
The beauty of it, in my opinion, is more use of that Fujinon-SW 5.6/65 lens: if not THE, it has to be one of the highest resolving lenses I have owned/shot.
Hi Wayne. The tape problem you encountered may be due to the start of the roll being ‘dried out’ a little. I found I could only get satisfactory adhesion by discarding the first few inches. The 120 size take-up spool worked very well – no alignment problems and I don’t think I lost more than a frame by not having the additional film/paper leader.
Having to unload in a changing bag isn’t an issue for me – and I’m very pleased with my first results from the 65mm lens !
I’ll give this a try on my GSW690 (65mm lens) – I’m just waiting for delivery of the silicone tape. My only concern is how easy is it to remove the tape ? – I’d be reluctant to f**k up a perfectly good camera :0(
Your reference to the tape gives the impression that it shouldn’t be left in place for more than 24 hrs –
“Importantly, it’s self-fusing and will stick to itself but not your roller within 24 hours.”
I’ve also found a source of adapters that includes a 120 sized take-up spool which has a slot to accommodate 35mm film. It also looks as though there are a two pairs of projections within the slot to grab on to the films’ sprocket holes. If it works OK this will do away with the need for a 35mm take-up cartridge – although unloading the camera in the dark will be necessary.
Hey John, the tape is very easy to remove – it only “sticks” to itself to form a bond. You’ll be fine 😉 Regards the adapters, I specifically went for a two-canister approach because I don’t want to have to mess around with dark bags and would rather reload in the field once my first roll is spent. It’s all about what works best for you, though. Get shooting first and refinements will come naturally!
Hi Em,
Thanks for the info., – much appreciated !
Perfect! I have been planning on this for a while, but just need to get my hands on a GSW680/690! Got an Xpan but it’s too expensive to justify keeping, plus the GSW is fully mechanical!
Another great way to shoot 35mm in a medium format camera. I have been doing it for a while but without camera modification. I do exactly the same as Matt above. Re-roll 35mm onto a 120 spool complete with backing paper. You can guarantee your frame spacing will be correct and you can sue the roll in any medium format camera including those with a red viewing window in the back. I usually shoot these modified rolls in a Pentax 6×7 and scan the whole negative because #sprocketholesaresexy .
Great article. I love 135mm panorama as well. Many of my cameras work with Graflok standard film holders, so I used a Mercury Works kit to convert an RB67 roll film back into a 135 format 65×24 mm panorama back. I use this back with several different cameras, including a lightweight 3D printed medium format body and Mamiya-Press model G (G for Graflok). I am working on a couple more home-built options. My favorite lens (so far) to use with this back is a Mamiya-Press 50mm. This conversion kit results in a properly flat and well-supported negative; the RB67 backs are cheap, plentiful, well made and have all the convenience of lever-advance and frame counter. Converting a roll film back is a great option since it expands options for working with a variety of cameras and lenses, as well as letting you to set aside the panorama back mid-roll if you need the camera for something else.
Damn fine article. Thanks for writing down.
My Hasselblad cram and hack method makes me feel so uncouth compared to your suaveness Em. #redscale https://t.co/eeRye0gkJf
nice one, simple and easy instructions. When I do this I roll the 35mm in to a 120 spool with the backing paper and tape one end, just like 120. I think cut the roll and use the remaining 12 ish shots in the 35mm can as a short roll for my 35mm cameras, which also suits me as 36 is too many 🙂
What a great idea. I own a Fuji GW690ii and have already done something similar in order to shoot 135 film in my 6×6 Bronica using a 220 film back(thanks to this Flickr tutorial: http://www.flickr.com/photos/86265840@N05/sets/72157631972143051/). Luckily, I opted to splash out for the metal adapters, rather than butcher a plastic 120 film spindle as depicted in the Flickr tutorial.
Nice trick, the silicone tape. Of course with the very reluctant Pentacon Six there is absolutely no chance to synchronize advancement, so not ever thinking to try something alike.
I’ve used sometimes a couple of my beloved Erconas, first times with an adapted 120 receiving spool (open only in darkness!) and recently with two rolls, the way you’ve shown. Some of my last shoots are in Jan. FP4party, to compare. It’s easy to trace a sequence of the number of turns you need (no lever!). Not so easy that you’ll respect that table on the field, anyway…
I still have a lot of well-working metal canisters (how well they made things in XX century!) but after some trial decided to use a plastic one, as any fraction of millimetre matters, and plastic ones are slightly shorter tan metal ones. Is it posssible that your caution about fragility is excessive? it is the spool, much more than the canister, which is stressed during the advancement. Using reloadable canisters you can clean a little the felts at each reload, whereas with sealed metal ones it’s not easy.
Optimum is with self-loaded rolls, if you put a leader on each spool you virtually lose no film at all.
Have to cut a mask to ensure planarity, however – although I’ve been tempted to sacrifice one of the rare and precious 6×6 original reduction masks.
Woohoo! Thanks for the clear write-up, Em!
This is super great. now I’ve gotta buy one of these cameras again!
I think this is the first time I did something before reading about it on https://t.co/IlHw2Jy5i5!