The Mamiya C220 Professional TLR is an engineering marvel and I haven’t found anything about it that I don’t like. Well, not much – they knew how to make cameras in the 1970’s.
Unlike its mightier Mamiya RB and later RZ 67 cousins, this camera is easy to use out of the studio and in the field. It’s lightweight by comparison (a mere 1,553 grams) and photographers could easily take them out into the street and the landscape, and make their fair share of square imagery. For me, this is a more accessible way into the square format than going the Hasselblad route, a camera I’ve always promised myself. Oh well.
I took the plunge in Autumn 2013 and hit the beach and the woods after pondering for a good while about ‘the square’! As a landscape photographer (as I call myself) could I see myself working with the constraints of the 6×6 format? Then I read somewhere that, all we have to think about is that every album cover being proof that some excellent square images can, indeed, be made.
About the Mamiya TLR System
This is a Twin Lens Reflex (TLR) camera that takes 120 roll film, and, typically for this format, it shoots 12 exposures per roll (24 on 220 roll film if you can find it anywhere!) The “System” bit comes from the fact that you can change the stock 80mm lens for others in the range – 45mm all the way up to 250mm.
The camera is unique among TLRs in that it focuses using a large bellows system, allowing you to capture subjects at very close distances (more on this later). The C220 Professional was an evolutionary step in the Mamiya ‘C’ line of TLRs, which started with the Mamiyaflex C in 1956 and continued through:
- Mamiyaflex C2 (1958-62)
- Mamiya C3 (1962-65)
- Mamiya C33 (1965-69)
- Mamiya C22 (1966-68)
- Mamiya C220 (1968-82)
- Mamiya C330 (1969-74)
- Mamiya C330f (1972-82)
- Mamiya C220f (1982-95)
- Mamiya C330s (1983-94)
Each evolution introduced new features (as described here) and updates to the build. The most useful feature, as mentioned above, is the fact that you can, almost exclusively in the world of TLRs, change the lenses. It’s interesting to note that all lenses can be used with all bodies and some of the later bodies in the C220 and C330 series also alow focus screens to be interchanged between models.
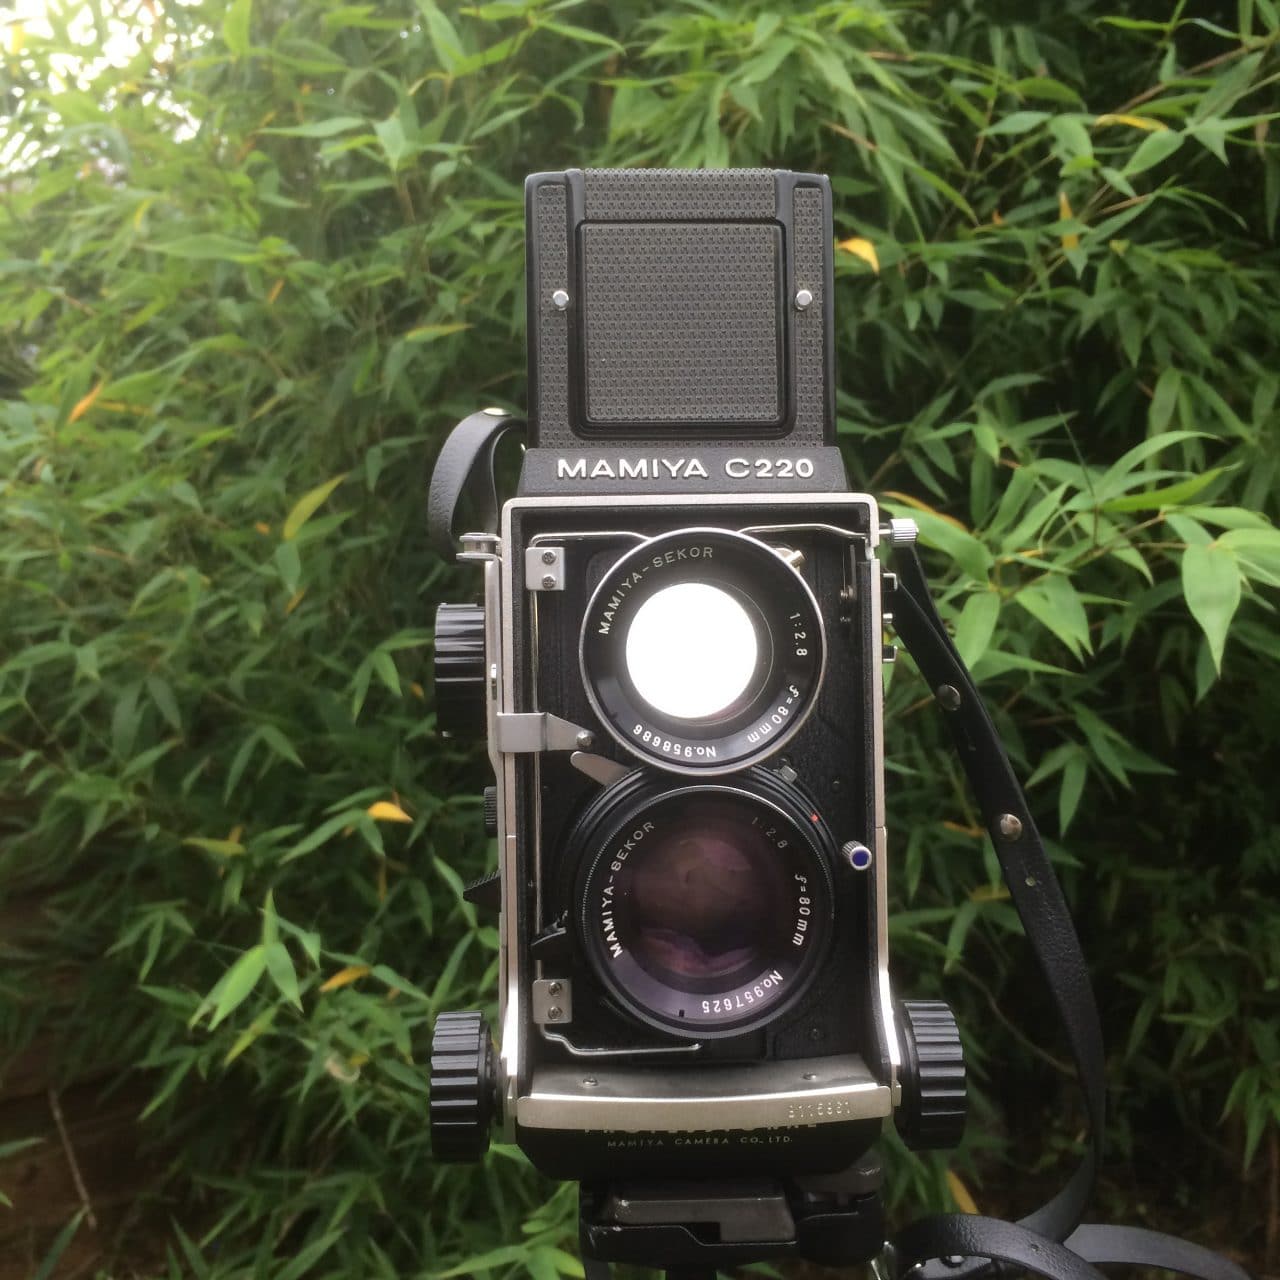
The Mamiya C220 Professional body
The body is fitted with a waist level finder as standard. This means that you look down onto the focusing screen, where you see a laterally reversed (flipped) image. Being a TLR, the image you see on the focus screen comes from the topmost lens, whereas the bottom lens is the one used for capturing your image on film.
As you look down, you will see the focus knobs jutting out from the front left and right. These fall perfectly into place when hand-holding the camera. They are linked, so work simultaneously.
Right view
On the right-hand side of the body:

Here we have the (folded) film advance crank (just over 1 and a half turns to move to the next frame), an indication of the film length loaded, the frame counter and a switch will allow for multiple exposures. The multiple exposure switch can be moved from the ‘Single’ to the ‘Multi’ position if that’s your bag. Regarding film length (120 or 220), this has to be set manually to ensure the correct frame counters (12 or 24 exposures) are displayed.
The shutter trigger mechanism is on this side too and you can use either a standard cable release or press down on this release mechanism. When the camera is set to the “Single” position, an interlock on the camera prevents the button from being pressed after a shot has been taken until the crank has been wound to the next frame.
Left view

On the left of the camera from this viewpoint is the ‘cold-shoe’. If you use it to mount a flash, it must be triggered via the PC socket on the side of the lens. Also on this side is a selector switch that must be used in order to remove the lens assembly.
The camera has no meter but does provide an exposure compensation indicator, which is engraved on a plate on the side of the camera along with the parallax correction scale. I have no experience of using these myself.
Front view

The front of the camera is imposing but uneventful. Here you can see the twin lens block (which can be removed and swapped out for another, different focal length) you have the lens lock/release bar and on the taking (bottom) lens, you can see the shutter cocking lever on the right and the lever for the aperture setting on the left.
Lenses take standard screw-in filters, the most common size being 46mm.
Rear / door view

The film door opens completely on a hinge on the bottom of the camera, thereby allowing easy access for film loading. The door only has a combination catch/lock for opening/closing, and an indicator of the film format type (120 or 220). The indicator changes automatically when you adjust the film pressure plate inside the camera back (rotate to switch between 120 and 220 film)
Bottom
The bottom of the camera only has a standard tripod screw fitting bush (center), and placement holes for a Mamiya quick release tripod plate.

Focusing
The camera uses a rack and pinion bellows focusing system, so if close up is your thing, you’re in for a treat. The 80mm ‘standard’ lens focuses to 35 cm (the 55mm will go to 24 cm). At close camera-to-subject distances, you can allow for parallax compensation (the shift in field of view between the taking and the viewing lens) with a remarkable contraption called the “Paramender”.
Loading film
Loading film is a breeze (in comparison to even my Bronica, and more so the Hasselblad), as it is pulled from the spool straight up the back of the camera into to the take-up spool. There is no threading the backing paper under rollers or back on itself. The spools slot in easily as the take-up spool ‘pins’ can be pulled and locked out of the way until the roll is seated.
And now, the best bit…
The Mamiya C lens system
The advantage these Mamiya’s have over the TLR opposition – even the sought after variants of the Rolleiflex – is that the twin lenses are interchangeable – mid-roll if you wish. In this regard, it’s like the poor persons Hasselblad, indeed, even the default waist level finder can be swapped out – or even enhanced.
There are 10 lenses generally available, from a 55mm f/4.5, through the 80mm f/2.8 right up to a 250mm f/6.3 (some focal lengths having more than one variant). The lenses take either a 46 or 49mm filter (which is economical – a step up ring only being required to enable one set of filters to cover all these lenses).
By dint of an internal blind to hide the film, and a stiff wire catch on the front, the lens sets can be removed and changed for another focal length, as easy as that. The lens set can’t be removed until the selector is moved to ‘Unlock’, and a red ‘flag’ appears in the viewfinder to indicate that the lens is being changed.
The lenses use leaf shutters which have to be ‘cocked’ manually before exposure and the standard 80mm f/2.8 that I have has a Seiko shutter range of 1/500 to B and click stopped apertures up to f/32 (though they can be set between stops too). The newer C330 models provide an automatic lens cocking system.
These lenses also have an M-X flash selector too – (‘M’ would have been for flashbulbs – remember them? – and ‘X’ for electronic flash. Being a leaf shutter design, the flash synchronises at all shutter speeds. I plan to get the 55mm f/4.5 at some point (around a 35mm equivalent focal length in 35mm film terms) in order to make my landscape work a bit more flexible.
Accessories
Quite apart from the lens range noted above, the camera is able to take a range of accessories, with a range of finders available, an eye-level finder, one with a Cds photocell (Porrofinder), for exposure measuring, magnifying hoods and sports finders. There’s even a drop-in “chimney” that can be slotted into the open waist level finder to provide enhanced magnification for critical focus.
Each lens also has a matched lens hood and these can be supplemented by a special effects apparatus which provides various cut-out filters for shaping bokeh, or splitting the image for creative multiple exposures.
A pistol grip and an angled bracket are also available and three versions of the Paramendar, an attachment that fits between the camera and tripod head for close-up work, as outlined above.
All in all, you can build up an impressive system of bits and pieces.
In use
When out and about, when, like most people one is more familiar with the rectangular format, be it 35mm, 6×4.5, 6×7, 5×4, 10×8 etc, (Polaroid – ha!), getting the hang of the square can be a challenge. I don’t feel that one should set out still ‘seeing’ in rectangle, and say, “I’ll shoot this square but I can always crop it rectangular later”. You have to embrace the square and compose on that basis.
It’s often said that images with the subject in the centre, when shot square, are more restful because the eye comes to rest there naturally.

From a landscape perspective, think of a lone tree in a field. The same is true of portraits of course. I feel this is actually true, but it’s also a bit of a cheat! For me, the trick is that the rules of composition are still true, and you still need a ‘subject in its surroundings’ approach. So, would that tree below be better to one side, in order to show that it sits on the edge of a quarry for example, or would the portrait be better, more ‘relaxed’, if the subject was to one side?
I try to use this when out shooting.

Granted, a lot of digital cameras allow for 1:1 cropping ‘in camera’ when shooting, so by all means, practice on that if you have such a tool, it’s going to be cheaper, but once more sure of yourself with that, then use what you learn in this film shooting environment.
Another trick, that I like to use a fair bit, is to employ depth of field to isolate your subject within the square – arguably there are 2 subjects here (three if you count the ‘mess of the trees’ in the middle) but I want the viewer to see the tree on the left, but in the context of the wider landscape – which will be very familiar to anyone in the North of England!

The camera is smooth as silk to use, a joy to carry around and hardly gets in the way once you get that hang of the shooting sequence, so enjoy yourself with it and remember, only 12 shots per roll, so there won’t be any ‘sprayin’ and prayin’.
I meter exposure with my trusty, and excellent, Weston Master V – get one!
In summary
Pros
This camera has just the right amount of weight behind it to make it a comfortable carry around camera, its mechanically smooth and everything falls to hand easily, and the viewfinder is bright enough to be useable in most conditions.
Cons
As the viewfinder shows what you see through the top, ‘viewing’ lens, using graduated filters or, to a lesser extent, polarizers are nigh-on impossible with any degree of accuracy, but I guess print film has a certain exposure latitude which may render this no too problematical, but I’d watch out with reversal film!
The genuine, as supplied, Mamiya strap that I have is a bit of plastic awfulness, so stiff it doesn’t easily run through the lugs through which it is threaded, and more often than not gets in the way.
And that’s as bad as it gets!
The only fault with it that I have is that mine doesn’t get used often enough (too many cameras to choose from – which I’m doing something about!) but at least the battery won’t go flat. [wink] The on-line manual for this camera is available from the excellent web resource here.
Thanks for reading!
~ Ian
Share your knowledge, story or project
The transfer of knowledge across the film photography community is the heart of EMULSIVE. You can add your support by contributing your thoughts, work, experiences and ideas to inspire the hundreds of thousands of people who read these pages each month. Check out the submission guide here.
If you like what you’re reading you can also help this passion project by heading over to the EMULSIVE Patreon page and contributing as little as a dollar a month. There’s also print and apparel over at Society 6, currently showcasing over two dozen t-shirt designs and over a dozen unique photographs available for purchase.


13 responses to “Camera review: Mamiya C220 Professional TLR”
I took my best pictures with the Mamiya C220 and C330F in the seventies and eighties. Later I traded them in for a Pentax 6×7, which I sold when Nikon launched the full frame D700. This Nikon is a great camera allowing me to use my old Nikon lenses. I recently I bought both a Mamiya C330F and a C220 back, out of nostalgia, but also to really enjoy taking pictures mindfully. These cameras make you think before pressing the shutter button, which makes for better pictures. The Mamiya lenses are great too, with the exception of the 6,3/250mm, which is not very sharp and shows only little contrast. With these TLRs, and the available accessories, Mamiya offered a complete system meeting the requirements of professional photographers. Looking through the viewfinder puts a big smile on my face.
Hi Emulsive folks!
I love film much more than digital, no question about that. What is keeping me away from all cameras with bellows is the fact that they can be very easily damaged. Taken into account that most of these lovely cameras are old enough, can somebody let me know please if these Mamiya C330/C220 bellows can be replaced and if this is so how much would that be?
Many thanks everybody! Happy shooting!
Wolfgang von Rudenauer wvonrudenauer@gmail.com
“You have to embrace the square and compose on that basis” Brilliant. I’ve been photographing on 6×6 for a long time and I’ve come to love the square and find that I very seldom crop what I print. Great article. Thanks very much.
Engineering marvels.
Are these cameras available?
They are still out there – am sure a quick visit to eBay will turn some up, if not now, then soon enough. Often come across them on camera shop used sections on their websites.
I use my Mamiya C3 Pro still nice Camera
There are a number of possibilities for spacing issues. But first and easiest to fix thing that could be your problem is that the pressure plate is set for 220 film. Modern Mamiya TLRs could handle both 120 and 220 films, and there are two settings to change, the film counter, and turning the pressure plate. I’ve owned about half a dozen Mamiya TLRs and have never had spacing issues on mine. All of my Eastern Block cameras did have a spacing problem to one degree or another (Kiev 60, Exacta 66, Pentacon 6.)
The Mamiya C220 was my first camera- a present from my dad in the mid 1980’s when I was in my teens. I’ve owned a few of them and most of the lenses over the years and it’s one of my all time favorites. I am now using a C330 and recently bought a C220 for my daughter who is roughly the same age as I was when I got my first.
One thing I’d note that is a plus to the TLR system is if you like shooting long daylight exposures. You can put really deep ND filters on the taking lens, yet compose normally with the viewing lens. And the Mamiya system uses “normal” screw in filters unlike many other TLR systems that use “Bay” filters. I was shooting yesterday with my Mamiya and a Hoya 9stop ND plus a red filter that allowed me to take a 83 second (including compensation for reciprocity failure) exposure even though the sun was out. With ND filters it’s fun to be able to get the clouds to smear around and water to go flat, and that’s much easier with the TLR system than with SLRs.
Having used a C220, C330 and C220f, my favorite is by far the C220 (and f). While it is only a single data point, with the C330 I had, the camera mechanics occasionally jammed up due to the integrated film advance/shutter cocking mechanism. With the C220 and C220f, I appreciate that these mechanisms are *not* linked. Both C220s I’ve used always gave perfect spacing of the images on the film roll, while with the C330 I had all sorts of film spacing issues–often getting only 10 or 11 shots instead of 12 on the roll. While I know the C330 is the “top-of-the-line” for this camera series, I find there is an excellent weight and mechanical argument in favor of a C220 variant!
Firstly, a fine review for a great camera. But something is niggling me!
“This camera has just the right amount of weight behind it to make it a comfortable carry around camera”
I have one of these cameras, and can say with some certainty some people won’t find that to be the case. It is a hunk of metal weighing 1.5kg plus. Add one of the longer lenses to take it to 2kg. Add a second lens and you have got some serious heft to lug around with you all day!
To give it some modern context, a full-frame DSLR like the Canon 6D and a 70-200 f/4 IS weigh the about same as the standard model c220.
3.5
Luv my C220
@ibartlett13_ian One of my all-time favorite TLRs! Had one for years.