As I write this in mid-May 2020, it’s week seven of lockdown here in the UK. I’ve been furloughed and have found myself at home with buckets of time and very few ideas on what to do with it. Having burned through much more film than I normally would, just because developing it was something to do, I found myself (much like the rest of the world) frustrated and lacking inspiration.
So, feeling blue, I did what any self-respecting millennial does: I turned to retail therapy, for that fleeting hit of sweet, sweet dopamine. I browsed eBay listings and Facebook ads in search of inspiration, deciding finally that what I really needed to add to my photographic arsenal was an instant camera.
My research began.
I decided that I would definitely be going for a Polaroid of some sort because I love that classic 80’s look. And after finding the cameras themselves were cheap enough, I fell over backwards at the price of 8 shots of 600 i-Type film which runs about £15-£20 a box depending on where you look.
Knowing that I would quickly bankrupt myself once the gratification of having instant photos was in my hands, I decided to look into other instant options.
I eventually settled on Lomography’s Lomo’Instant. It takes Instax Mini, which comes 10 shots to a pack at a much more reasonable price than 600i film. So, I hit the Buy It Now button on both the camera, and four packs of film.
A week later, the film arrived…obviously not like the photo below but you get the idea.

I waited in anticipation of all the fun things I was going to do with my new camera. A series of portraits perhaps, a stitching together of instax to make a panoramic scene, a collage of my dog. The possibilities were endless but more importantly, the creative juices were flowing.
The camera didn’t arrive.
Two weeks passed and it still hadn’t arrived. Three weeks went by. And at the time of writing, five weeks later, it still hasn’t arrived.
Now, I’m a resourceful chap. And having a couple of Polaroids stuck to the wall above my desk and four pack of the stuff stashed under it, got me thinking: “Can you shoot this without an instant camera?”.
It turns out, you can… maybe. Here’s a little preview.

What you’ll need
In order to do this, you will need:
- A fresh pack of Fuji Instax Mini
- A camera that can fit one shot in the back AND close
- A cloth (we’ll get to this in a minute)
- The other two things that are greatly beneficial but can be substituted are:
- A changing bag (you can do the loading in a completely dark room)
- The roller from any instant camera (you can use a lint roller or rolling pin but I wouldn’t recommend it)
…I stole the rollers from a rotten Polaroid Land camera.
Now, I am, by no means, an expert. With that in mind, please excuse the following description. But it is important to understand in order to get this to work.
Instant film is exposed onto the back or ‘black’ side of the film and develops on the opposite side. Once the film is pulled through the rollers, the ready and waiting developer in the ‘base’ of the white frame then spreads into it, developing the image.
So, how do you do it?
The first step is to see if you have a camera that will fit an instax shot in the back and still allow for the back door to close. I used a Konica S Hexanon. The film overlaps onto the seal slightly but the door clicked shut without too much protest.
To test this, you can use an already exposed shot like I did, or you can measure the distance between the door seals. An instax mini is 54mm across. So if the inside of your camera is 54mm or larger from seal to seal, you’re in luck.


Once you’ve found your camera of choice, grab the instax cartridge (removed from the packaging
to avoid fumbling around in the dark), your roller (or substitute) and cloth, and head to the dark
room (or changing bag).
Step 1: Open the back of your camera
No photo needed.
Step 2: Slide out a sheet
Put your thumb on the back of the Instax cartridge (where it says not to put your thumb) and slide upwards. If you are using a fresh pack of film this will remove the black plastic screen protecting the first shot from the light.
Next, do exactly the same thing again only this time, you’re pulling out your first shot of film.


Step 3: “Load” the Instax into your camera
Now place the film into the back of your camera (black side down) and close the door. The camera and the placement of the film when putting it in will determine the framing of the shot. This can be perfected through trial and error.

Step 4: Save the rest!
The final step in the changing bag/darkroom is to take your cloth and wrap the film cartridge with the remaining exposures up in it. The idea here is that it will prevent the following shots from being exposed to light when you open the changing bag or turn the light on in the dark room.
Now you’re ready to shoot!
Instax film is rated at 800 ISO so I recommend exposing it at that speed, but of course, that’s completely up to you!
Once you’ve taken your photo. Return to your darkroom setup, open the camera and take the exposed film out.
Now for the hard part
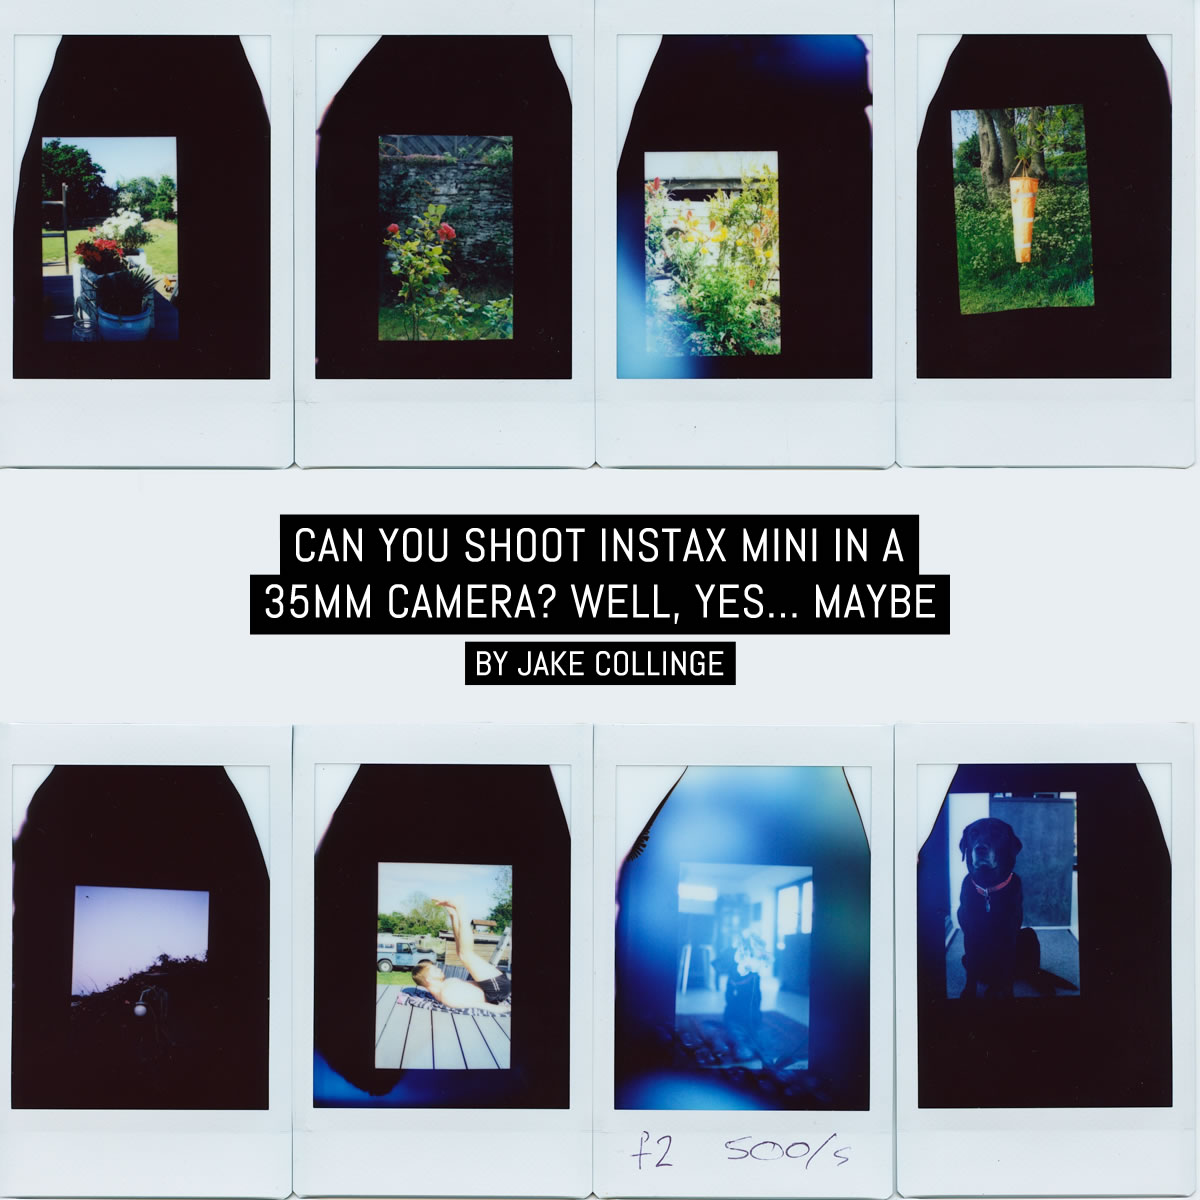
From left to right in the image gallery below:
- Feed the film, base first, into the roller.
- Pinching the rollers together on the side that you are feeding the shot into, it will help it go through much more easily (this is something best practiced in the light to make sure you get it right).
- Once the base is through you will feel a small ‘click’ as the rollers move onto the frame. Now you should be able to pull the film through the rest of the way. You will feel some resistance once you have reached the top of the frame, pull a little harder and it should come through with ease.


For the best results, pull the sheet slowly but consistently without stopping. This ensures an even distribution of developer across the frame, which prevents lines or blotches on the image. However, pulling through fast can yield some funky and interesting results like the example below.

Congratulations! You have just taken your first shot of instax in a 35mm camera! Take it out of the dark and marvel at its glory! That is really all there is to it. It’s awkward, inconvenient and time-consuming. But lots and lots of fun.
Here are a few sample scans from the sheets I’ve exposed and developed so far (click/tap to view full screen):


If you’d like to do this yourself and have any questions, please don’t hesitate to get in touch. I’d also love to see your results!
~ Jake
PS. To the eBay seller who still hasn’t posted my camera, I’d like to say; Thank You. If you’ve got any questions, drop them in the comments below, or find me on Instagram!
Share your knowledge, story or project
The transfer of knowledge across the film photography community is the heart of EMULSIVE. You can add your support by contributing your thoughts, work, experiences and ideas to inspire the hundreds of thousands of people who read these pages each month. Check out the submission guide here.
If you like what you’re reading you can also help this passion project by heading over to the EMULSIVE Patreon page and contributing as little as a dollar a month. There’s also print and apparel over at Society 6, currently showcasing over two dozen t-shirt designs and over a dozen unique photographs available for purchase.


5 responses to “Can you shoot Instax Mini in a 35mm camera? Well, yes… maybe”
I tinkered in a similar way using the backs for an RB67 and I have to say it worked really well. One thing I did was feed the film back into the pack, then covered the instax lens and hit the button, so it processed properly.
Worked really well until I put one in upside down and it jammed in the rollers.
This works very well with a Rolleiflex or similar. I’ve tried it a few times. Normally I use the Instax camera to develop by squeezibg the film back into the cartridge and firing the Instax with the lense covered.
Novel thinking, well done!
A few questions… Have you tried reinserting the dark slide after removing a piece of film?
How do you know which end of the film is which in the dark? and how long can you leave the film before developing it? – I’m thinking along the lines of taking a few shots using a dark bag and then developing them all in the darkroom later… Also how about using medium format camera to get a bigger image?
https://youtu.be/TeYC5ppZ_mk
Instax film in mid format camera and all the questions you asked, except how long can you developed later.
Thinking this might be interesting with a 6×6 or 6×9 camera. Might have to try this one…