“Oh sure, it may not look like much, but it’s going to be my new photo darkroom.”
I said this, with a touch of nostalgia, a bit of a whim, and the driving force of practicality around the return of my college-age children (and their belongings) to our home this summer.
It was New Years Day when I opened the door of our basement storage area. Not every home has a basement, but in our part of the central plains, it’s fairly common that some of the basement be fully finished rooms, often with a walk-out door to the outside. In our case, the part of the basement where I was standing is a large, partially finished space, with some raw wood stud walls, a few electrical sockets.
In the space was a separate and an odd-shaped corner room that was finished on the inside.
This was – at the time, storage – filled with overflowing boxes, old studio lights, a hand-painted portrait backdrop and other collections of “things“. The kind of stuff that is the by-product of moving one too many times.
But I was committed. It was to become my darkroom.
What follows is my story, complete with the clickbait title: I built my own darkroom for less than $500, now you can too!
In case you’re worried that it’s all clickbait, allow me to try and reassure you that it’s not with a conveniently placed table of contents….
Much better.
Introductions and a look ahead…
I’m a documentary and portrait photographer and my journey in photography began in the 1970s. I had a small home darkroom in high school…that darkroom gear is long since sold and gone, but I remember the joy of printmaking. I also remember the war stories I’ve heard from old-school journalists who bragged about “back in the day” when they developed film in motel bathrooms converted to impromptu darkrooms.
It was their war stories that made me look at a half-finished room filled with 21st-century flotsam and jetsam. If they could do it then, why couldn’t I do it now….and so began my search.
And at the same time, I recalled advice from a famous TV chef who said, “you either have time or money, rarely both”. Sigh, I had time, which meant the money needed to be watched closely. I did not want to spend a lot and I wanted to be realistic about what it would cost.


My storage-room-turned-darkroom does not have dedicated plumbing and I did not want to add it, so I settled on washing prints in the nearby bathroom sink or tub. With that choice, I did not need to do any construction.
My vision of a dark room was thus:
- An enlarger
- Developing trays up to 8×10 size
- A film developing tank for both 35 mm and 120 film
- A thermometer
- A timer I could see in the dark
- …and a safelight.
And if I found some extra things like tongs to move the prints in the tray or some measuring cups or beakers for mixing chemicals, that would be a bonus.
But how much was it going to cost? I looked over the major photo retailers at enlargers. The price for a basic enlarger was $350 but most of the enlargers I looked at were in the $600 – $1,400 price range.
As I have shopped on our local Craigslist for photo items, I have occasionally seen estate sales or “complete darkroom kits” for sale, so Craigslist was my next stop. At the time, there were no listings, so eBay became my source.
Can I add a disclaimer here? I’m not an eBay pro, over the years I’ve made enough purchases and sales to have about 150 feedback points. I am certain I’ve paid too much for some items and sold others for too little.
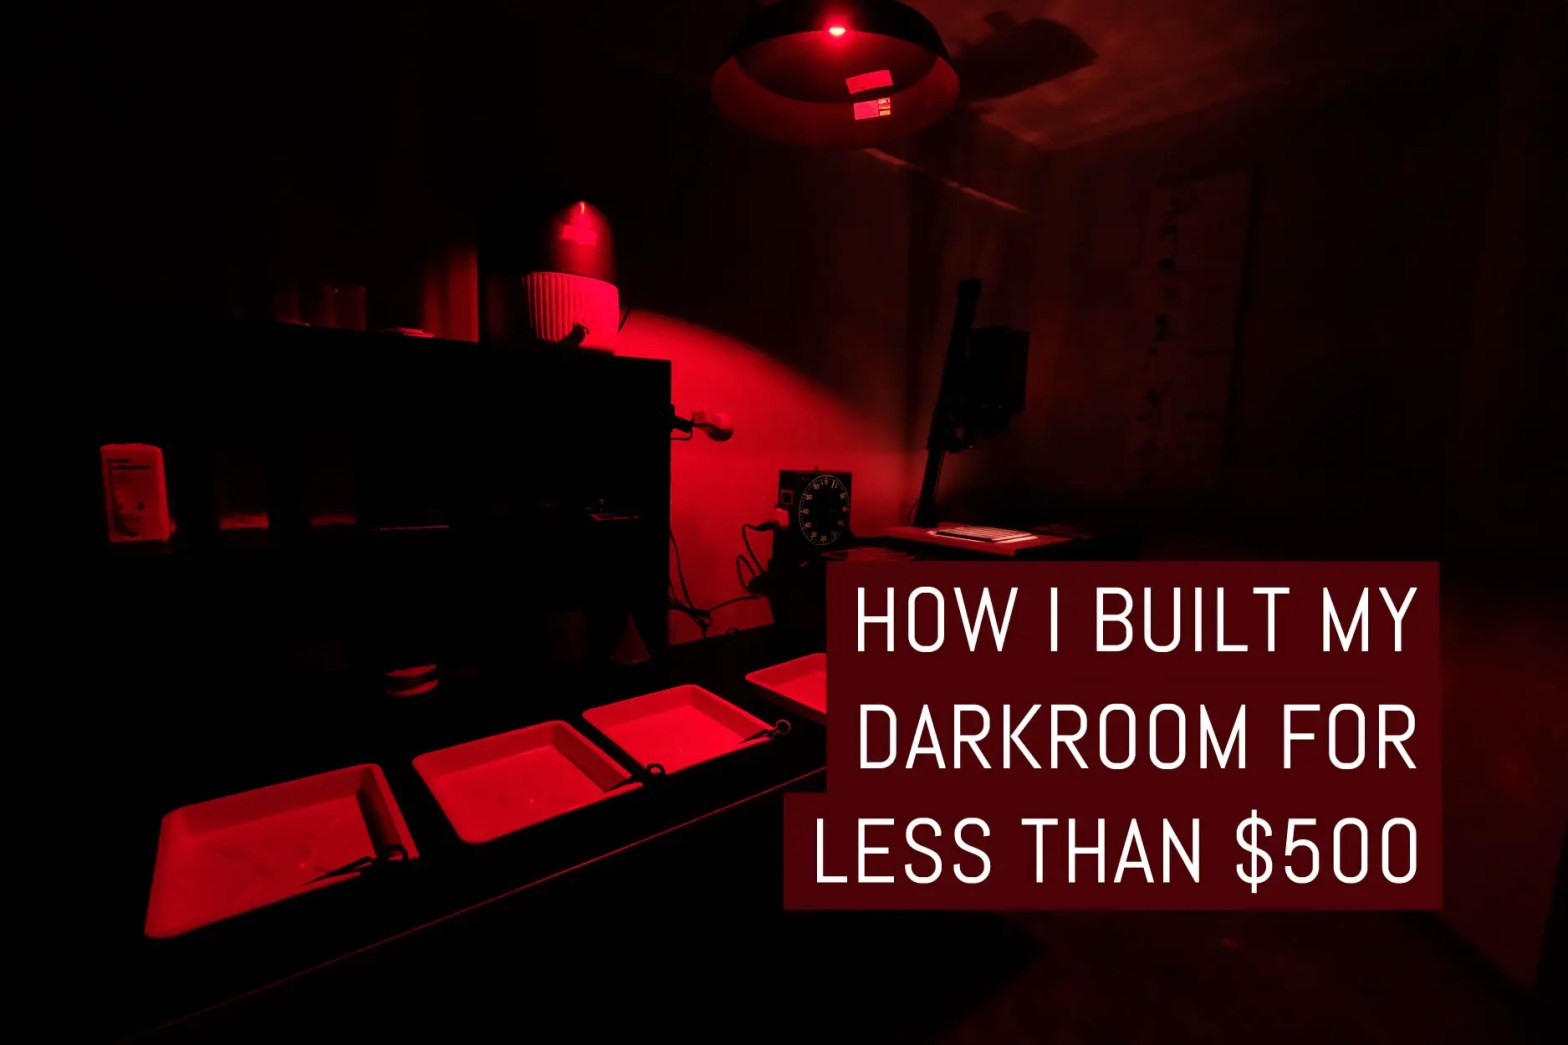
All in all, I’m happy with my eBay experience, but I know not everyone shares my experience. What follows is my journey, my failures and a few notes of what I might do differently the next time. It’s all laid out chronologically from February 10th to Match 16th 2019 – a little over a month to purchase everything I needed to get started. Before we jump into the constituent parts, here’s a quick look at the finished (suitably lit) darkroom:

Step one, a complete darkroom kit…right?
My first idea – and the easiest approach – was to purchase a complete kit from an estate or a photographer who was moving on. What I found when I searched eBay were lots of “complete darkrooms” but the sales I found were “local pickup only” Great prices, but too far to drive.
Others were priced right — but shipping costs were in some cases over $100. Enlargers are heavy and the support rail that the head slides up and down on is long, so shipping is not a simple matter of putting in a box with a label.
I decided to look at enlargers alone and put together the missing parts later, which is where the journey really started. What follows is an itemised list of the components I purchased – large and small – complete with prices (current as of 2019) and timelines.
The enlarger – Beseler 67C
There are lots of enlargers for sale under many different conditions, from “parts-only” to “nearly new”.
As I looked over the brands and models, I quickly figured out I needed some help deciphering what was what… and that’s where Jonathan Ollinger’s site provided help. Olinger was my reference as I reviewed listings on eBay and then read his commentary and description of the enlarger.

I settled on a listing for a Besseler 67 CP. I’m guessing it was built around 1981. From the seller’s photos, the enlarger was intact and complete and included a few parts I couldn’t identify, a couple of books, and some film in canisters.
As a note, as I was shopping, many of the people selling were not original owners and most didn’t know how enlargers worked beyond “when I turn it on, the light bulb comes on”. So I was ready for the potential risk of a bad purchase.
When it arrived, it was exactly as pictured – but was missing a few parts:
- The enlarger head separates just above the bellows to accept the negative carrier. While it operated fine, it was missing the hand lever that made this easier.
- Speaking of negative carriers, what I thought was the negative carrier was actually a filter frame. My next eBay purchases would include 2 negative carriers.
- And last, the round knob that adjusts focus was also missing (after reading web forums, this is a common piece to break in school photo labs.)
Running total: $160 (February 10 2019)
Additional enlarger parts: a lever and knob
I found a lever that attached to the enlarger head to move the head from the bellows and accept the negative carrier. The item description was for a different model of Besseler enlarger, but it looked like the diagram in the owner manual I downloaded from Ollinger’s site.


I jotted a note to the seller and asked if they would measure the spacing in the mounting holes. The distance was the same as my enlarger and so I purchased via “Buy it Now”, lever and knob $9.79 and $9.95 respectively, shipping included
Running total: $179.74 (February 21 2019)
Beseler 35mm negative carrier for 67C enlarger

Next, I searched for a Besseler 35mm negative carrier and found one in new packaging. I again used “Buy it now”. The surprise here was as I searched for 6×6 negative holders they were both expensive and hard to find. New, a 6×6 negative holder was $125. The 6×6 was going to take a longer search. For the 35mm holder: $20.00.
Running total: $199.74 (February 22 2019)
Beginners basic darkroom kit
At the major photo stores, Beseler sells a “Developing Outfit, starter printing kit” which includes 23 pieces of basic intro level developing trays, a film developing tank, thermometer, timer, tongs, and some chemical bottles.
One of those stores had a listing on eBay for the item and a “Best offer” option. I made an offer of $90 and did not get a reply. Another vendor had older “new stock” of the kit as well and accepted my offer of $70.

I had low expectations for these items, but I thought they would work well enough and long enough for me to see which things I might want to upgrade.
The box arrived in perfect condition, but once I opened it, the corners of all 3 developing trays were crushed — at some point in storage, I’m guessing this box had a hard fall. I jotted a quick note to the seller who immediately offered to send replacement trays which arrived a few days later with no additional shipping charges.
Running total: $269.74 (February 22 2019)
Darkroom timer – GraLab Model 300


I didn’t plan on buying a GraLab timer. I was thinking any timer would work for my simple darkroom, but I found several listings on eBay with low starting auction prices. The “Buy it now” pricing was running $60 – $120, but I watched one listed by a “retired photographer” and near the end of the auction it had 0 bids and the starting bid was $24.95.
So I may have paid a bit more than I could have, but I’m hoping there is some photographer karma still left in the timer.
Running total: $294.69 (February 22 2019)
Beseler 6x6cm negative carrier for 67C enlarger

It took a while of watching eBay before I found the 6×6 film carrier. I usually avoid listings with the word, “vintage or antique” as they are almost always overpriced. This was listed as “vintage” but I thought $25 was fair, so I bought it as well by “Buy it now”.
Running total: $319.69 (March 9 2019)
ILFORD Multigrade III filter set (3.5×3.5” plus paper & book)
This is the only purchase that I wish I could do over. Polycontrast papers or multi-grade papers require filters to adjust the contrast. Depending on the enlarger, the filters are either placed between the enlarger lens and the photo paper, or between the condenser lenses inside the enlarger head.

Kodak brand filters sets are abundant on eBay (and cheap) Ilford sets, too, are available, and at a higher price. New these filters sell for $30 and used they sometimes come as part of a kit with some paper stock as well.
Ilford will tell you that the older filters for Multigrade III don’t work with the new Multigrade IV papers — the lowest and highest grades do not respond correctly. I did not read the listing closely enough, and what I bought was the Multigrade III filters, a book and 25 sheets of out of date Multigrade III paper for $20.48. This was an auction that received 0 bids until my bid in the final minutes.
If I were to do this over – and I may buy the filters in the future – I would be to be sure I had the current Multigrade IV filters.
Running total: $340.17 (March 9 2019)
Enlarging lens – Schneider Kreuznach Componon 80mm f/5.6
This was from a second auction after the first one got away from me for $1. 35mm negatives and 120 negatives use different focal length lenses in the enlarger. A 50mm enlarger is good for the 35mm but a 75mm or 80mm lens is helpful for the medium format work. Without a clue about good/better/best enlarging lenses, I used the Photoconucopia list to get a general sense of options and comparisons.

My first bid was on a Schneider Componon-S 80mm f/5.6 Enlarger Lens. I put a $45 limit on my bidding and didn’t watch the bidding in the final hour. The next day I learned I was outbid by $1. So I searched and purchased the Schneider Componon 80mm by another seller for $45 using “Buy it now”.
But it wasn’t the bargain I thought. Enlarger lenses are mounted into the enlarger head at the base of the bellows using a lens board… a metal piece cut to size with a hole drilled for the lens. However, lens diameters vary and this 80 mm did not use the more common Leica mount but a smaller 25 mm hole.
Running total: $385.17 (March 13 2018)
Metal lens board for Beseler 67C enlarger. 25mm hole

I couldn’t find the best search terms to find a lens board, but a Google search did lead me back to eBay and a seller who had lens boards for sale for $22.99. This one fits perfectly I and actually have two lens boards makes swapping lenses quick.
Running total: $408.16 (March 16 2018)
Reflecting on my experience
My eBay experiences were all great, sellers were quick to respond (with the exception of one) and the shipping prices were reasonable. Your shipping costs and your eBay experience may be different than mine.
So the question on your lips now is: do I have space for my returning students belongings?
Well, yes, thanks for asking, but the real question is “do I have any advice,” and what would I do differently?
If I may offer some humble tips:
- Online shopping and eBay include risk, never buy something you can’t afford to lose the money and never see the product. It happens rarely, but don’t spend the grocery money on something you have so little control over.
- Be patient. If you need a darkroom functioning by this weekend, pay retail. Otherwise, put together a list of things you need and a general price you are willing to pay. There is no required order to receive your parts, take them as you find them for your price.
- You will always have a second chance. eBay is huge and people sell things all the time. If you miss a sale, another will come around again. Maybe a little more money, maybe a little less money. It will come around.
- Look at enlarger parts, too. If you buy a brand X model Y enlarger, look around on eBay or the web to see how many options there are for replacement parts. Chances are your enlarger may need parts in the future and there are more parts for some brands and models than others.
- Ask the seller questions. Most of the time, when I do ask sellers questions, they respond quickly and are eager to help. And if you need something else, ask them, they may have a source.
What would I do differently?
Because shipping costs vary wildly on eBay and depend on where you live, I’ve left shipping out of the total. At the same time, so many sellers now offer free shipping, I would have saved even more if I would have limited my purchases to those offering free shipping.
I might have delayed the purchase of the 80mm lens for now and printed the best I could with only the 50mm but honestly, my biggest regret is that I didn’t do this sooner.


I have been able to successfully process both 35 and 120 films, make contact sheets, and do several test prints of un-interesting but challenging frames with a wide range of exposures and tonal ranges. The test negatives have been total fun to work with, even with my rookie mistakes and blunders.
Yes, I exposed paper upside down…
Yes, I forgot to set my timer…
Yes, I touched an unexposed paper or two with slightly damp fingers…
But perhaps like you, it’s about (re)learning the craft and art of printmaking. You can read all the books you like, but at some point, you have to jump in and make your own art.
Thanks for reading,
~ Fritz
Ps. The attentive reader may notice the lack of mention of a print washer. Let’s leave that for a future update. All I will say for now is the cat needed a new litter tray when I was finished… Necessity is the mother of invention.
Share your knowledge, story or project
The transfer of knowledge across the film photography community is the heart of EMULSIVE. You can add your support by contributing your thoughts, work, experiences and ideas to inspire the hundreds of thousands of people who read these pages each month. Check out the submission guide here.
If you like what you’re reading you can also help this passion project by heading over to the EMULSIVE Patreon page and contributing as little as a dollar a month. There’s also print and apparel over at Society 6, currently showcasing over two dozen t-shirt designs and over a dozen unique photographs available for purchase.


4 responses to “How I built my darkroom for less than $500”
Nice. Thanks to generous friends lending me an enlarger, trays etc., I built mine for about £100.
This sounds like the author had a fun an rewarding adventure.
Well, since I bough a complete darkroom with many duplicates of some items for very little… https://t.co/byrxxCibej
As said before I only joined Twitter to read articles like this.