Being partial to shooting some slide film where financially possible has always left me with a big frustration when it comes to viewing my precious slide film photos. I own a slide projector and a very good 35mm scanner but with the last real darkroom process for printing slide film: ILFORD’s Cibachrome having been out of production since 2012 I’ve never bothered to print any of my images. I obviously could just send my perfectly good scans to a lab for some high-quality colour prints on RA-4 paper but I love the masochism of printing colour photos in the darkroom on an enlarger while listening to some banging tunes!
One day. being particularly bored at university. I came across this video by Go Everywhere on Youtube explaining how to process colour negative film as slides by first using a black and white developer and then exposing the film to regular light before running the regular C-41 process.
I wondered if this could be translated to regular RA-4 paper to get prints from slide film and upon looking online found next to nothing about it apart from a few ancient posts on forums from the early 2000s debating on whether it would be possible…but with no real results.
There was only one thing to do…
…I went into the university darkroom to experiment!
The process
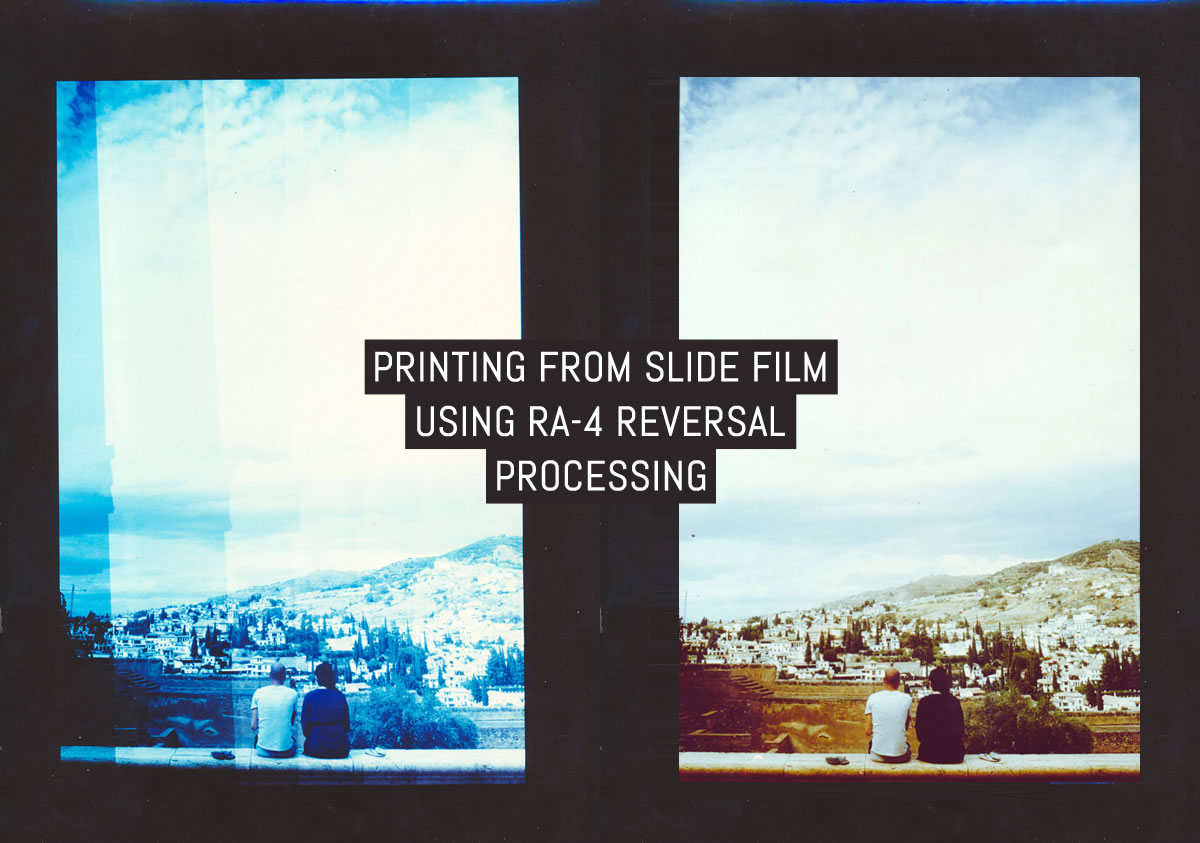
With a plan in place I just needed a slide to print from so I got out my slide holder. I decided on this image I took in Granada on holiday a few years back (Minolta X-700, MD 50mm f/1.7 and Fuji Provia 100F for those interested):
The process itself involves exposing the paper as you normally would in the colour printing process and then, while in total darkness, developing the paper for about a minuite in regular black and white paper developer (I used ilford multigrade at 1+9 dilution in this case) then use a stopbath to arrest the development.
After this step you then turn on the main lights and expose the paper to regular light! You should see a black and white image on the paper at this point, after which, you can then process the paper in regular RA-4 chemistry and you then get a positive print from your slide!
If you are unfamiliar with the RA-4 process I recommend reading this wonderful wonderful guide written by Abel Rico here on EMULSIVE.
I first started with trying to get a test strip completed using the following steps:
- Load the slide in the negative carrier and focus the image on the easel.
- Set the Yellow and Magenta dials to 50M and 50Y – this is where I usually start with Fuji crystal archive paper.
- Insert the paper in the easel and make a test strip — I used 7-second intervals with the lens at f/8
- With all of the lights still turned off, remove the paper from the easel and place in the black and white paper developer.
- Leave it in there for 1 minute agitating continuously.
- After one minute use a stop bath to arrest the development.
- Check that your box of paper is light tight and turn on the room lights (I know it feels wrong but it has to be done). You should have a faint black and white image on the paper at this stage.
- Finally, run the paper through the standard RA-4 process and at the end you should have a test strip.
When I saw the test strip coming out of the Colenta machine that the university had I was ecstatic! It worked!
However, it was FAR from perfect, being nearly totally blue. The exposure needed work as well. Due to the process being positive-to-positive, exp[osure was the opposite way around from usual — on the test strip, the darker parts were exposed for less time and the brighter parts exposed for more time!
I selected 18 seconds for my first print which was somewhere in the middle of 14 seconds where it was too dark and 21 seconds where it was too light.

So, we’ve got an exposure time to make a print right? Correct the colour and we’re golden! This is where it started to break my brain.
Anyone who is familiar with RA-4 printing will know that on the enlarger dials if you wanted to add, let’s say, some yellow to the image you would actually remove yellow on the dial. If you wanted to remove yellow you would add yellow on the enlarger. Well this process being positive to positive it is actually the “right” way around so to add yellow you add yellow and to remove it you remove it.
You may ask why this was so difficult and the answer is this: after printing colour for so long you just learn to look at a print and which dials to turn! So suddenly having to think and do the opposite as usual proved to be a bit difficult to wrap my head around! Here is a chart I modified to show the colour corrections needed for the RA-4 reversal Process:

Having done a test strip, it was time to get printing. After realising the colour correction issue from my very blue test print (which I have since misplaced) It brought me to this print here:

It certainly got better but 18 seconds left it a little dark and there was a heavy Blue/Cyan tint. Notice the very high contrast in the print – this is simply due to the high contrast of slide film itself and is unavoidable with printing from it. What also came up with this print was odd marks on the paper. The problem here was due to the Colenta machine I was printing with at university. It uses rollers to transport the paper and the black and white developer got onto the rollers, causing the marks — this would come back to bite me later!
With the process getting closer to a useable print, now was the time to dial in that Cyan cast, for which I added 15Y and 15M on the dials. I also increased the time to 22 seconds, which would make it lighter.
Here is where we ended up:

Compared to the first “full” print above, this is slightly better result. It’s much brighter than the first print and has some of that Cyan removed.
Once again the print had a Cyan cast so I made a third print — this time adding another 15Y and 15M which resulted in knocking most of the Cyan cast out although the print (although it was still definitely a bit cold).
Sadly, it was at this point where I hit trouble. I had been using the university facilities at the same time someone else had started printing. The black and white developer (remember that?) had begun to affect their prints and as such, the darkroom technician came and shut down my little journey of discovery! Here is where I got up to:

My Conclusion
Despite its issues and my inability to arrive at a final print, I would call this test a success and the potential of this process I think is very exciting.
I certainly look forward to see the results you guys get if you choose to try this! Currently, I am working on getting my darkroom space set up again for printing and absolutely will be giving this a go once more as soon as possible.
Watch this space.
~ Jake
Share your knowledge, story or project
The transfer of knowledge across the film photography community is the heart of EMULSIVE. You can add your support by contributing your thoughts, work, experiences and ideas to inspire the hundreds of thousands of people who read these pages each month. Check out the submission guide here.
If you like what you’re reading you can also help this passion project by heading over to the EMULSIVE Patreon page and contributing as little as a dollar a month. There’s also print and apparel over at Society 6, currently showcasing over two dozen t-shirt designs and over a dozen unique photographs available for purchase.


4 responses to “Printing from slide film using RA-4 reversal processing”
How long do you turn on the light after the BW developer and stopper?
Very nice work! I did quite a bit of RA4 reversal and it can be very tricky to get good prints, it varies a lot from paper/film combination and the first developer you use. On the Photrio forum there is a very nice thread with all kinds of experiments and results, as well as instructions on how to modify chemistry. I experimented with Dektol and had good results. RA4 reversal is my favorite process!
for good Colors one need to learn Standard Printing at Standard temp. with all necessary tools. when experimenting and cannot change temperature. if not doing that one will struggle all the time. and lose lifetime.
Do you think a flash would work?