I got bit by the RA-4 reversal bug a few weeks back, diving deep into chemistry, filtration, processing, and rinsing (more on the rinsing a bit later). The RA-4 development process is used to produce a color print on (you guessed it) color paper in the darkroom.
In this article, I cover my RA-4 reversal process, the chemistry I used, and how I got to using it to create prints from slides and from colour darkroom paper I shot as paper negatives.
Jump to a section using these links or strap in and keep reading:
What is the RA-4 reversal process?
Making colour prints in the darkroom: welcome to RA-4 printing
The “normal” RA-4 process is used to produce colour prints from colour negative film. In the RA-4 reversal process, we use colour photographic paper to make pictures directly from a camera (i.e., as a paper negative) or when printing from slides.
Because this paper is meant to be used to print from colour negatives — which have a deep orange cast — we need to use a lot of filtration when adapting the paper for the reversal process. Essentially, we need to shift the colour of the print from blue back to normal (this is done using filters in the darkroom). Processing the paper also uses both traditional black and white AND RA-4 colour chemistry.
Let’s start with a quick word on the chemistry needed…
Chemistry 101
I live in Canada, and for some reason, RA-4 chemistry is expensive up here. I didn’t like the idea of mixing up a liter or two and having to use it quickly before it degraded and then, one day as I was skulking around the local camera store, I noticed a bottle of CD-3 (made by flicfilm) in the chemical cabinet.
CD-3 is a key component of RA-4 chemistry, so I got it and set about getting the other constituent chemicals needed to mix my own:
- A few drops of triethanolamine (2ml)
- Some potassium carbonate (washing soda-13g)
- A pinch of salt (.17g)
- Sodium sulfite (.33g)
- Plus some CD-3 (1.67g)
…makes 333ml of developer–enough to develop about 15 sheets of 4×5 sheets of colour darkroom paper. Cost: 80 cents.
Of course, all of the bulk chemicals cost $65, but will make around 20 liters of developer! Once mixed up, the chemistry only lasts for a day or so, but the dry chemicals will last a long time (years?), and I can make as little or as much as I like as and when I need it.


Getting rid of the silver: bleach and fix
For blix (bleach and fixer), I took the easy way out by getting Kodak RA-4 blix 2-part concentrate from that same camera store. Apparently, blix is basically fixer (ammonium thiosulfate — part A) and bleach (ferric ammonium EDTA — part B) which removes both developed and undeveloped silver halide from the print leaving just the dyes on the paper.
Ferric ammonium EDTA is not easy to find, so one of my projects is to find a substitute so I can make my own blix. Cost: 83 cents to make 250ml. Once mixed, it seems to last a couple of weeks at least. Substitute bleaches can be used, such as potassium ferricyanide, or iron EDTA, but then bleaching would have to be a separate step from fixing and would take significantly longer to do.
Getting rid of the “blues”
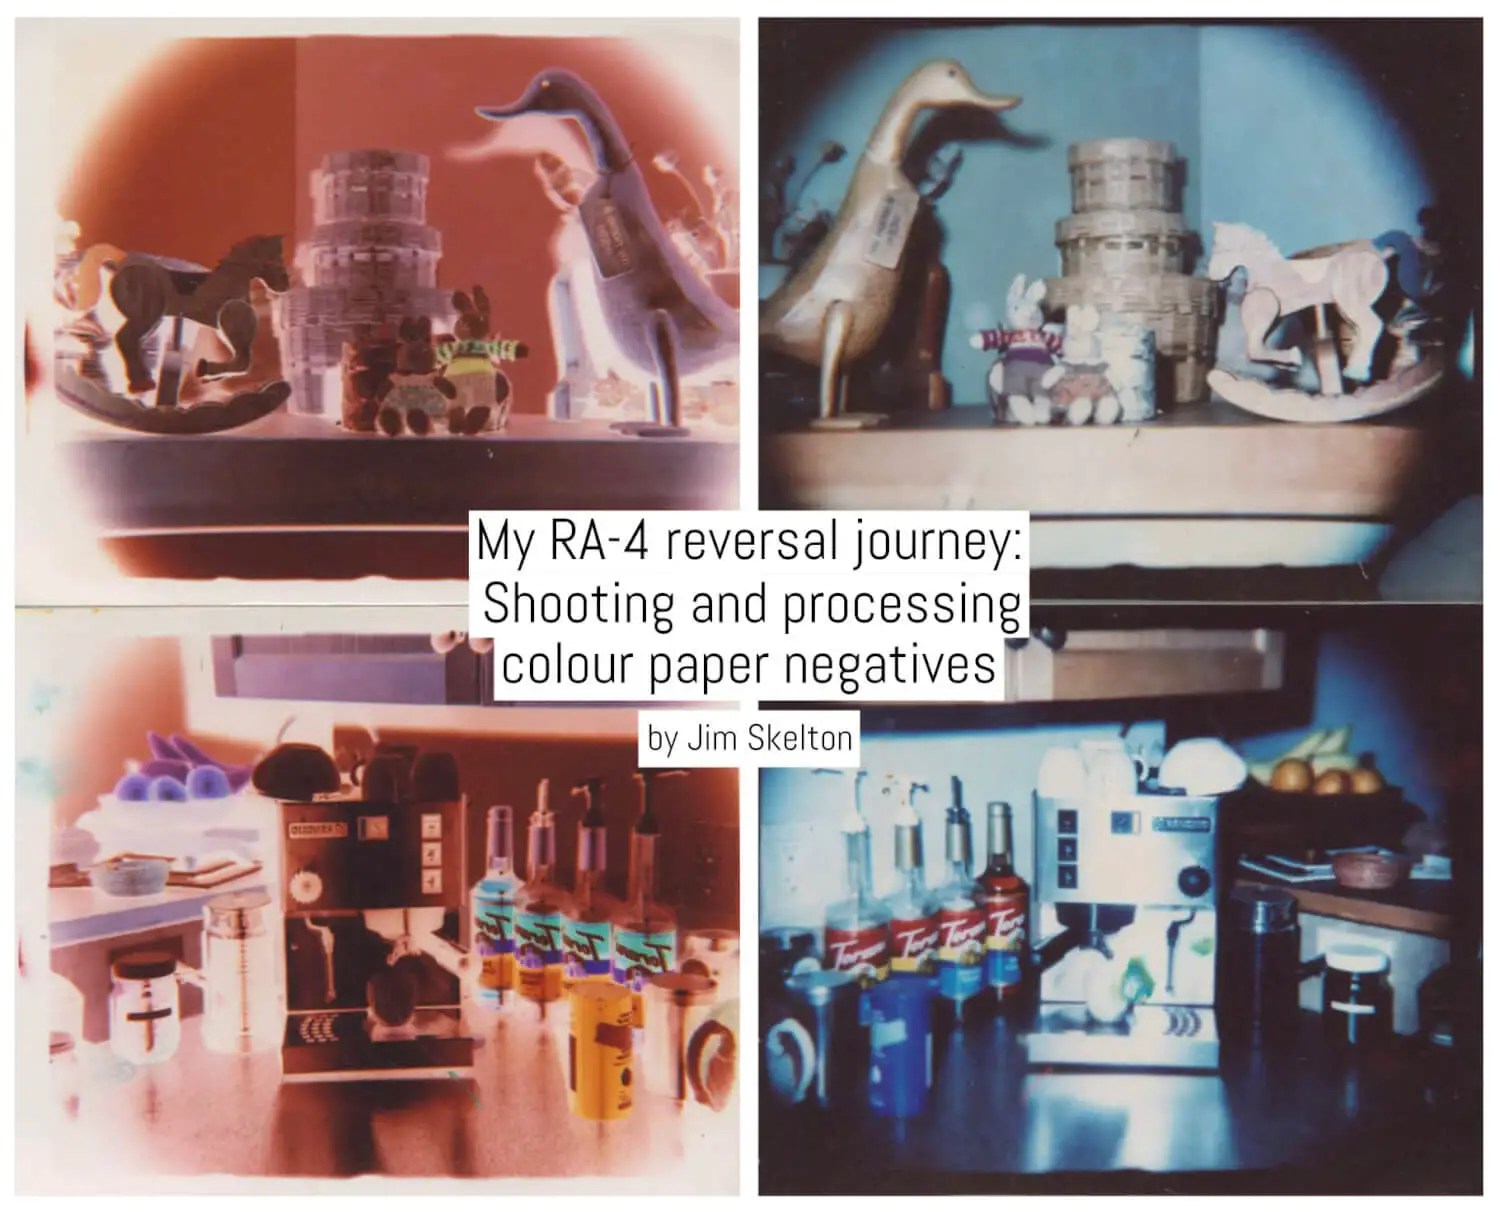
Typical colour darkroom paper like the Fujifilm Crystal Archive paper I’ve used to date has a blue tone to offset the deep orange cast when printing from color negatives. Since I’m not printing from negatives, most of my results had a blue cast to them until I used a pretty heavy filter pack with mostly yellow and some magenta to counter the affect.
For indoor photos under 3200K incandescent light, I used a standard yellow filter with some magenta (M40) and yellow (M50) filters from an old colour enlarger (below).


Outdoors required another dose of yellow (add an 85B filter to the previous mix) in direct sunlight with no clouds. Cloudy days need even more yellow, and cloudy snowy days in the winter? Keep stacking those filters!
Still, colour filtration is tricky, and some colour cast seemed to end up in the result. Adding to that, the filtration ate up around 2-stops of exposure.
This isn’t a technical outline and is meant to illustrate the point that using enlarger filters to filter out this tone is not easy.
Going where colour paper wasn’t designed to go
Processing was straightforward. For reversals, the paper is first developed in B&W paper developer for 2 minutes, then given a stop bath. Apparently, developing in B&W developer prevents any of the dye couplers associated with the exposed silver halides from getting developed in the next step.
To help, I wound up with an old Cibachrome processing drum, and that works great for the B&W developing step, though this step can be done in a tray in the dark. A quick rinse to remove any acid then turn the lights on to fog the paper. The negative looks faint but dense.

Next step: a minute in the colour developer (at 95F/35C) develops any dyes associated with previously unexposed, but now fogged silver halides, effectively reversing the exposure and producing a positive print.
This is the magical part of the process and never seems to get old. Seeing the colour print transform out of a faint negative image is always a delight to observe, after which, 2 minutes in the blix to remove all the silver and the picture brightens and rises in contrast.
Take a look at this magic:
Pre-rinsing: an unexpected discovery
I found out about this when I was cutting an 8×10 sheet of paper into 4x5s in the dark and erroneously cut one sheet into 4x4s, leaving a 1″ strip. When I turned the lights on, I was surprised to see that the paper had a cyan/blue cast to it. Could this be how it compensates for the deep orange negative mask?? Surely this cast didn’t stay on the paper otherwise, the resulting photo would appear low contrast and blue. I quickly tried rinsing the paper and found the blue cast rinsed off easily!
Ok, so you can rinse the blue cast off of Fuji colour paper. What’s the big deal? That would be higher ISO and less filtration. Using an indoor filter pack, I was working with ISO 1.5. Using a Polaroid camera and powerful M3 flashbulbs, the maximum distance from the subject was only 3 feet. If the blue cast was removed from the paper and filtration tossed aside, it would be like removing 3x neutral density from the process.
I rinsed some 4×5 pieces of paper and dried them in a dark box, then took a picture under incandescent light using ISO 12. The picture came out exposed and colour balanced perfectly! Without the blue cast, Fujifilm Crystal Archive paper seems to be balanced for 3200K.


So I made up a drying rack that fit into the dark box and washed a few 8×10 sheets of Fuji paper in the bathtub in the dark. I squeegeed the sheets, dabbed them with a lint-free cloth and, dried them for a couple of hours then cut them into 4×5’s. It does get easier to fumble around in the dark after a little practice!

Creating a dedicated camera: A sort-of instant Big Shot?


All this got me working on a dedicated Polaroid portrait camera — kind of like the Big Shot — which I could use just to take portraits. My plan was to use M3 clear flash bulbs without the typical blue filter over the reflector. I found out that these bulbs have a colour temperature of around 4200K, which is corrected by around a Y40 filter.
I got a Polaroid 2.2X teleconverter and made an adapter for it to make it fit onto the Polaroid, which was converted to 4×5 so that I’d be working more with a portrait focal length, then removed the blue flashbulb cover from the flash unit. I figured that bare M3 bulbs would have a guide number of around 65 at ISO 10, allowing me to take pictures up to 8 feet away on the Polaroid camera (a big improvement over 3 feet!) I hardwired the shutter to always shoot at 1/30 and fine-tuned the rangefinder to focus correctly.


Setting the camera to f/12.5 allowed me to shoot at 5 feet, which is a good distance for portraits on 4×5 with a 240mm lens. The pictures aren’t very instant. It takes around 6 minutes to develop, but halfway through, there’s a “wow” moment when the subject can see their mug (face) appear out of a very blah negative, so this process provides a bit of entertainment as well.
Get Outdoors
Outdoor filtration with rinsed paper is still a bit tricky since the colour temperature can change a lot. I’m still experimenting with the best filter pack, and so far, I’ve come up with using an 85b filter with around a 50 yellow and 40 magenta on a sunny day (5400K) using ISO 5. Cloudy days (6000K) require more yellow filtration, and for some reason, snowy days even more.

Cibachrome 2.0?
After reading this article about making prints from slides using the RA-4 reversal process, I dug out some old Kodak Ektachrome slides and set to work. It was surprisingly easy to get a good result with rinsed paper, using just slight Y25 filtration. I found it faster and easier to pre-rinse the paper for around a minute in the wash tray just before exposing it. A quick squeegee removes most of the water before laying it down on the easel, and a quick wipe with a cloth removed the water left behind.


The rinsed paper has a really fast ISO, so I had to set my enlarger bulb to the dim setting to get exposure times up to 5-10 seconds using f/16. It’s a little confusing at first to evaluate the test strips since it’s a reversal: Darker means less time, and lighter means more.
I suppose that makes sense, but it’s the opposite from printing normally from a negative. I was surprised by how good the colours and contrast on the prints looked.
Paper negatives
The last experiment was taking pictures at ISO 12 using rinsed paper as the negative. Developing was done using colour developer in a tray in the dark, which only took a minute to do. After the stop bath, I put it in the blix and turned on the lights. This process is twice as fast as reversals since there is no B&W developing step.
I found the negative interesting since it’s on white paper instead of film stock which typically has an orange cast. Much more control over exposure and colour could be obtained when contact printing with the enlarger colour head, and of course, I can make multiple copies of the negative.


I tried some contact prints from these negatives using rinsed paper and the results were OK. The picture wasn’t as sharp as a direct positive, but the potential here is making more than one print of the negative. I even tried enlarging the paper negative. The result was a little fuzzy, and I’d need to fiddle with the filtration to get rid of the pinkish cast, but it was fun seeing the potential.
Wrapping up
It all started with a bottle of CD-3. I pretty much figured I wouldn’t ever get into colour photography in this manner because it’s too expensive and finicky, and it’s hard getting the colours right. But that bottle of CD-3 inspired me to pursue the chemistry, then the process.
It can be done economically (a little bit more than B&W), and is quite usable when the paper is rinsed. It also brings me closer to realizing instant photos on a pack camera, and I’m still pursuing how I can make it easy to shoot colour instant pictures on a Polaroid camera. I’ll never achieve “pictures in about a minute,” but maybe I can come close.
Thanks for following along with my adventures!
~ Jim
Share your knowledge, story or project
The transfer of knowledge across the film photography community is the heart of EMULSIVE. You can add your support by contributing your thoughts, work, experiences and ideas to inspire the hundreds of thousands of people who read these pages each month. Check out the submission guide here.
If you like what you’re reading you can also help this passion project by heading over to the EMULSIVE Patreon page and contributing as little as a dollar a month. There’s also print and apparel over at Society 6, currently showcasing over two dozen t-shirt designs and over a dozen unique photographs available for purchase.


7 responses to “My RA-4 reversal journey: Shooting and processing colour paper negatives”
Yoooo! This is mindblowing with the wash away filter!! what a find!
Love this article, Jim and all the technical tips you provided. Great and unique results too!
Great article, very innovative. While there are several who have tried RA4 reversal, I havent ready about the idea of rinsing the paper before exposure to make it more balanced. It really increases the potential of the process.
Also a good idea to use flashbulbs for exposure, since they are warmer than electronic flash and also quite powerful.
Now if I could find a way of loading paper negatives in old polaroid pack film cartridges, it would be of great use to me.
Hopefully the next article will be on making film holders for Polaroid cameras, which makes shooting paper negatives much easier…
Jim, normally film and paper reversal requires a bleach after the b&w developer before re exposing. you did not mention that here. I just wanted to confirm you did NOT do that. makes this even easier why that step.
thanks
Mike
Yes, that is how b&w reversals work, with bleach following the b&w development, fogging, then developing what hasn’t been developed.
But colour works differently. I suppose bleach could be used after the b&w development, but it’s unnecessary since the development that happens after fogging doesn’t develop what has already been developed with the b&w developer.
Hi, just setting up for first color enlargement this week and would like to try reversal as well, one thing that I am not clear about, after bnw development how long do I expose to light? Or everything happens with the light on in a tray after bnw development?
Thank you,
Tiberiu