Probably the most awkward aspect of developing films at home is getting your exposed film onto a reel and into a developing tank. It can be quite a fiddly process and, on top of that, it has to be done in complete darkness, so you can’t even see what you are doing.
You can develop black and white, colour, or slide film at home, you just need the right chemicals for each particular film type. Whichever you are doing, loading the film into a developing reel is exactly the same process.
This short tutorial aims to guide you through that process and also offers a top tip that is pretty much guaranteed to make loading your film a hassle-free process.
There are many different types of film development tanks and reels but I have always used Paterson equipment and so this tutorial relates to that. Fortunately, these are very popular so you should have no problem picking up something second-hand from a car-boot sale or the internet. And if you can’t don’t worry, Paterson is still very much in business and you can buy equipment or spares from their online shop.
What you need

So you have a roll of 35mm or medium format film, you’ve bought some chemicals and you want to develop it at home. Here’s what you’ll need:
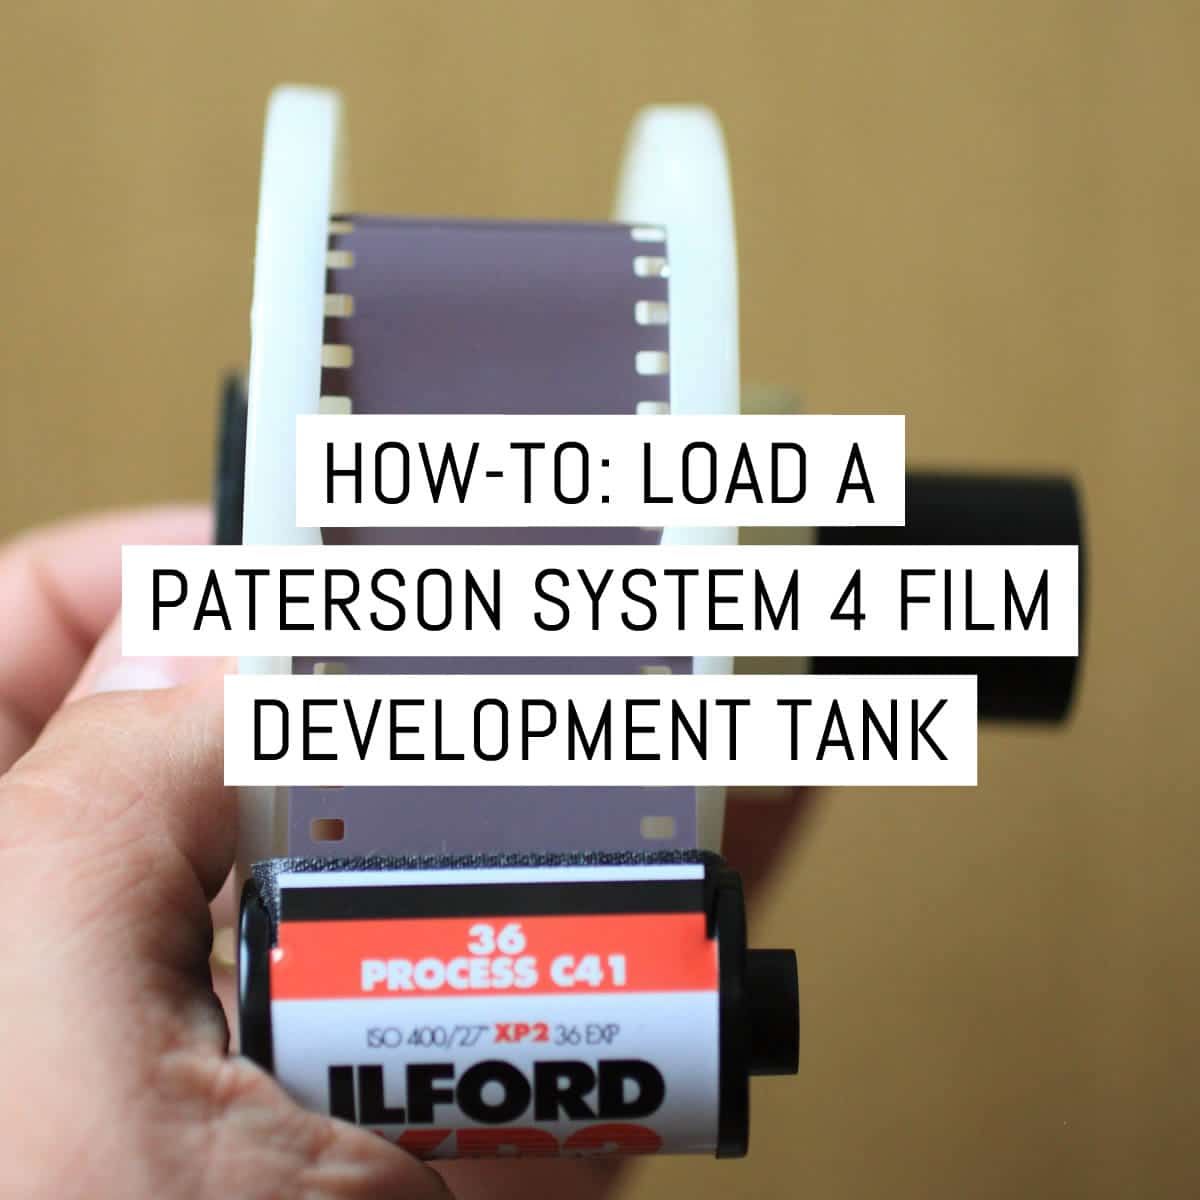
A Paterson Tank: Mine is an older System 4 tank, but the technique for the newer Super System 4 tanks is exactly the same.
Auto-load reels: The reels come in two halves which snap together. There are guide rails for 35mm, 120 medium format and 127 film. Just twist and snap the halves into place for the type of film you have. You can develop one medium format or two 35mm films in a standard tank, although Paterson sells multi-reel tanks capable of taking up to eight 35mm films at a time. Even if you only plan to develop one 35 mm film in the tank it is worth putting an empty reel on top so that the film does not slide up and down the column when you are inverting the tank during processing. Hold the reel in your left hand and notice how you can rotate the right-hand side in relation to the left. You use this action to pull the film onto the reel.
Column: The reels slide onto the column and it sits in the centre of the tank.
Column clip: If you only have one reel in the tank it is worth holding it in place with a column clip so that the reel does not slide up and down the column when you are inverting.
A bottle opener or film leader retriever: If you are using a more modern film camera, chances are that it rewinds the film all the way into the canister. In which case you have to get the film out. Either use a bottle opener to flip off the top like a bottle of beer (but only do this in the dark) or you can use a film leader retriever in daylight. I use the bottle open as I cannot get the film retriever to work. You’ve either got the knack or you haven’t!
Scissors: To cut the film from its spool and to remove the leader. Not to worry if you forget this, film can be torn with your fingers accurately enough.
Darkroom or changing bag: the whole process must be done in complete darkness. If you’ve seen a red light being used in darkrooms that is only for black and white printing. No light must get to your film whilst you are developing it. In fact, if you are using true infrared film, you should also load and unload the camera in complete darkness. So if you have access to a darkroom use that (but I would put all the equipment in a shallow-sided tray before you switch the lights out to ensure stuff doesn’t roll around too much). Or you can buy a changing bag. This is a double-skinned black bag that has two armholes. You open the zip(s). Place your items inside, close the zip(s), put your arms in and you’re good to go. The room does not have to be dark but I would still avoid bright lights. I’ve been using one for years and have never had a problem with light leaks.
A hairdryer (optional): so you’re in the dark, your film has jammed on the reel, it’s buckling as you try to load it further on and you don’t know what to do. Help! Avoid this by remembering my top tip for loading film: make sure that the tanks – and especially the reels – are bone dry before you try and load a film. Dry everything before use and run the reels under a hairdryer to get rid of any microscopic specks of water. Water is the enemy of loading film; it causes friction and makes the film jam. I dry my reels every time and 99% of the time I have no issues loading film.
Getting Started
Take a look at the reel and you will notice two fluted groves (highlighted in red below), followed by a pair of ball bearings, one on each side. The ball bearings allow you to ratchet a 35mm film onto the auto reels using the film sprocket holes. 120 film doesn’t have sprocket holes but the entry point is still the same and 120 film still ratchets on just fine.
The examples below deal with loading 35mm film although I provide notes for 120 below.

I place the reel I am going to be working with on the column with the ball bearings towards me when the column is sticking out on the right. This means that I know which way round things are in the dark.
35mm film: If your film leader is out
If you do know how to use the film retriever, or have an older camera that lets you leave the film leader out, then cut off the leader and just cut off the sharp corners at the leading edge of the film – this will help prevent snags.

Keep the leader as you can use this to test your fixer.
Place a couple of inches of film on the spool but not so much that you start to re-expose your film. Place all your tank items in the changing bag or switch the lights off in your darkroom.
35mm film: If your film leader is in the canister / If you’re loading 120 film
If your film leader is inside the canister place it, your tank parts (tank, lid, column, scissors and bottle opener) into the dark bag. Close it up and put your arms in; you are now working blind.

Inside the bag use the bottle opener to prise open the top or bottom cap of the film canister and pull the film out. Take hold of the leader and cut it off with the scissors. Trim the leading corners to help prevent the film from jamming in the reel. Insert the film into the reel (this is where knowing which way around it is can be helpful).
If you are loading 120 film, tear the tape binding the roll together and unwind the backing paper. When you feel the film, let it roll up on itself until you get to the tape that sticks the film to the paper – peel off the paper and then slowly peel off the tape.
Loading the film all the way on to the reel
You should now have the film, tank and your arms in a closed changing bag and the film leader should be on the reel.
Hold the left spiral of the reel in your left hand and, using your right hand rotate the right-hand spiral of the reel towards you and then away from you. You will feel the film ratcheting onto the reel. Now, the film is tightly curled, so I tend to place my small finger against the curled film and this helps straighten it before it is fed onto the reel.
Continue your ratcheting motion this until the entire film is on the reel. This is the most difficult stage as film can catch and start to buckle inside the reel. Your heart will sink when this happens, as you struggle to avoid tearing or creasing your film.
You can largely avoid this situation completely by making sure everything is bone dry and clean before it goes into the changing bag.
If you do feel some resistance to loading just gently flex the spirals apart as you load it. That extra millimeter of space you create should prevent jamming. You can also try shortening your ratcheting motion or putting your palms flat on each side of the reel to apply even pressure. Even a combination of all three.
It’s worth bearing in mind that films with a thinner base will give you more problems, especially as the inside of the bag starts heating up.
If you are loading 120 film, you can keep ratcheting the film on until your leader (actually the end of the roll), hits the inside of the reel’s spiral. If you’re feeling adventurous, Paterson reels are capable of holding two rolls of 120 film on a single reel. Give it a shot but remember to increase the amount of chemistry you use to ensure there’s enough developer for the extra film!
If you’re loading 35mm film, you’ll eventually get to the end of the film. You can cut/tear it off at the cartridge or spool. It’s worth remembering that if you leave about 1cm of film on the cartridge, you can use it to bulk load film – useful if it’s DX-coded.
If you have a second empty reel place it on the column, or use the column clip. This helps prevent the reel with film on from sliding around when you invert for agitation.


Place the reel(s) in the tank column base-first. Place the white ring into the lip of the tank and then place the lid on. Rotate it anti-clockwise until it drops into the start of the screw thread and then rotate it clockwise to screw it on.
Feel around the bottom of the lid and ensure it is on square. If it doesn’t feel level then take the top off and screw it down again
Your film is now in a light-tight container.
You can now open the bag (in daylight) and take the plastic cap off the tank. You are ready to start pouring in chemicals.
And that is it.
Conclusions
Loading film at home is not a difficult task and becomes very easy with some practice. Make sure you have all the bits, use a darkroom or a changing bag and away you go. But just one last time: dry your reels with a hairdryer before you load your film!
~ Malcolm
Share your knowledge, story or project
The transfer of knowledge across the film photography community is the heart of EMULSIVE. You can add your support by contributing your thoughts, work, experiences and ideas to inspire the hundreds of thousands of people who read these pages each month. Check out the submission guide here.
If you like what you’re reading you can also help this passion project by heading over to the EMULSIVE Patreon page and contributing as little as a dollar a month. There’s also print and apparel over at Society 6, currently showcasing over two dozen t-shirt designs and over a dozen unique photographs available for purchase.


15 responses to “How-to: Load a Paterson System 4 film development tank”
Saw this coming after all the talk of burping.
First and most important tip:
Practice, practice, practice with a dummy roll with closed eyes, but with the ability to open them and see what could possibly have gone wrong now!
Don’t bother with a dark bag. They are hell on earth.
Arrange for a sealed room. It is always possible to get a room sealed off somewhere in your vicinity.
Alternatively get up at night in the weekend and do the loading in the bathroom. Then wait until morning for the actual development.
A tiny light leak that you only detect after your eyes are dark adapted, are not catastrophic, even with fast film. Film is not very sensitive to incident light.
No need to crack open and remove the 135 canister. It’s a nice counterweight that will keep your film straight and not go sideways in a spiral. Keep to finger over it, to not have it catch all the way up to the spiral winder.
Trim the sides of the tip of the leader to 45 degrees, to make it not catch with a sharp edge.
Separating the backing paper from film with 120 can be a bit confusing at first and is the hardest part to practice (you only get one go per roll) unravel the whole roll while standing in the dark. Hold it by the edges as far as possible. Find the end where it is glued to the paper. Rip them apart and load the opposite end without glue residue.
That way the glued end won’t get in the way in the spiral.
When feeling more confident later, cut off the glue end, though I’m sure it’s special glue the won’t affect developer, residue could float around and sit on the film, inhibiting development.
You’ll be scared that you’ll load the paper instead of the roll, but try creasing the end and you’ll feel a marked difference between thick plastic and plasticky but thin paper.
I’m going to try a hair dryer next time. Thanks for the tip.
@PatersonPhoto https://t.co/JLZXgyxcAd
And here is one loading 120 into those dam reels.*
*actual video of me attempting to load 120 film https://t.co/2heaQvwjGs
Here’s another great tip to make loading 35mm film onto an automatic reel like the Paterson.
Rather than starting from scratch with all the film still in the cassette in complete darkness, thread the film onto the reel just past the gripping pawls BEFORE you go dark…it would look similar to the last picture in your article with the trimmed leader onto the reel and the cassette close to the reel (obviously, you need to have the leader out and trimmed first.) Those first few inches of film are blank anyway.
Also, rather than removing all the film from the cassette at one time, slowly pull out a few inches at a time and load until the cassette is again close to the reel, then repeat until the entire roll is loaded. This prevents a rolled up mess when trying to load your reel.
IMO, it’s worth becoming proficient with a film leader retriever so you can use this process. I reuse factory cassettes to reload bulk film, so in my case, using an opener to pop off the tops isn’t an option I’d choose.
On a second subject. I use a sectioned off part of my garage as a darkroom. Whilst I can work happily if I remember to use the LED lights I have set up I have to constantly remind myself not to turn on the overhead strip lights. When we turn off fluorescent lights everything will normally appear dark but wait for 10 minutes for your eyes to adjust and you will find the lights glowing. That is how they work; they give out light by phosphorescence! That light will be there immediately the lights are turned out and could cause a film to fog, we normally don’t see it until our eyes adjust. This applies also to the old CRT computer screens and the low energy neon style bulbs. Some bathrooms have similar technology ring lights. If I have been working in my garage during the day using the lights I wait at least four hours before using my darkroom section.
Thanks for both your tips Stephen. I will definitely try your film retriever method!
Adding to Malcolm’s comments about using a leader retriever. I used to have big problems but I have now found a way that reduces my frustration. I load part one of the retriever (the straight part) and then just locate part two (the curly bit) under the rim of the cannister. Then I hold the cannister close to my ear and slowly rotate the spindle anti clockwise until I hear a faint click. I then push part two fully home and extract. I can normally get the film out in 2 or 3 attempts. You must rotate the spindle very slowly otherwise the end of the film will be two far away the the curved part of the retriever to catch it; and it is a very quiet click you will hear.
Thank you to all of you for your comments, glad you liked the tutorial! Some useful tips there!
Great article for those starting on developing their film on their own.
The first time for me was with 2 different film types – 2 rolls of HP5+ and 1 roll of JCH. The 2 Ilford rolls were easy to load, and got through developing easily and confidently. The base of the JCH roll was thinner than the Ilford, and i soon experienced binding while loading onto the reel. I kept winding the film back into the cannister 3 times in a row when i got stuck, and nearly gave up. I decided to cut the film halfway when it started to bind again on my forth try, and load the remaining onto another reel. After developing and scanning, i saw lots of scratches and binding marks on the film.
Nowadays i use Ilford HP5+ and Delta 400 mostly, but i have 2 more rolls of the JCH and will definitely try them again following your tips. Fingers crossed!
Thanks for this. Very well explained and well illustrated. Maybe some day soon I’ll get round to trying some home developing.
I use a dark room (bathroom) with no windows. I load the film on the reel (35mm) with the lights on just far enough to get started and then turn the lights out for the remainder. Most cameras leave about a foot of blank film in the begining so loading with the lights on is no problem however disposable cameras and some older cameras this may not be the case and your loose your fist image if you pull too much film out, so be careful.
With 120 you can’t load any part with the lights on so memorize the reel and this makes it easier to load.
Good call on explaining the importance of dry reels. I’ve seen many people go nuts because their film is binding on the reel and have no idea why. Great write up!
Another tip to make loading the film onto the reel easier, especially if your reel has been in Photoflo, and even if it is dry, work around the grooves of the reel with a pencil, it acts as a lubricant and the film will load easier. Also, don’t load film during a hot day, it gets hot enough in the bag as it is, if you start sweating it can get a lot harder and frustrating, wait until it’s cooler in the evening.