Due to the current pandemic situation and resultant lock-down rules, I’ve decided now would be a good time to learn how to develop film at home. Since I got back into shooting film a few years ago, the thought of developing my own photos at home has crossed my mind on more than one occasion. I’ve usually pushed these thoughts to one side though, partly because I’m happy with the service and results I get from my local lab, and partly because of concerns that I would ruin rolls of otherwise nice photographs with my oaf-like clumsiness.
However, things have now changed. My local lab is currently closed due to the coronavirus lock-down (although the lab I use for colour stuff is still open for mail-order processing) which means I would either need to sit on any rolls of black and white film I manage to shoot during the pandemic (likely to be reduced from normal due to the limits on where I can roam) until they re-open or, to take the plunge and try to self-develop my film at home.

Because I don’t know how long the lockdown is likely to last (at least 8 weeks is my current estimate though), and because I like to try and keep a flow of fresh images coming for my blog, I decided to give home developing a go. The film was ILFORD HP5 PLUS and was shot on my Minolta SRT 101b using an MD Rokkor 50mm f/1.7. I developed the film in ILFORD ILFOTEC DD-X for 9 minutes at 20°C. All photos were taken in late March / Early April 2020.
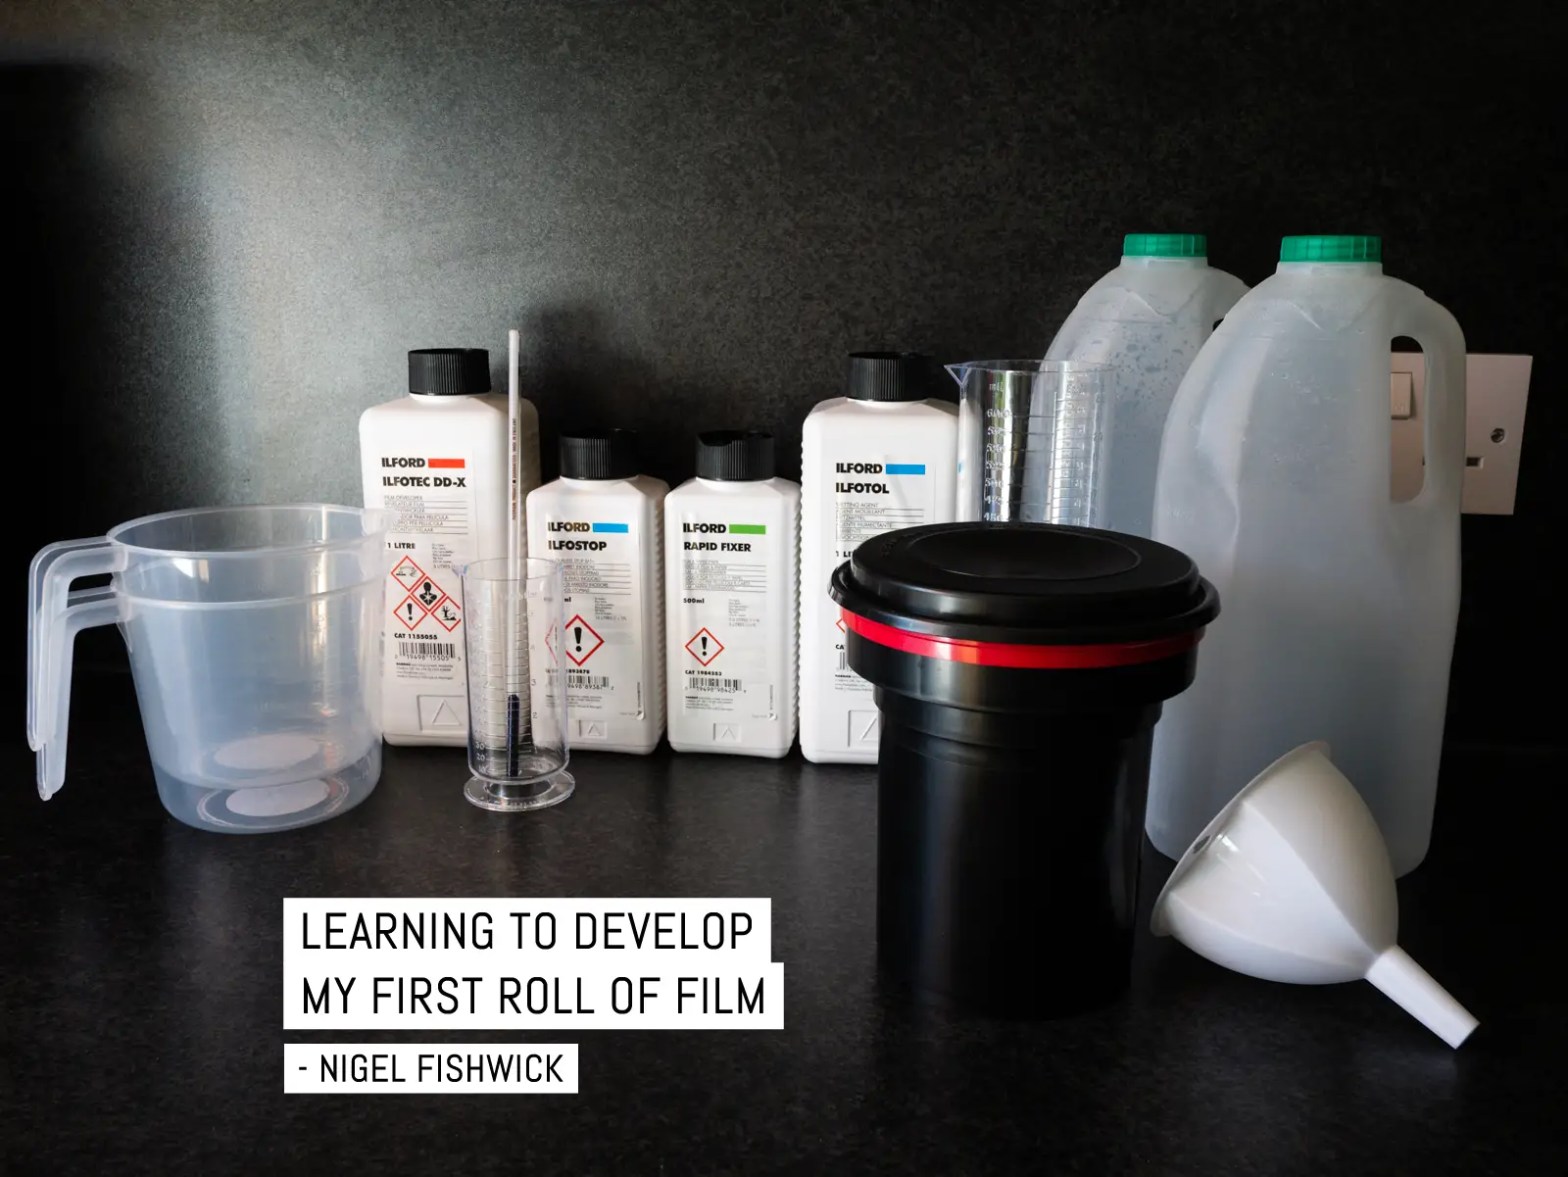
While developing my own film should prove cost-effective in the longer term because I’ve had to buy most of the chems and equipment to get me started, it’s been a significant investment – I could have had a dozen or more rolls lab-processed at least for the outlay – so I’m keen to make it work.
I decided to go for ILFORD chemicals for my first foray: stop-bath; fixer; wetting agent; and developer – I chose ILFOTEC DD-X. The DD-X was quite low-cost for the bottle and I was keen to keep my initial outlay down as much as possible. DD-X is supposed to be a very good developer, but it’s probably not the most economical to use – while the 1L bottle was much cheaper than something like Kodak HC-110, it will also develop far fewer rolls.
Once I’d acquired all the equipment and chemicals, it was then just a case of finishing off a roll of film. As my movements are much restricted due to the UK lockdown, most of the photos on the roll are from around the house, or pictures I’ve been able to take while out for a walk to get to exercise and fresh air.

I decided that it would be a good idea to practice things as much as possible before having a go with my “live” roll of film, so I used a roll of Agfa Vista Plus that I use to test cameras sometimes. The roll has been exposed to light when a camera back was opened at some point, so it could be safely sacrificed.
My first tests were in daylight, extracting the film onto the spiral from the canister itself (without removing the cap and taking the film out altogether). After understanding the process, I then attempted it again inside the changing bag. This was trickier and a few attempts failed, but after a while I was successful. Then, given that the roll of film I would be developing for real had had its leader completely retracted into the canister (I tried to retrieve it but without success), I had a further attempt inside the changing bag, this time opening the canister with a can opener and loading it onto the spirals while loose. This was trickier as my efforts again failed on the first two attempts, by which time the film had become a twisty un-spooled mess inside the bag. I forced myself to persevere though as, when it came to my proper roll of film, removing my arms from the changing bag wouldn’t be an option. After a while, I loaded it ok. Practising in this way was a valuable experience and I’m really glad I did it.

The next day, it was time to do it for real. I double and triple-checked that I had everything I needed and then carefully placed everything into the changing bag: The developing tank, lid and spiral; the film; a pair of scissors to cut off the leader and chamfer the corners; and a small bottle opener to crack open the film canister.
I soon ran into a problem when I found that the bottle opener was failing to open the canister. In my test, I’d used a larger bottle-opener (a corkscrew) but had thought the smaller one would be easier to handle in the changing bag. Now I was in a situation where the canister was still sealed, but might be in a condition that made it no longer light-tight. In order to prevent any light-leaks, I placed the still closed canister in the bottom of the developing tank and fitted the light-tight funnel. This allowed me to safely remove my arms and go and get the corkscrew. Because the corkscrew has a pointy end that might conceivably piece the changing bag if I wasn’t careful, I taped the sharp bit up with some masking tape before putting it in the changing bag. Once that was done I was able to take the film canister back out of the tank and this time remove the cap successfully.

The next job was to cut off the leader and chamfer the edges to allow easier attachment to the spiral. Making a neat cut across the film and then taking off small triangles from each corner is tricky when you can’t see what you’re doing and I was a little concerned about taking a piece of my finger-tip off in the process! Thankfully this didn’t happen though and I was now ready to attach the film to the spiral.
Attaching the film was straightforward and I began winding it on. And winding. And winding. And wind… Something had gone amiss. I now had to take the spiral apart in the bag, take off the section of film already wound on, and start again. As with my earlier practice runs, the film was now forming into a big coiled heap in the bag, making this more difficult than before.

The same thing happened again on the second attempt, winding on for a while but then stopping, requiring the spiral to be opened and the film removed once more. Thankfully, the third attempt worked ok, which was a big relief. The only issue was right at the end of the roll where the film popped out of the tracks, but I was able to gently re-afix with my thumbs it and, after cutting off the reel, winding it the rest of the way onto the spiral. I then inserted the centre column onto the reel and placed everything into the tank and fitted the lid, making everything light-tight. I was certainly glad that this part was done!
Now the film was safely in the tank I decided to take a break before starting the actual developing process. Plus I wanted to give everyone a chance to use the bathroom before I barred them from entry when it was time to dry the negatives when they were ready.

I got everything that I needed for the developing out on the work-surface in the utility room, neatly arranged in a logical order. I filled two clean 2-litre milk bottles with water at the correct temperature, thinking it would be easier to keep it at 20 degrees in easily accessible bottles rather than mixing it from the hot and cold taps. I used this water to mix up my developer, stop-bath, and fixer and arranged their jugs in left-to-right order. Also to hand was a clean cloth to mop up any spillages and my phone with the Massive Dev Chart app open and ready. I decided to go with the timings recommended by the app (although these are different to those given on the ILFORD HP5 PLUS data sheet – MDC states a full minute of agitation, followed by 10 seconds at the start of each minute thereafter, whereas ILFORD state 10 seconds at the start of each minute). Everything in place, it was now time to begin…
I poured in the stop-bath first!
Yep, that’s right. I fell at the first hurdle. I put this down to nerves. Kick myself! Doh! Massive facepalm!!! etc.
Cursing my stupidity I quickly poured the stop-bath back out. While my experience is limited, I was fairly confident that stop-bath wouldn’t have too detrimental an effect on the undeveloped film. Thankfully I had loads of water in the two bottles I’d filled earlier, so I rinsed the film in the tank several times until I was confident that I’d washed away the stop-bath. Then, after making a fresh batch of stop-bath, I started again.

This time I poured in the developer first! Clicking start on the MDC app, I began the agitation cycle. I’d decided to wear a pair of plastic gloves during the whole process to avoid getting chems on my skin and, while I’m not sure if it was water or something else on the sides of the tank after the previous mishap, it was quite wet so I was glad to be wearing them. I think I might have been a little too vigorous on the first few inversions, sloshing the tank about a little too much before catching myself and adopting more of a tumbling method throughout the rest of the sequence. After nine minutes I poured out the developer and added the stop-bath (again!), then the fixer for the final stage.
I used ILFORD’s method for washing the negatives: 5 inversions, then empty the tank; 10 inversions, then empty, 20 inversions, then empty (although I also added 15 and 25 inversions stages for good measure). After this I opened the tank, added some fresh water and a few drops of the wetting agent before carrying the tank back to the bathroom to hang the film to dry. At this stage, I still didn’t know if things had worked (or if my stop-bath mishap might have ruined things somehow), so now came the moment of truth as I took out the spiral and saw the results for the first time.

I had negatives!
And they looked to be ok! Being slightly paranoid about getting dust stuck all over the wet negatives, I quickly hung them up inside the shower cubicle, closed the door, and left them to dry for a few hours (although I did crack the door ajar to show off the product of my endeavours to my somewhat uninterested wife and kids). 🙂
When I came to take them down later I was able to get my first proper look at the results. The negatives looked perhaps slightly dense, but nothing over-the-top and had, to my slight dismay, a water mark on many of the frames where it looked like a drip of water had flowed down them during drying. My mistake here was that I didn’t shake off any excess water when I hung them up. Something to remember next time. The negatives had a slight curl, though nothing extreme, and this actually aided me when cutting them into strips for filing. The curl meant they lay on their edge on the desk, so I could cut them without scratching the surface (or attracting any stray dust).

The next step was to scan some frames on my Plustek and see how they looked. I was worried that the drying marks might show on the scans, but was relieved to find that it was only really visible on a single frame – one with a large area of otherwise blank sky – and even that would be easy to remove in Photoshop should I want to. While I didn’t want the drying marks and will take steps to try and avoid them in future, on this occasion they didn’t really cause any issues.
The resulting scans look pretty nice. I’ve had to tweak them a little to get them how I like them – the roll has come out a little bright, something I think is probably down to my agitation technique during development rather than the metering, but nothing too severe and easily fixed during the scanning and post-processing stage. The grain on the negatives is pretty subdued too, possibly more so than those I get back from my local lab (which are processed in Xtol), which is nice – I really don’t mind grain, but some of these photos are especially sharp-looking as a result (though some of that is down to the Rokkor 50mm f/1.7 lens, which I’ve found to be an excellent performer).


On the whole, while it would be hard to say I enjoyed the slightly stressful experience of developing film for the first time, I was very pleased with the results. I think the stress levels will be much lower next time I do this though and am looking forward to my next attempt.
If you’ve not developed your own film before and are thinking of giving it a try, then go for it. If I can manage it (and recover from mistakes to boot) then anyone can!
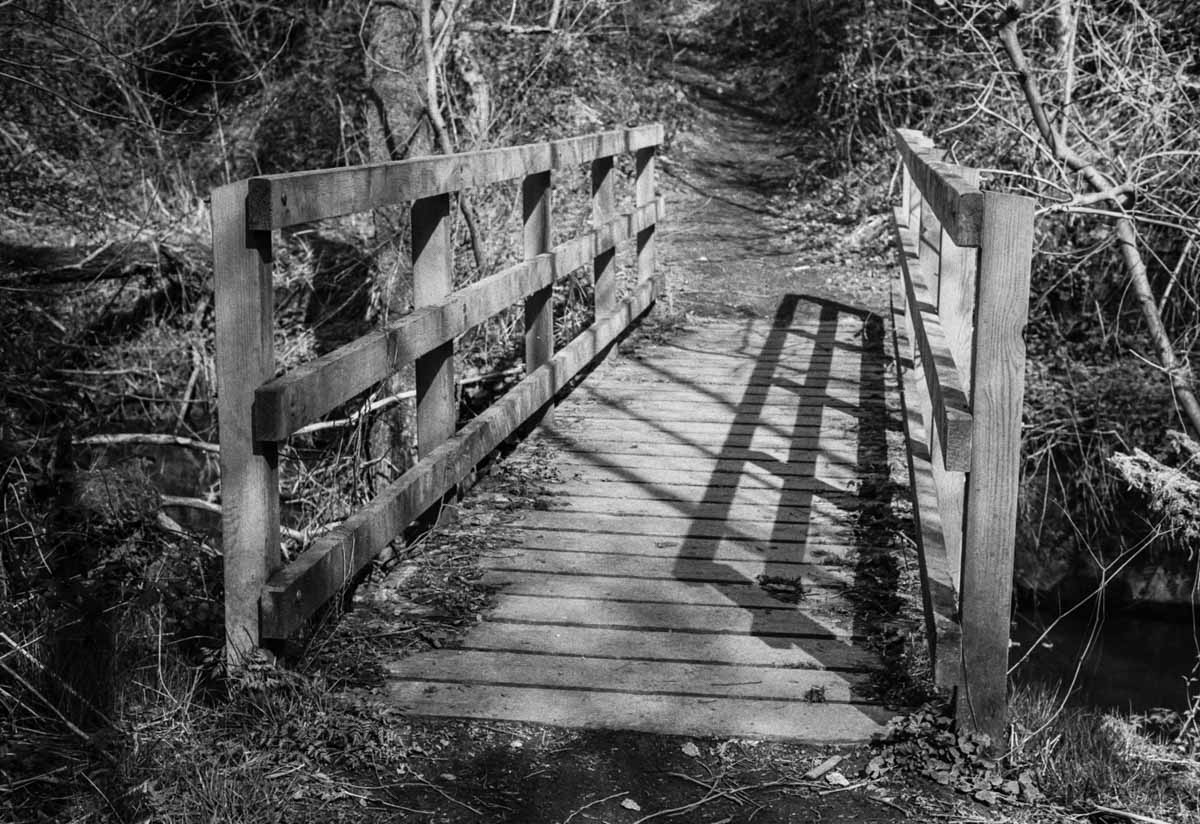
The photos in this post are all from the roll I developed (the ones I’ve uploaded to Flickr so far, at least). As I’ve been limited in where I can go due to the current lock-down caused by the coronavirus pandemic, these were all grabbed while out for a walk to take some exercise or in my home, so maybe don’t go looking for any prize-winners. 🙂
~ Nigel
Share your knowledge, story or project
The transfer of knowledge across the film photography community is the heart of EMULSIVE. You can add your support by contributing your thoughts, work, experiences and ideas to inspire the hundreds of thousands of people who read these pages each month. Check out the submission guide here.
If you like what you’re reading you can also help this passion project by heading over to the EMULSIVE Patreon page and contributing as little as a dollar a month. There’s also print and apparel over at Society 6, currently showcasing over two dozen t-shirt designs and over a dozen unique photographs available for purchase.


37 responses to “Learning to develop my first roll of film”
Thanks Dave. I’ll bear the AP reels in mind if my Paterson reels ever become troublesome. Do they fit in a standard Paterson developing tank?
It depends on the film I think. I’ve always gotten it done relatively quickly, but some films are curlier than others – HP5+ seems to be more difficult to load for instance. Quite often I need to split the reels open and start again when the film get stuck part way through loading, although it’s never been too much of a problem so far.
Hi Nige, another one from TP…
At the risk of starting a war, don’t squeegee! But give everything a good shake after you’ve poured the final wash out. Very rarely get drying marks… and you’re from a soft water area IIRC, so they should be rarer there.
I use a different type of tank (a Rondinax) which means the film is always wound out from the canister straight onto the reel, and I’ve very rarely had a scratch in doing so.
As someone said, you can usually tell when the film comes off the take-up spool when rewinding. If you keep missing it, or have one of those auto cameras that doesn’t give you the option, a film retriever is a cheap investment. My first one wouldn’t work, but my second one has worked fine. I’ve never managed to get the “wet piece of film” approach to work!
Don’t forget that you can re-use the Stop and Fix multiple times. I think I’m still on my first bottle of Stop after 5 years; Fix lasts a bit less (my first bottle of Fix developed weird flakes inside the neat bottle, that showed up as dust-like spots on my film, so had to go). I use clip-seal jars to store the mixed chems. Still go one-shot on the developer, though.
Great start, though.
Chris
Hi Chris. I’ve not squeejee’d my negs as such, but have started to gently use my fingers to remove the excess (after giving them a shake). So far this has worked ok, with no drying marks and no scratches on the rolls I’ve done it to. I think I’m onto my 7th use of both my stop and fix now. I might err on the side of caution and mix up some fresh when I get to the next few uses.
Nice images, Nigel. I remember my first developing session ended up being a disaster and I didn’t develp another roll for 30 odd years. I set myself the goal of learning to do it properly this year and I’m doing well so far. The satisfaction from a job well done is a great motivation for continuing home develpment and don’t worry too much about mistakes. You were fortunate this time and got away with it. File that one under “happy accidents.”
Thanks Jim. I’m certainly glad that, despite my mishaps, my first roll turned out ok. It might have been offputting otherwise – although given how much all the chems etc. cost, I’d have felt wallet-bound to perservere! 🙂
Nigel, your story was impressively reassuring, i too have been in photography aeon’s, prob about the time of the dinosaurs,and due to “life” taking over my passion for the art for over 2 decades, whilst the kids where growing up, i have reimmersed myself back in my serious hobby, i have had all the darkroom essentials for many years, and now will certainely process my own films, thank you for sharing your trials and tribulations, and may you succeed in each attempt to become a master processor/ printer.i used to love all the old masters, roger hicks, stewart bell (londons fine art printer) les McClaine etc..thank goodness there are plenty of old books still available.you take care and enjoy your endearing passion. 🙂
Nigel, your story was impressively reassuring, i too have been in photography aeon’s, prob about the time of the dinosaurs,and due to “life” taking over my passion for the art for over 2 decades, whilst the kids where growing up, i have reimmersed myself back in my serious hobby, i have had all the darkroom essentials for many years, and now will certainely process my own films, thank you for sharing your trials and tribulations, and may you succeed in each attempt to become a master processor/ printer.i used to love all the old masters, roger hicks, stewart bell (londons fine art printer) les McClaine etc..thank goodness there are plenty of old books still available.you take care and enjoy your endearing passion. 🙂
Thanks Soloman. Good luck with your own film developing! I’ve done several rolls now and it becomes a much less daunting experience once you get the hang of it more.
When rewinding the film you should be able to tell when the leader comes off the take up spool. Stop at this point and the leader will still be out of the canister. You can then trim this in daylight and even load it onto the beginning of the spiral. Then put everything into the changing bag and continue to wind onto the spiral. There is a slight danger of scratching the film as it comes out of the film canister but as its already gone into and out twice, if there is something in the lips of the canister then the film will be already scratched. This is far easier then fiddling around with openers and scissors in a changing bag.
Thanks John. Some of the cameras I use have automatic re-wind, so it’s tricky to stop them taking the film all the way back into the spool unfortunately. I need to be more careful with my manual re-wind cameras to ensure I leave the leader free though.
Congratulations! You’ve done what most people have not – develop your own film! You’ll blow a few rolls now and then (everyone does) so don’t sweat it, but your first roll looks great! The thrill-gut wrench-joy-fear of unspooling your wet film to see what you’ve got never goes away. It’s a little gift you give yourself every time you develop a roll. Have fun!
Thanks Dewayne. I’ve devved around seven rolls now (including two this weekend), and still going ok. I’m getting more familiar with the process and am not especially daunted by it any longer. It’s definitely a great feeling to see those images appear from the developing tank. 🙂
Congratulations! You’ve done what most people have not – develop your own film! You’ll blow a few rolls now and then (everyone does) so don’t sweat it, but your first roll looks great! The thrill-gut wrench-joy-fear of unspooling your wet film to see what you’ve got never goes away. It’s a little gift you give yourself every time you develop a roll. Have fun!
If you use a hairdryer on your film spiral before you load the film it will go on easier and use gloves as the moisture from your hands can cause the film to stick,
I also dont use a wetting agent ,i immerse the film in methylated spirits,which you keep for later use,this aids drying time and disperses the surface water on film.
Then tap off excess and hang to dry and never and i mean NEVER wipe film down as this can and usually does cause scratches.
Thanks for the tips. I’m not faring too badly getting the film onto the spiral now. I’ve found the 120 film is easier than 135 too. Drying marks went away after the first roll, but then re-appeared on some more recent ones. I’ve started using the insides of my fingers to gently remove the excess and son far (fingers crossed!) I’ve not had any scratches on the negs. If I start getting any then I’ll re-evaluate my technique. 🙂
It’s interesting you find 120 easier than 35. I can spend anywhere from 7 seconds to 45 minutes getting 120 onto a reel. It has a lot to do with how curled up it is. 35mm goes on almost immediately every time (unless I’m being hasty).
My experience too – I used to send 120 off for developing because of the hassle. However, I now use AP film reels with an easy load tongue for 120 and find this almost foolproof especially if I gently warm the reel first.
If you use a hairdryer on your film spiral before you load the film it will go on easier and use gloves as the moisture from your hands can cause the film to stick,
I also dont use a wetting agent ,i immerse the film in methylated spirits,which you keep for later use,this aids drying time and disperses the surface water on film.
Then tap off excess and hang to dry and never and i mean NEVER wipe film down as this can and usually does cause scratches.
Hey Nigel,
Came here from TP 😁
My experience was pretty much exactly like yours. Same chemicals same issues. Well apart from extracting the film from the can. I used a film lead extractor before I put everything in the bag.
I even did a crappy video
https://youtu.be/dwOppdiFDPM
Nice one! I’ll give the video a watch – I’m sure I can pick up some tips. 🙂
Congrats! 🙂
I usually don’t crack the canister open – it is easier and cleaner to wind from the canister imho, and you can also cut and chamfer the start of film and load about 10 cm into the spiral, all in the daylight.
To get the leader out, just take a piece of old film, stick a small square of double sided sticky tape on one end, push it into the canister as far as it goes (sticky side pointing “down”, i.e. towards the spool), turn the spool a few turns (your old film will roll in, but keep some length out) and then just pull everything out.
Thanks Pavel. I agree that this method will be easier. Unfortunately, all the 35mm rolls I’ve shot so far have re-wound into the cannister and I’ve not managed to successfully fish one back out again as yet (I tried the piece of film technique – which I’ve done successfully before – but without success), so I’ve ended up cracking the cannisters open in the changing bag. It’s a bit of a fiddle, but I’ve managed it ok so far.
I really love your post about doing film & making it seeable by making negatives & actual pictures. I remember doing steel-braided line for my car for transmission lines & fuel lines. They weren’t as expensive if you took the time to do it yourself as opposed as to having a shop do it for you. I remember having to fix mistakes too when putting the steel braided line on a hose connector. This had to be right so the pressure of everything including the liquid running to the connector to having the hose so tight that it would never leak too. You had to put them on & test them to find out whether you needed to fix them or not. So fun after I had it all working right! My grandpa on my mom’s side had a darkroom to do his own film too. So neat to see!
Thanks. I guess that, like many things, learning to do it yourself can save money AND produce great results with practice.
Hi Nigel. That’s a nice set of images to get you started. Nothing wrong with DDX it’s great stuff.
If you have a film where the leader has been fully wound back inside the canister. Wet the end of a duff strip of 35mm negative and push it into the canister through the felt as far as it will go. Then draw it back slowly. Usually it pulls the leader back through the felt 1st time. If not try it again. I’ve found this method much better that the film leader extraction tools. When you have your leader visible. Cut the curved section off and load the film directly onto the spiral before you put it in the changing bag. Remember the 1st 4 inches of film has more than likely been exposed to light anyway while loading the film in your camera.
Some films have a thinner negative than others and sometimes the ball bearings on the spiral won’t grip the film, which can make it really difficult to start to wind it onto the spiral.
I’ve found that if you warm the spiral first on a radiator or with a hairdryer, that little bit of expansion due to heat is enough to grip the film with no problems at all.
Thanks Andy. I’m liking the look the DDX ig giving me. It’s been pretty consistent in how it looks. I’ve got a roll of Fomnapan that I need to scan, so it’ll be intersting to see how that looks in comparison with the Ilford films I’ve devved so far (and how it compares with some lab-processed shots devved in XTOL).
It does get easier with practice.
One thing I’ve found makes working in the changing bag much easier is to take a shoe box with a hinged lid and tape and staple it so that you have a working tray and a cover/support at the back that hold up the top of the bag. It also makes it easier to get everything in and out of the bag.
Thanks James. The top of the changing bag *can* be a little annoying. I fins I have to keep pushing the top up with my hands. Having the dev tank in the bag helps though.
I remember bungling around with my first roll but believe me, you’ll adapt and streamline your processing in no time. The negatives came out really well and you got your first development ‘rush’…what more could you ask for?
I’ve now developed three rolls (including my first roll of 120 this lunchtime), and while I’m not streamlined just yet, now that the initial anxiety of messing it up has been passed to some extent, the process feels much less daunting than before. The prep and subsequent cleaning and tidying up of all the kit is the hard bit now!
And you’re right. It’s a definit buzz seeing your results hung up to dry. 🙂
My method for drying the film to avoid watermarks and speed up drying time is to immerse the film in Photo-Flo. Then I use very clean high density sponges soaked in the Photo-Flo solution and squeezed out, and carefully wipe down the negatives using one sponge on each side.
The sponges I use were made specifically for wiping film. Key is keeping them clean from any particles that can scratch the film.
This way the faster the film dries, less chance of airborne dust clinging to the film and getting glued to the emulsion while is wet and soft.
Practice this method before trying it on any important work. It has worked for me for several years.
Thanks. I do have a squeegee, but I’ve avoided using that after being warned of scratches by so many other people (although I appreciate that this is probably not the same as your high-density sponges). The second roll I developed dried spotlessly, with no dust or water marks – I remembered to shake off the exess water before hanging them that time. My third roll is drying as I type this, and I’m crossing my fingers that the same will be true again. 🙂
Hey Nigel ! congrats on your home developing process !
absolutely great results for the first try
Thanks Victor.
As someone who’s been doing this for 20 years, but took a 6 – 7 year break after C-41 came, I can tell you once you get used to it becomes very easy. A few suggestions – you may wish to use reels made by Arista which are easier to load (have longer take-up edges). In terms of chemicals, with the exception of bath, consider using powder chemicals that could buy several packages at once & mix as needed. Another option is a monobath developer – there are a few out there, best known is cinestill (I’ve found it works best if use it for 100 ASA film). It’s also reusable.
Thanks Llanero. I’m actually finding the Paterson reels fairly straightforward to use now. Still have the odd mishap, but nothing that has caused any stress or panic to rectify.