Disclaimer: Unlike most film reviews that have comparison shots of the same subject, taken under different settings and exposure values, this review will feature a set of photos that show the film’s capability to perform under different lighting conditions. As the photos are part of an ongoing project, I could not set up shots for testing the film specifically.
At a time when film prices started to soar and all my gear had been lost to a thief on a train, ORWO N 74plus came to my rescue. I have a special relationship with the ORWO brand because of my childhood days in Bombay, now called Mumbai.
My dad owned a Zenit EM (he saved up almost two months of his pay back in 1981) and ORWO film was big in India. Socialist India had good ties with Russia and East Germany back then so the “Agfa” of the GDR/DDR appeared in Indian photo studios in the form of Original Wolfen (ORWO), next to the Fujis and Kodaks.

ORWO N 74plus tins
I had shot a few rolls of their NP 22 film (ISO 125) when I picked up photography in 2004 but the film vanished for a while before being resurrected by a company called Filmotec in Germany. ORWO film is now only available in cine film bulk rolls direct from distribution and the minimum size is a 100 feet roll of 35mm film that comes in nice metal tin. They produce films for still photography/cine use it in two speeds, UN 54 (ISO 100) and N 74plus (ISO 400).
The company continues to provide negative and positive duplicating stock and it is possible to purchase bulk loaded films of all varieties from a number of resellers.
Here’s what I over in this extensive review:
Why ORWO?
As mentioned earlier, the main reason for my going with ORWO films was the skyrocketing price of my favourite film, Kodak Tri-X 400 and the complete loss of all my gear and photos to a thief in a train in India.
In fact, it was when the price of Tr-X hit S$12 a roll in 2017 that I tried two film brands — Foma Bohemia (Fomapan 200 and 400), and ORWO (N 74plus and UN54). I settled on the latter as their emulsions seemed to have better latitude and the QC was a lot better than Foma. Roll for roll, the bulk loaded ORWO N 74plus still came under S$6 a roll which was cheaper than anything ILFORD and Foma Bohemia had to offer. It also helped that both the films (UN54 and N 74plus) could be processed at box speeds using the same timings for the developer. So I could easily process a batch of 100 and 400 ISO rolls together.
Lastly, the film base of the ORWO was much thicker than the Fomas and it never curled like the Foma emulsions. Though Foma fixed this issue on their 35mm films, my heart was sold to ORWO.
The first batch of film I tried in India was stolen along with my gear so I never knew what came of that field test. ORWO’s place in my camera bag was pretty much sealed after this tragedy, more because of the economic circumstances I was in than because of any aesthetic inspiration (there was none since I could not see any of the photos from that fateful trip). I ordered another tin of the N 74plus and the UN54.
I returned to the same location in India 2 months later and with another 20 rolls of N 74plus films freshly loaded from a bulk roll. My preferred ISO was 400 as it allowed me to shoot in the rapidly changing lighting conditions during train travel. With or without the sun, with or without window light inside the train, I manage to shoot in almost all daylight conditions with the 400 ISO film, never having to push the film and compromise quality.
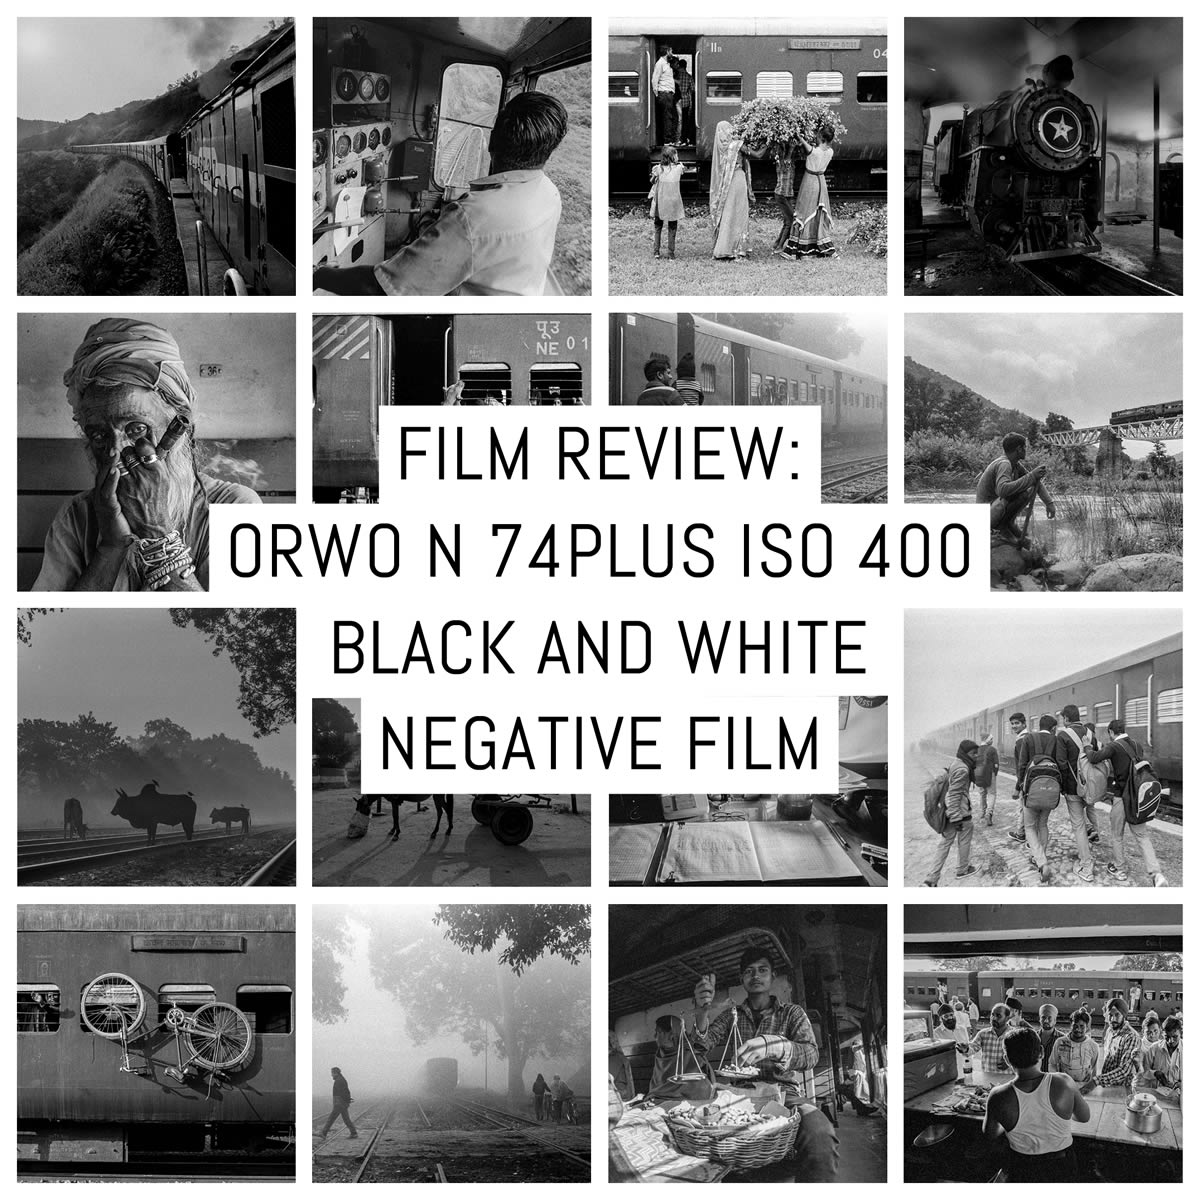
The results you see here are chosen from around 100 rolls of exposed film and were shot over a 2-year period during my many visits to India documenting vanishing smaller trains. What you see here is a small (41 frames) selection of photos from a pretty big photo project.
The film was perfect for my cash strapped project, but did it perform?
My camera and lenses
The cameras used were the Nikon FM and Nikon FM2n, both of which did not have functioning meters. I used a Sekonic L-308S light meter for calculating the exposure and on quite a few occasions guesstimated my exposure in window-lit shots requiring a quick reaction. This produced overexposed negatives on several occasions but very much printable without requiring prolonged exposures in the darkroom.
For lenses, I used my Nikkor E series 50mm f/1.8, Voigtländer Color Skopar 20mm f/3.5, and Nikkor 135mm f/2.8 lenses. Some of the shots are shot on my pre-AI Nippon Kogaku 50mm f/1.4 lens that I have recently acquired after having it converted to Nikon AI mount.
Development details
The first roll of film that I shot in Singapore turned out fine when exposed at box speed and processed for 7 minutes in HC-110 (B). It had good shadow detail and was not too contrasty as the Fomapans in the same developer combo can be.
You might think more contrast is good, but once you start printing in the darkroom, contrast is not always a good thing. It can be increased a lot more easily than decreased when printing with an enlarger. All in all, I’ve compiled a set of photos from around 100 rolls of exposed film and all the photos you see here have been shot with an EI of 400 and were developed based on the recommendations from the manufacturer.
While developing timings were given for a few developers in their datasheet, I mainly work with HC-110 (Dil B) simply because there isn’t a better developer available in Singapore that is this long lasting, this easy to mix and giving this balance of grain, contrast and tonality at a price of under S$50.
When I feel like splurging or have a few extra dollars in my wallet, I dunk a few rolls in Ilfotec DDX (1:4). The film responds very well to DDX when processed at 1+4 for 8 minutes, producing very manageable contrast for making prints by keeping the highlights and shadows at just the right density. If I could afford it, I’d gladly dunk all my rolls in DDX but economics dictated that I use HC-110. Most pictures you see here are done with HC-110 Dilution B (1:31) unless stated otherwise. Here’s how my development scheme broke down in more detail.
Chemistry
Developers: HC110 (B) (1+31) or Ilford Ilfotec DDX (1+4)
Temperature: 20 deg. C
Duration: 7 minutes for HC110 and 8 minutes for DDX.
Agitation: Continuous Rotation using the agitation spindle for the first one minute and for 5 seconds at the start of every subsequent minute.
The reason I use the agitator is because inverting or shaking the tank produces a lot of bubbles and the noise from the banging of the tank to dislodge them is quite annoying in the small community darkroom, as the table and sink is not made of concrete.
This rotator/agitator keeps the bubbles in check and also keeps the temperature rise in check. The temperature seems to rise a lot faster when we agitate the tank or use the inversion method. The ambient temperature in Singapore is around 30 deg C.
Stop bath / rinse
Rinse with Tap water cooled to 21-22 deg C. Some of the rolls were rinsed at 24-25 Degree C which is the temperature of the tap water in Singapore. This caused considerable increase in grain.
Stop Bath: Ilfostop Odourless Stop Bath
Temperature: 20 Deg C.
Duration: 30s
Agitation: Continuous, then rinse with tap water cooled to 21-22 deg C.
Fixing
Fixer: Ilford Rapid Fixer (1+4)
Temperature: 20 Deg C.
Duration: 5-6 Minutes depending on the age of the fixer.
Agitation: Continuous or the first one minute and for 5 seconds at the start of every subsequent minute.
Final rinse and drying
Final rinse: 7-10 minutes in running tap water
Temperature: 25 deg C.
Wetting Agent: Kodak Photoflo
Temperature: 25 deg C.
Duration: 1 minute
Hang dried on a drying column made in the 1970s for about 20 minutes. I can’t remember the brand of the dryer.
Push/Pull testing
The film behaves very well when exposed and processed at box speed. I am not a very big fan of pushing film and the only pushing I normally do is to push ILFORD Delta 3200 (at ISO 3200) in dire circumstances where getting the shot is of utmost importance. Even then I am not too happy with the thin negatives D3200 gives but I have learnt to live with it.
All the ORWO films I’ve shot so far have not been pushed intentionally. As such, I won’t be commenting much on the pushability of the film. I did extend development times for a few rolls by a couple of minutes in HC-110, and the results were not too pleasing. The grain increased noticeably so I decided to stick to box speed for all of the photos I shot for the project.
The tests
The tests could be called baptism by fire. I shot under conditions where this film had not been tested (backlit scenes and foggy environments) and being a victim of economic constraints but fuelled by a strong desire to finish this project on film, I brought this film to shoot almost 90 percent of all my 35mm shots.
Here are the five sections that follow. In total, there re 41 “sample” photos for you to review:
Test1: Outdoors in daylight
Test 2: Indoors with window light
Test 3: Backlit scenes
Test 4: Fog
Test 5: Low light
The shots you see are part of a project called the “Little Red Train” where I am shooting black and white films and making prints in the darkroom that would be hand coloured with photo oils. A sample of the hand coloured prints is shown below:

ORWO N 74plus – hand-coloured print
So the results you see are the final images that may or may not become part of the final series but definitely not shots set up to test the capability of the emulsion. Hope you like the photos and the test results.
Test 1: Outdoors in daylight
Shooting this film outdoors in both sunlit and overcast conditions is pretty easy and it’s difficult to tell the film apart from other 400 ISO emulsions. It has a very good balance of tonality, contrast and grain when shot at the box speed and processed in HC-110 (B) or Ilfotec DD-X (1+4).

ORWO N 74plus @ EI 400, Nikon FM with Voigtländer 20mm f/3.5 lens
As long as the sun is visible in the sky, the film has no issues in keeping the details in the highlights and shadows.
In the shot above the sun was shining straight into the camera but the film still kept the details in the highlights without blowing out the sky too much while keeping the details on the train and the surrounding foliage from getting too dark. More on back lit shots later.

ORWO N 74plus @ EI 400, Nikon FM with Voigtländer 20mm f/3.5 lens.
With the sun behind the photographer, the film handles beautifully, recording good detail in the highlights and shadows. The grain is moderate and to me this is perfect because I am not a big fan of super fine grain film and if I was in need of fine grain, I’d switch over to the Acros 100. Here you can see the details on the train which is quite far back and occupying a very small proportion of the frame.
The sun was shining from behind me to my right. This negative was printed on 12×16 inch paper and still kept adequate details on the train and the bridge without the grain obscuring the details.

ORWO N 74plus @ EI 400, Nikon FM with Voigtländer 20mm f/3.5 lens.
Like the shot before, the sun was behind me, so it very quick shutter speeds that allowed me to freeze the movement of the simians. However, I lost all details inside the door of the train. I am not too worried about it as the main focus of the shot was the action outside.

ORWO N 74plus @ EI 400, Nikon FM2n with Nippon Kogaku 50mm f/1.4 lens
The graininess of the film becomes apparent when overexposure combined with a raised processing temperature causes the film to look more like an 800 ISO film than a 400 ISO film. Although this scene is lighted up by the setting sun, the grain is pretty big, making it look like a low light shot taken with a higher ISO film.

ORWO N 74plus @ EI 400, Nikon FM with Nikkor E 50mm f/1.8 lens
Once again, the temperature of the fixer was much higher than the developer resulting in slightly enlarged grain and a reticulated look in the image above.

ORWO N 74plus @ EI 400, Nikon FM2n with Voigtländer 20mm f/3.5 lens
After a few blunders in maintaining temperature consistency, I got my act together and the resulting negatives were a pleasure to print in the darkroom. This print, for example, could be blown up to 12×16 inch prints very comfortably with minimal grain showing even at that size.
I am not anally retentive about fine grain but having a reticulated finish is not very appealing to me either. Grain should emphasise details and add beauty, not destroy details and become a subject by itself.

ORWO N 74plus @ EI 400, Nikon FM2n with Nikkor E 50mm f/1.8 lens.
Even in reflected sunlight (not directly hitting the subject), the film holds details in the brightest and darkest areas as illustrated in the two examples above and below where the direct sunlight was blocked by another train but there was still adequate ambient light to shoot handheld.

ORWO N 74plus @ EI400, Nikon FM with Nikkor E 50mm f/1.8 lens 
ORWO N 74plus @ EI400, Nikon FM with Voigtländer 20mm f/3.5 lens
A fair amount of my rolls were spent shooting the trains in the monsoons whereby overcast sky and very diffused lighting was the norm. N 74plus handled perfectly well here too, allowing me to use adequately fast shutter speeds to keep the train’s motion frozen without compromising the depth of field too much.

ORWO N 74plus @ EI 400, Nikon FM2n with Voigtländer 20mm f/3.5 lens 
ORWO N 74plus @ EI 400, Nikon FM2n with Voigtländer 20mm f/3.5 lens

ORWO N 74plus @ EI400, Nikon FM2n with Nippon Kogaku 50mm f/1.4 lens.
I avoid shooting outdoor portraits at noon as the light is not at all flattering. Eye sockets cast shadows giving the raccoon eye effects. But trains do not run accordingly to my photographic requirements so I was asked to take a portrait of this senior locomotive driver at noon. I was lucky that the film captured adequate details in his eyes that I could bring out in post.

ORWO N 74plus @ EI400, Nikon FM2n with Voigtländer 20mm f/3.5 lens.
So as long as the sun was shining on my subjects, I loved taking pictures with this film.

ORWO N 74plus @ EI400, Nikon FM2n with Nippon Kogaku 50mm f/1.4 lens.
And as long as I didn’t mess up the processing too much the grain would hold pretty well for most daylight scenes, under the sun or under the clouds. If I did mess up the processing by not monitoring the temperature of the chemicals and baths the film got a bit grainy like in the shot above.
But when all was controlled, the results in daylight were very acceptable and even pleasing.

ORWO N 74 PLUS @ EI400, Nikon FM2n with Nikkor E 50mm/1.8 lens.
Test 2: Indoors with window light
The most challenging situation I shoot in is when I hang out of a running train and shoot the outside of the train and the inside of the compartment with a passenger looking out. The light inside is very dim even if the sun is shining bright on the outside.
The exposure difference is around 2 to 3-stops and to get a balanced exposure or one within the films latitude can be tricky. Couple this with the motion of the train and it becomes a pain in the rear.
Set the shutter speed fast to keep the shot steady and you lose the details inside the coach. Furthermore, the train looks like it’s not moving. Keep the shutter speed slow enough to expose for the interior of the coach and there is a real risk of the entire photo becoming motion blurred or the outside becoming too overexposed for printing in the darkroom. Fortunately, N 74plus made life easier for me by being able to handle such situations well. I am guessing cine films have this capability of holding the highlights well despite there being significant overexposure.
A common piece of advice dished out by “film experts” is to overexpose and overdevelop the negatives when in doubt. Most of the people that give out this advice have possibly never printed in the darkroom and don’t know how much of a nightmare it can be retrieving details from very overexposed and dense negatives on a diffuser enlarger. Here are some examples of the situation I mentioned above.

ORWO N 74plus @ EI 400, Nikon FM2n with Voigtländer 20mm f/3.5 lens.
With the sky overcast, I managed a shutter speed of 1/30 of a second and the gentleman seated inside was about a stop underexposed while the outdoors were overexposed by almost 2 stops. Such was the exposure difference. But the film still recorded enough details on both sides of the coach for a decent print to be made. The only problem was burning the bars of the window to keep it dark and less distracting. On a digital scan this was very easy.

ORWO N 74plus @ EI 400, Nikon FM2n with Voightländer 20mm f/3.5 lens.
While I would have preferred to have this mendicant looking out of the window when he lit up his joint of marijuana, he was afraid of the wind extinguishing the match stick flame. So in the process, I lost the light from the window lighting up the face.
At 1/30 of a second the window was totally overexposed but the right side of his shoulder got adequate exposure. What surprised me was the amount of detail that the left side of the face captured despite being a whole stop or a stop and a half underexposed. It was shots like this, made in difficult situations, that made me appreciate the film and make it my go to film.
I stopped missing Tri-X after these shots.

ORWO N 74plus @ EI 400, Nikon FM2n with Nikkor E 50mm f/1.8 lens.
In completely indoor conditions, there were times where I was not sure of being able to hand hold the camera at shutter speeds of 1/30 and 1/15s. but this father and son managed to stay still in a rocking train and I managed to get the shot at 1/15s at f/5.6 with a 20mm lens.

ORWO N 74plus @ EI 400, Nikon FM2n with Voigtländer 20mm f/3.5 lens.
It was a lot easier when subjects sat closer to the door so there was a lot more light coming in without direct localised sunlight hitting parts of the scene.

ORWO N 74plus @ EI400, Nikon FM2n with Voigtländer 20mm f/3.5 lens.
Even when there was direct sunlight coming through the window and lighting up localised areas, I could expose comfortably to recover details in the shadows like you see here on this peanut vendor. The direct rays of the sun were lighting up the peanut basket but with just one stop of overexposure the film managed to hold the details on the vendor’s face as well. This leads me to believe that the film might push well as the dynamic range of the film is decent and there have been enough situations where I managed to recover almost two stops of underexposure.

ORWO N 74plus @ EI 400, Nikon FM2n with Voigtländer 20mm f/3.5 lens.
Partially helped by the thick morning fog, this shot would possibly not have worked out exposure wise because the exposure outdoors at this time (9am) would have been too bright. The fog diffused the light adequately to allow enough details to be recovered from the hanging bicycle and the foliage outside the coach while allowing the gentleman’s face to be properly exposed.
Once again a shutter speed of 1/15 or 1/30 made this a tricky shot. Its one of those few moments where I gave serious thoughts to pushing the film at a higher EI. Fortunately, I did not.

ORWO N 74plus @ EI 400, Nikon FM2n with Voigtländer 20mm f/3.5 lens.
Even when it was not overcast and the sun was out in full blast the film holds details in the brightest and the darkest areas. This was one roll that was processed in DDX (1+4) so the grain and contrast were both adequately low and it was a pleasure to print from this negative in the darkroom as I did not have to burn too long to keep the details showing in the highlights.

ORWO N 74plus @ EI 400, Nikon FM2n with Voigtländer 20mm f/3.5 lens
Another example of how the exposure difference was handled very well by the film was in this shot from inside a locomotive. I managed to retrieve details from the darkest parts of the locomotive while not losing the details on the foliage outside.
Test 3: Backlit scenes
Now here is where things got challenging. Backlit shots can very easily become unintentional silhouettes whereby the subject gets severely underexposed as a result of being lighted up from the back and confusing the camera’s meter. I used a hand held meter for all my shots as both my 35mm camera’s meters were kaput. Below are some examples of backlit shots that I did which turned out better than I thought.

ORWO N 74plus @ EI400, Nikon FM2n with Nikkor E 50mm f/1.8 lens.
This shot from the inside of a railway canteen car was tricky as the sun was unblocked and was shining very brightly into the camera when I framed the shot from my eye level. So I lifted the camera up to put the sun just behind the top of the stall front.
Although I had metered for the shopkeepers back, I was worried about losing the train and the details on the customers’ faces, as I had not shot backlit subjects on this film and this was my first attempt. But it surprised me pleasantly how easy it was to print this photo in the darkroom and keep the details on the peoples’ faces and the train in the background.

ORWO N 74plus @ EI 400, Nikon FM with Nikkor E 50mm f/1.8 lens.
The sun in this shot too was just behind the tree on the right and about to set in half an hour or so. I played it safe and overexposed the film adequately to keep the pointsman’s face well exposed. At 1/30 of a second, the face was sharp but the waving hand got blurred. I was okay with that because his face was reasonably sharp. It was nice to recover details in the overexposed sky as well.

ORWO N 74plus @ EI 400, Nikon FM2n with Nippon Kogaku 50mm f/1.4 lens.
I had more trouble keeping the flare out of the old 50/1.4 Nippon Kogaku lens than ensuring that the film did not lose the shadows. This shot of the off duty railway staff was also processed in DDX (1+4) and I managed to bring out the details on his face in the digital scan. Hoping I can do something similar with the darkroom print.

ORWO N 74plus @ EI400, Nikon FM with Voigtländer 20mm f/3.5 lens.
This was one of the backlit shots that didn’t work out very well. The details on the train guard’s face were almost gone and recovering the highlights was almost impossible. I have a feeling this is because the temperature of the solution (stop bath and fixer) were too high resulting contrast increasing and details in the shadow areas becoming more obscured. It didn’t help that the jacket he was wearing was black so that became even more underexposed.

ORWO N 74plus @ EI400, Nikon FM2n with Voigtländer 20mm f/3.5 lens.
A combination of backlighting and indoor lights made this shot especially tricky. The background was completely blown out on the negative and I was not hopeful of getting any details printed. Fortunately, the digital scan allowed me to recover the details in the background.

ORWO N 74plus @ EI 400, Nikon FM with Voigtländer 20mm f/3.5 lens.
Another backlit shot that did not quite work out. The tea vendor just placed the cup and left so I hurriedly set up my camera guessing the exposure in the early morning light. His face was underexposed by more than a stop I think but it was not easy recovering details in the shadows on his face.

ORWO N 74plus @ EI400, Nikon FM2n with Nikkor E 50mm f/1.8 lens.
Fog often saves the day when shooting backlit subject as it diffuses the sun and allows capturing adequate detail in the shadow areas without blowing out the highlights. But fog seems to bring in its own set of problems which we’ll see in the next section.
Test 4: Fog
I find fog interesting to work with but I also get frustrated when it obscures details a bit too much at times. Fog does, however, add an element of mystery to the photos. One state in India where I shot a lot of my photos for this project had a notorious reputation for fog-related accidents on the road and significant delays in the trains.
I was hoping the film would keep at least some details in the background areas where the fog’s effects were the strongest. Having never tried shooting fog with this film, I went in prepared to bracket the shots with a wide range of exposure values. But a combination of film shortage and good sense made me trust my intuition and the results were decent even without the generous bracketing.

ORWO N 74plus @ EI400, Nikon FM2n with Voigtländer 20mm f/3.5 lens.
Quite a few recommendations have been made on using orange or yellow filters to cut through fog and haze but I find it difficult to work with them simply because the filters slow down shutter speeds or force me to open up the aperture to get good exposures. And with moving trains there is not much of an option to slow down shutter speeds. Here too the details on the train standing in the background have become fuzzy.
A selection of foggy shots appear below, illustrating what I said earlier about fog obscuring details but adding an element of mystery to the photos...

ORWO N 74plus @ EI400, Nikon FM2n with Nippon Kogaku 50mm f/1.4 lens. 
ORWO N 74plus @ EI400, Nikon FM2n with Voigtländer 20mm f/3.5 lens. 
ORWO N 74plus @ EI 400, Nikon FM2n with Voigtländer 20mm f/3.5 lens.
Test 5: Low light
This film has not been my first choice for low light and long exposures especially for the latter. The much better handling of the Fuji ACROS 100, and its great reciprocity characteristics made it my first choice for long exposures. However there were situations where I didn’t have access to the Acros and had to rely on the ORWO N 74plus to get the job done. Below are a few examples of photos made with long exposures in low light.
On most occasions, I overexposed the negative by one stop by dragging the shutter speed longer. There were no reciprocity charts available so I just guesstimated the compensation for reciprocity failure based on what I used to do with the Tri X.

ORWO N 74plus @ EI400, Nikon FM2n with Voigtländer 20mm f/3.5 lens.
The station master’s table during a power cut was lighted up using a hurricane lamp. This 8-second exposure allowed me to expose the station masters’ papers adequately and the overblown highlights on the lamp were easily recovered in the digital scan. It would be interesting to see how easy it would be to recover the details on a darkroom print.

ORWO N 74plus @ EI 400, Nikon FM with Voigtländer 20mm f/3.5 lens.
I have been tempted to switch to ILFORD Delta 3200 on some occasions but fortunately I didn’t do so. In shots like these, Delta 3200 would’ve given me a shutter speed that was three stops quicker but also producing a lot of unnecessary grain. Seeing that the subjects were perfectly still in their slumber, I took a chance and shot the sleeping passengers with the ORWO N 74plus. Was pleasantly surprised to see it handled the 15-second exposure pretty well. To compensate for reciprocity failure I overexposed the photo by 1 stop.

ORWO N 74plus @ EI 400, Nikon FM with Voigtländer 20mm f/3.5 lens.
Even in well-lit interiors, the shutter speeds were still not quick enough to get tack sharp images especially if there was even minimum movement. The station master here was on the phone and he hardly moved but I was trying to maintain adequate depth of field so set my aperture to f/5.6 The resulting shutter speed of 1/8s was not adequate to keep the gentleman sharp.

ORWO N 74plus @ EI 400, Nikon FM2n with Voigtländer 20mm f/3.5 lens.
This shot of the station was a minute long exposure at f/8 in order to make sure all the arches looked adequately sharp. The meter reading was around 15 seconds but I erred on the side of caution as I was not too confident of the film capturing adequate details on the roof interiors with just one stop of overexposure.
So I extended the exposure by another stop. I had a very well balanced negative and it was pretty easy to print as the contrast was just nice.

ORWO N 74plus @ EI 400, Nikon FM2n with Voigtländer 20mm f/3.5 lens.
There two fluorescent lights illuminating the room where the locomotive was housed. It was a bit tricky because the locomotive was almost black and the fluorescent lights were pretty bright. A combination of smoke and steam from the locomotive helped diffuse the fluorescent lights. Which of course made the exposure a bit longer (around 8 seconds).
The locomotive cut almost all the daylight (very little daylight was available as it was minutes prior to sunrise) so the fluorescent lights on the light were the only sources of light. The black locomotive was very well exposed and the film recorded details even in the darkest areas on the left.
Conclusion

ORWO N 74plus @ EI 400
Having shot around 100 rolls, I find myself being perfectly comfortable with this film. Latitude is very important for me as I find myself shooting in situations where sunlight and shelter appear in the same frame whereby its very easy to lose details in either the sheltered or the sunlit areas. With careful exposure control and processing, the ORWO N 74plus delivers very decent results and I have stopped missing the Tri X as a result of this film’s performance.
The only problem I have with this film is its sensitivity to the temperatures of the chemicals and water baths. Unlike the HP5 PLUS or Tri-X, ORWO N 74plus’s grain tends to enlarge easily giving an almost reticulated look when temperatures of the stop bath or fixer are more than 3 degrees higher than the developer. Of course, once I recognised this problem, I ensured that the film always had all three chemicals consistently at 20 degrees with water baths too kept within a range of +/-2 Deg C.
The other shortcoming I foresee would be the possibility of very large grain if the film were to be pushed. While the film’s latitude would allow a photographer to push the film by a stop or so, the resulting grain might be a bit too obtrusive going by what I have seen in the few rolls that I overdeveloped. I generally do not push film so I would leave this experiment for someone else to do and post the results.
There would be many who would claim better results from a different combination of film and chemicals but I am not in an economic position to be buying films and experimenting with them to see which one outperforms the other.

ORWO N 74plus @ EI 400
Gone are the days when we could buy 3 rolls for S$10 and put the films through rigorous testing. Being a photographer working in adverse environments, having a film that gives consistent results and being able to work with economical chemistry is of the highest priority to me.
I sincerely hope ORWO continues to stay in production and does not meet its maker like many of the Fuji and Kodak emulsions of the past.
Thanks for reading,
~ Nandakumar
Share your knowledge, story or project
The transfer of knowledge across the film photography community is the heart of EMULSIVE. You can add your support by contributing your thoughts, work, experiences and ideas to inspire the hundreds of thousands of people who read these pages each month. Check out the submission guide here.
If you like what you’re reading you can also help this passion project by heading over to the EMULSIVE Patreon page and contributing as little as a dollar a month. There’s also print and apparel over at Society 6, currently showcasing over two dozen t-shirt designs and over a dozen unique photographs available for purchase.


15 responses to “Film review: ORWO N 74plus ISO 400 black and white negative film”
Thanks for a great review and wonderful pictures. It’s over 30 years since I shot the ORWO NP22. Have been toying with getting their current films to bulk load so really helpful
Photographing old trains with old film cameras is the perfect mix, congratulations with the beautiful photos that will one day turn into important historical documention.
Thanks for reading through Peter! 🙂
Awesome pictures of the train life. They remind me of a night train trip from then Madras to Bangalore I did in 1988. Thank you for these impressions.
I would also love to see the pictures in a printed edition.
Great article and photos! Well done!
Lovely images. Would love to see this project in book form!
Hey, thank you so much for the article. Beautiful work and very good tips for using the film, i find myself in the process of switiching from TriX to ORWO (will make sure to keep my stop and fix at 20*C – thanks!). Keep up the good work!
Fabulous images and a really interesting account of the project.
This work needs to be published and a documentary made.
I salute you sir for what you achieved here.
what an absolutely stunning set of images.
One of your better, if not best, film test. This Nandakumar guy knows what he is doing. Chapeau.
Greetings I really liked the series of photos you made testing the ORWO N74PLUS, but I would like to have your email to explain my experiences with ORWO that are more than 30 years processing. My email is
froucophoto@gmail.com
Regards
For more than 30 years I worked with ORWO film from the 125 iso to the negative film np55 and np7, films with an exceptional transparency and an anti-alloying layer that could be easily removed, the grays reproduced with good latitude, I I live in Cuba it is a shame not to be able to receive these materials. Here I send you the address of my Blog. Philip
https://froucofotoblancoynegro.wordpress.com
Is this the film you are using @oconnell_chris ?
Beautiful photos, well done. I really like the retro tonality of this film. And I think you are a bit of a master printer! – not easy to make prints this good.
Really liked this article, enjoyable and interesting writing combined with some great photos.