Welcome to part three of the AEROgraphic Project!
There’s no time for preamble, as this is where things start to get really interesting (and fun). If you’ve been following along so far, you should have:
- A dozen or so bags of components
- Several large parts
- Quite a bit of leather
- A now-naked Graflex Pacemaker Speed Graphic shell
- Deep sense of foreboding.
The final item on the list is completely natural and should be expected but fear not, things are about to get much better.
If you haven’t been following along and are wondering what all this is about, jump on over to part one and part two of this build. Spoiler alert: we’re stripping a 4×5 Graflex Pacemaker Speed Graphic down to its bare mahogany shell and tuning its rangefinder for use with a Kodak Aero Ektar 7″ (178mm) f2/5 lens, known from here on in as the AEROgraphic.
In this part, I’ll be walking you through the process of cleaning and preparing the camera frame, staining and varnishing it, preparing your metal parts for stripping and painting. Here’s what we’ll be covering:
There’s no time to waste, so let’s get stuck in.
Parts checklist
We’re going to first make sure you have everything bagged up and set aside, as these parts/bags will be referred to extensively in this and the following part.
First, you should have these (large) camera components set aside. They are:
- Pacemaker Speed Graphic or Crown Graphic frame, stripped of its leather
- Front standard and bellows
- Graflock mount/back
- Bed and focus rails
You should also have the following 19 bags of components (in alphabetical order):
- Bed
- Bed guides
- Bed hinge
- Bed release
- Bellows mount
- Camera trim
- Feet
- Flash contacts
- Graflock mount
- Leather
- Optical viewfinder
- Rangefinder
- Shutter button
- Shutter cable
- Shutter cover
- Shutter curtain
- Shutter mechanism
- Shutter retainer
- Strap
Once you’re happy that you have everything listed above (even if they’re not labelled exactly the same), let’s get started with preparing the frame.
Materials list
You will need the following materials to had for this part of the project:
- Painter’s tape / masking tape.
- Electrician’s tape, black.
- Sandpaper / sanding blocks (three sheets each of 120, 280, 600 and 1000 grit or similar paper, plus at least one medium and one fine sanding block).
- Some kitchen / cooking foil.
- Wooden chopsticks.
- A lens cloth, small piece of silk or lens cleaning papers.
- Dishwashing soap.
- Paint stripper.
- Matte black spray paint.
- Wood stain (colour of your choice: liquid or staining cloth).
- Clear varnish (spray or liquid).
- A 2-3cm paint brush.
- A small sponge.
- A kitchen scouring pad (not metal).
- Protective gloves.
You will also need the following bagged components for this part of the project:
- Bed – screws and rivets
- Bed guides – all
- Camera trim – all
- Optical viewfinder – finder only
- Shutter button – entire assembly
- Shutter retainer
Optionally, you may also assemble the following to help you with your finish:
- Saddlesoap, Mons Dubbin
- Matte black nail varnish
- Harley Davidson matte black “crinkle” paint
- One black and one white paint stick
- Rangefinder – cover
If you’re ready to proceed, read on.
Step 1: Cleaning and sanding the frame
After removing the leather in part two, you’ll have quite a lot of glue residue on the shell and shutter button assembly. This all needs to come off.
If you are using a power sander, make sure you only use it on the wide, flat areas of the top, bottom, left and right of the frame. Everything else needs to be done by hand.
Start off with your coarse grit sandpaper and remove all of the rough residue on the body. This will take time and quite a bit of patience. You’ll need to decide for yourself when to switch to finer grained papers. Go as fine as the ~600 grain and leave the rest for the metal components a bit later. Use a dry paintbrush to regularly brush away wood dust so you can see what you’re doing.


It will take multiple attempts to remove some of the residue and metal stain from the wood. You should make sure that all of the thick residue has been removed before you decide to begin painting, staining and varnishing. The extent of your sanding will reflect the final look you want to create.
If you find you have persistent and difficult to remove residue on your frame, you may find it useful to make a kitchen scouring pad damp to the touch and add a few drops of dishwashing liquid to it. Lightly scrub away at the residue and then let it rest for a few minutes to allow it to soften. You may also be able to scrape away some of the residue with the tools you have to hand.
Your first pass should look something like this:


Keep going and remove all the dark/stained areas of your frame. Once you are happy, use a clean, nearly-dry sponge and dab the entire body with it. As the wood darkens from the moisture, you’ll be able to see glue residue that was missed. Attack it again until it’s all off.
Be sure to pay very close attention to the rear of the camera when you sand. You need to maintain the ridges that help secure the Graflock mount in place.
When you sand the front of the camera (the channels for the camera trim), you also may find that running a business card or thin piece of metal through the channels periodically will help to ensure they remain clear of dust as you go along.
Once you are happy with the external part of the shell, it’s time to move to the inside.
The inside should require only light sanding and you may find it needs none at all depending on the condition of your frame. The frame will have had quite a few thick coats of paint applied and you may well find it takes more work than the external aspect to remove it all.
Additionally, when sanding the bottom and left side of the inside of the shell, you will likely find the tripod and grip mounts. Leave these in place, as they’ll be covered by paint later anyway.
When you are happy with the inside, give the shell a final warm water sponge bath to release any persistent dust and leave it to dry somewhere.
If you really want to, you can submerge the entire shell in warm water before you start sanding and once again after the final sand. This will help soften the glue and remove all dust but I don’t recommend it, as a number of variables could leave to your shell being warped.
Whatever you do, be conservative with your use of water, as even the newest Speed Graphic will be nearly 50 years old at the time of writing.
Once your shell is dry, take a moment to admire it. Not only is the unstained wood beautiful, it’s also surprisingly light!
Step 2: Preparing your frame for painting
First off, congratulations! You’re at the halfway mark!
When you’re ready to proceed, mask up the front, sides and rear of your frame. You’ll want to mask up the shutter “pit”, too. Take your time to get every curve and corner perfect.
I sadly didn’t get a picture of this during my build but I’m sure you don’t need it.
You will need to apply three or four thin coats of matte black spray paint to the unmasked (internal) portions of your frame. These should be:
- Inside front and inside rear
- Rear “Ridged” Graflock mount
- Shutter “pit”
Make sure you apply your paint evenly and leave at least an hour between coats, longer depending on the weather where you live. When you are done, remove your painter’s tape and touch up where necessary. Finally, spray some paint into a small container and use a cotton bud to touch up as needed.
Let your frame dry completely somewhere for a day or so and move to the next section.
Step 3: Preparing your metal components
The bed guides, bed screws, bed rivets and some other components are brass and should be stripped/sanded. Drop these and any other parts you want to clean up into your paint stripper and leave for at least an hour. If you use a container with a sealable lid, go ahead and vigorously shake it every 20 minutes or so.
Now is a good time to clean up your shutter button. First, remove the shutter button guard and drop it into the container above. Next, take your fine grit sandpaper and go to town.
It may take you anywhere between 30 and 45 minutes to get this part cleaned up. Once you have removed all of the glue residue, use your finest grit sandpaper to polish your button assembly to a shine. Make sure that you sand in the same direction, so that you get an even finish. It’s up to you if you want to use a polishing compound to help you here.
Your finished shutter button assembly (when mounted in the next part of this series), will look something like this:


By the time you finish with the shutter button mechanism your paint stripper should have done its job. You can now remove your components from their bath and wash them in hot water. A bit of dish soap may help to remove both paint and stripper.
You can now attack these parts with fine grit sandpaper to bring them up to your required finish as you see fit but pay attention to the wide, flat end of you bed rivets, as you’ll want them to brass up for a final finish that will look a little something like this:

Step 4: Finishing the shell – wood stain
The shell is finished in two parts: stain and varnish. I recommend using a water based stain and varnish but it’s up to your personal preference. Oil stains and varnishes work well, too.
It goes without saying that if you like the bare color of your frame, you can skip this part completely!
…but I’m going to assume you already have a stain to your liking.
If you need to dilute it, mix it up to three times the manufacturer’s recommendation. For example, if the original dilution was one part water to one part stain, mix up 1:3. The extra dilution you mixed up will give you better control of the final color. This is also where a water based stain is a little more flexible than an oil-based one. It’s also easier to work with if you have no prior experience working with wood.
Grab your gloves and a sponge and lightly dab a corner of the sponge into the stain. Next, apply the stain by dabbing the sponge onto your shell evenly. Have a damp cloth ready to wipe off any excess that runs off. Refresh your sponge periodically and take your time to ensure you have the entire external frame covered in a single, uniform coat.
I would recommend starting by staining part of the bottom of the shell first, as you’ll be able to see the initial colour and adjust your technique from there.
If your stain is too dark, don’t worry too much just yet. Just apply that single, even coat and set aside to dry. It should get a bit lighter. Reapply your stain as many times as you see fit to get the tone you desire.
If your frame is too dark once dry, you can lighten it a bit by sanding down your frame using your fine grit sanding block. If you applied your stain conservatively, it won’t have penetrated the wood too far. The stain that I used came out a rather wild red and I recovered it to the final colour by doing just that.
With the stain applied and dry, it’s time to varnish.
Step 5: Finishing the shell – varnish / lacquer
Your choice of varnish / lacquer up is up to you but I went for a light gloss spray that I’ve used before for other projects. It’s easy to apply, can be refreshed quickly and results in a fine balance between showing off the tone of the newly-stained wood and it’s grain; and providing protection from the elements.
You can begin applying the varnish one coat at a time. Follow the instructions provided with yours and make sure you leave each coat to fully dry….no cheating. The last thing you want to do is to pool damp laquer/ or create a rough patch.
It’s up to you if you choose to mask up your frame internals during this stage.
The finished shell will look a little something like this:


After each coat, use your ~1000 grit sand paper to rough up the varnish evenly over the shell. Make sure that the varnish is even across the frame.
Build up coats (at least five), fully drying and lightly sanding between each. When you get to a point where you’re happy with the final look, don’t sand the varnish coat down. You’re done.
Step 6: Preparing the bed
If you opted to strip down the bed you will find that the external facing side is partially painted black. You may also find some glue residue here. You’ll want to sand all this down starting with a medium grit sanding block. Make sure the all the paint and residue is gone, especially where the center of the bed rises.
Try to avoid sanding down the paint on the bed hinge itself. It’ll be a complete pain to paint later.
Once you’re happy with your work, wipe off any paint/metal dust and when dry, use painter’s tape to mask up the bare metal bed arms and hinges.
Step 7: Finishing the bed
With the bed sanded (optionally primed), and masked up, give the outside a single coat of the same matte black spray paint you used for the interior of the shell. You may have a specific paint choice for this. I like the matte black look, as I think it makes the brass rivets stand out rather nicely.
A single, very light coat of the black matte paint will do, just ensure the entire bed is lightly covered for the first coat.
After this coat is dry, pay attention for any raised areas on the and sand them down. Once you are happy that you have an even surface, apply several coats (at least four), and finish up with another two of the same spray varnish/lacquer that you used for the shell.
Step 8: Optional work
At this point you may also chose to sand down and repaint the inside of the bed and the entire Graflock back and mount. I didn’t, as these components were already in nearly-new condition on my camera. I would highly recommend that you send these parts for sandblasting to ensure they’re clean instead of trying it yourself.
Repainting these components is a nice extra touch and will bring the entire camera together really well, especially if it’s taken a beating over the years.
You can use the Harley Davison “crinkle” paint to replicated the original paint but I won’t cover this optional extra step in any further detail.
If you want to bring your optical finder distance scale and rangefinder’s branding mark to new condition, use the white paint stick to the manufacturers instructions. You may also chose to strip these items down and paint them first but I won’t be covering this here.
End of part three
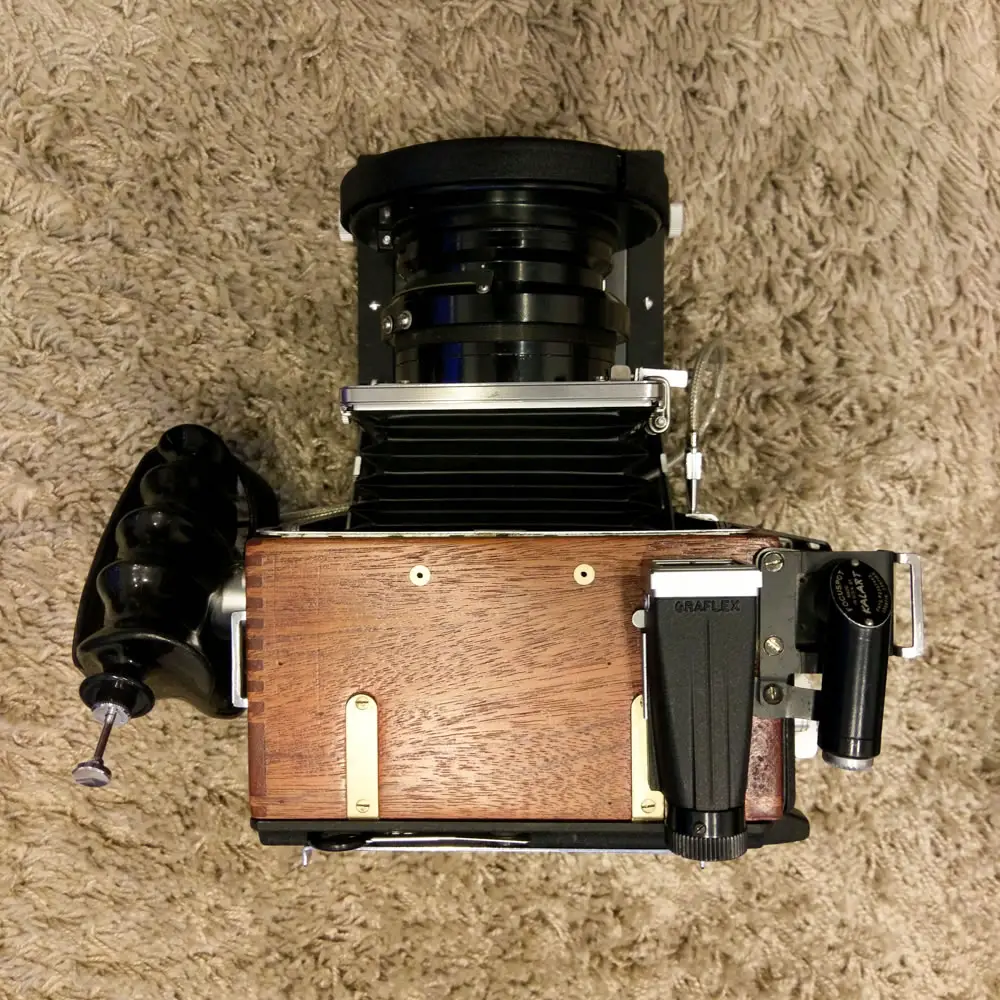
Well, that’s part three done. You should have a lovely looking set of parts just begging to be put together. I’ll be covering that particular joy in part four but the image below should give you an idea of what you should be looking at right now.

This was the most exciting part of the project for me, as it was the first time I could see the final stretch ahead of me. Spending time working to get the wood up to my desired finish helped me slow down a bit and made me more mindful of the process I was going through. You may find that you’ll do the same yourself.
Putting everything back in part four is more or less the reverse of what was covered in part two but there are a few differences an gotchas you will need to be aware of. I’ll describe them in full in the next part.
If you’ve gotten this far you should be incredibly pleased with yourself. There’s nothing stopping you from finishing the project now aside from a little more time and a bit of patience.
You can use the links below to jump to any part of the AEROgraphic build:
- The AEROgraphic project part 1 – introduction and required materials
- The AEROgraphic project part 2 – disassembly and strip down
- The AEROgraphic project part 3 – preparing and finishing the body (this article)
- The AEROgraphic project part 4 – reassembly
- The AEROgraphic project part 5 – focal plane shutter and rangefinder tuning
- The AEROgraphic project part 6 – conclusion and example images
Thanks for reading!
~ EMULSIVE
Share your knowledge, story or project
The transfer of knowledge across the film photography community is the heart of EMULSIVE. You can add your support by contributing your thoughts, work, experiences and ideas to inspire the hundreds of thousands of people who read these pages each month. Check out the submission guide here.
If you like what you’re reading you can also help this passion project by heading over to the EMULSIVE Patreon page and contributing as little as a dollar a month. There’s also print and apparel over at Society 6, currently showcasing over two dozen t-shirt designs and over a dozen unique photographs available for purchase.


2 responses to “Building a naked Aero Ektar Speed Graphic: The AEROgraphic project part 3 – preparing and finishing the body”
Thanks for the guidance. I just put my 1950 Crown back together. Your step by step details helped break it down to the point it was so simple. Not saying I want to do one again, but know I could.
I think I will have to send you mine…I don’t dare to sit with all those plastic packages 😀