You may remember me talking about my plan to build an Ultra Large Format (30×40cm) stereo wet plate camera in my interview here on EMULSIVE. It is another project that took way longer to finish as I would have ever imagined. This project has brought disappointment as well as happiness into my life. It took more than 6 energy consuming month to finish it and I’d like to share the build and results with you today
It all began in late 2018…
…after a visit to THE 3Dimensional in Vienna, a great exhibition about stereo photography. I saw a stereo wet plate camera there and it triggered my brain to think it would be a cool idea to build one by myself. Oh boy, would I have known what I was getting myself into with that thought, I never would have done it!! Even though I’m very happy and excited now with the outcome of this project.
I was lucky a good friend recommended a good book about stereo photography to me. This is for German-speaking people only: Stereofotografie und Raumbildprojektion from Gerhard Kuhn – ISBN 388955119X. I read this book during my 14 day vacation in Portugal again and again until I was able to understand the main principles of stereographic photography.
With this knowledge, it was crystal clear for me that it would not be enough to just “put two lenses together” for a stereographic image. The distance between the two lenses (the stereo basis) had to be changeable, so I could place them further apart for subjects that are far away. For macros and some other specific applications there was also the need of a tilting mechanism because at some point you can’t get your lenses any closer together.
Before I go on with my article I want to give you guys a recommendation for another great book, Queen in 3-D. It’s from the great guitarist and songwriter Brian May. He tells the Queen story in great 3D photographs and besides the images, it’s a great read too.
And I think Mr. May would be also a great subject for a stereographic wet plate project 😉
Finding the right lens(es)
I had this idea in my head to build my camera with two very old Petzval design lenses.
I own already one and thought it would be a great idea to find a second one. To find a second one that focuses on the same spot was a big pain. It took forever. Some of the guys from the wet plate community know what I’m talking about and I guess I will make them smile with this sentence. I remember when I talked with a shop assistant in a vintage camera shop in Vienna about my project, he just said he was happy he was not doing it. He was so right…

Lenses 
Lenses
At some point, I found a second lens that fitted my needs and so the building process started.
Building my stereo wet plate camera

Hardware store supplies
I spent a lot of time in hardware stores to get all the stuff I need. I guess you guys know that you can spend several hours in these big mega stores without finding anything or anyone that can help. If you live near the Vienna area, this can be different. Because in the 21st district there is a hardware store called Rudolf Holzmann. All the shop assistants in this store know their business and you are able to get all you need in minutes. This store was founded in 1860 – so we are talking about the wet plate era – I just love this detail would strongly recommend all the people with hardware needs to go there.

The final ULF stereo wet plate camera 
Stereo ground glass
After I had most of the parts for my camera together, I started to build the movable lens boards. It was a pretty easy task because I had already built some boards in the past but what brought up a lot of questions to my mind was the tilting mechanism for the lenses I mentioned above. For that, I bought different hinges, screws and wooden boards. I put the right combination of all these together to create the lens board you see below.

Lens boards (bare) 
Lens boards (varnished)
After the board, I had to build a shutter that was able to make a simultaneous exposure on both lenses. This shutter must, of course, be able to adjust with the movable lens boards. To make this happen, I glued little iron bars onto the lens boards and mounted my shutter with magnets on it. This way I was able to easily mount and dismount my shutter in combination with different lens board positions.

Shutter box (parts) 
Shutter box (build) 
Shutter box (finished)
The front board of the shutter was mounted with two hinges. To fix this board in its closing position, I used a shelf fastener (hope this is the right term for it). Close-up view below.

Shutter box lock
I learned to use all the different tools needed during my first job in metalworking. That means I have lots of tools at home, but I’m not a carpenter. That means I’m missing the tools to press things together. I had to use different household objects as needed!

Making do at home
The nearly last thing that was missing now was the inner separator/baffle for the camera. This was needed to create to separate image circles on the plate and ground glass. I build a system that can be connected together out of balsa wood. It is, for sure not the most beautiful solution, but it worked.

Internal baffle components 
Internal baffle (finished)
At the end of all this, I discovered I needed a little bellows for each of the tilting lens boards. I used a very thin black sticky tape for this.

Bellows material
If you want to check out a gallery with much more build photos, you can check out my blog.
My first stereo wet plate

The first stereo wet plate 
The first stereo wet plate (alt angle)
Finally, I could start to create my first 3D wet plate! My first model was another wet plate camera. I shot outdoors near my wooden cabin to get a nice depth effect.
I do not remember how long it took to do this plate, but I do remember that the first exposure was very long (about a minute) and the second plate was too dark even though I made a 4 to 5-minute exposure.
A friend of mine had previously told me that it would take lots of time to set the lenses up in the right way for a nice 3D effect – boy he was right – but the end result turned out really nice and the 3D effect was great.
You need special glasses to see the 3D effect in such big plates. These goggles have 4 mirrors in it so you can watch a single 3D image. I ordered mine here.

3D scope 
3D scope adjustmenst
And now enjoy my first stereographic image:

The first wet plate – finished!
…and here’s an anaglyph Version you can enjoy with 3D glasses:

Anaglyphic glasses 
Stereo wet plate anaglyph
Here is another version (with interchanged images) for the crossed-eye method and an animated GIF.

Cross your eyes 
Stereo animated GIF
Floating flowers a 3D wet plate macro
The next subject for this camera was macro photographs of flowers. This time I had an eye on the time the plates consumed. The effort to make clean 30×40cm collodion stereo wet plates is huge. I had to:
- …take care of the right focus distance on both lenses and maybe use an adapter ring to compensate that.
- Adjust the focus distance and maybe the tilt angle on the lens boards.
- Measure the exposure with an 18x24cm test plate.
- During my first plate, I learned that one of the lenses made brighter exposures than the other one, so I had to compensate that too with the aperture.
After I had all these things under control, I had to take care of the whole wet plate process on ultra large format plates. Maybe you can imagine now how focused I was during shooting to get everything right on the first shot/plate. Besides that, it’s not that cheap to make 30x40cm wet plates!
I used a Hensel Tria 6000, a Tria 3000 (including the EH Pro strobe heads) and a 1000 Watt Hensel Integra compact strobe. Together, these brought together 10,000 watts of power for the exposure. The light from these three guys burned my first model a bit, but it was exactly this little wound that looked great on the plate:

Burned flower
At the end – 7 hours – everything worked out great and I produced two nice looking plates:

Subject in situ 
Setting the lenses 
Initial checks 
Close inspection 
3D check 
The decisive moment arrives 
On the ground glass 
Time to develop 
The finished plate
Here again the anaglyph version (3D glasses needed, see info above).

Floating Flower anaglyph
And again, the version for the crossed-eye method and an animated gif:

Floating Flower side-by-side 
Floating Flower animated GIF
You can see more behind the scenes pictures on my blog.
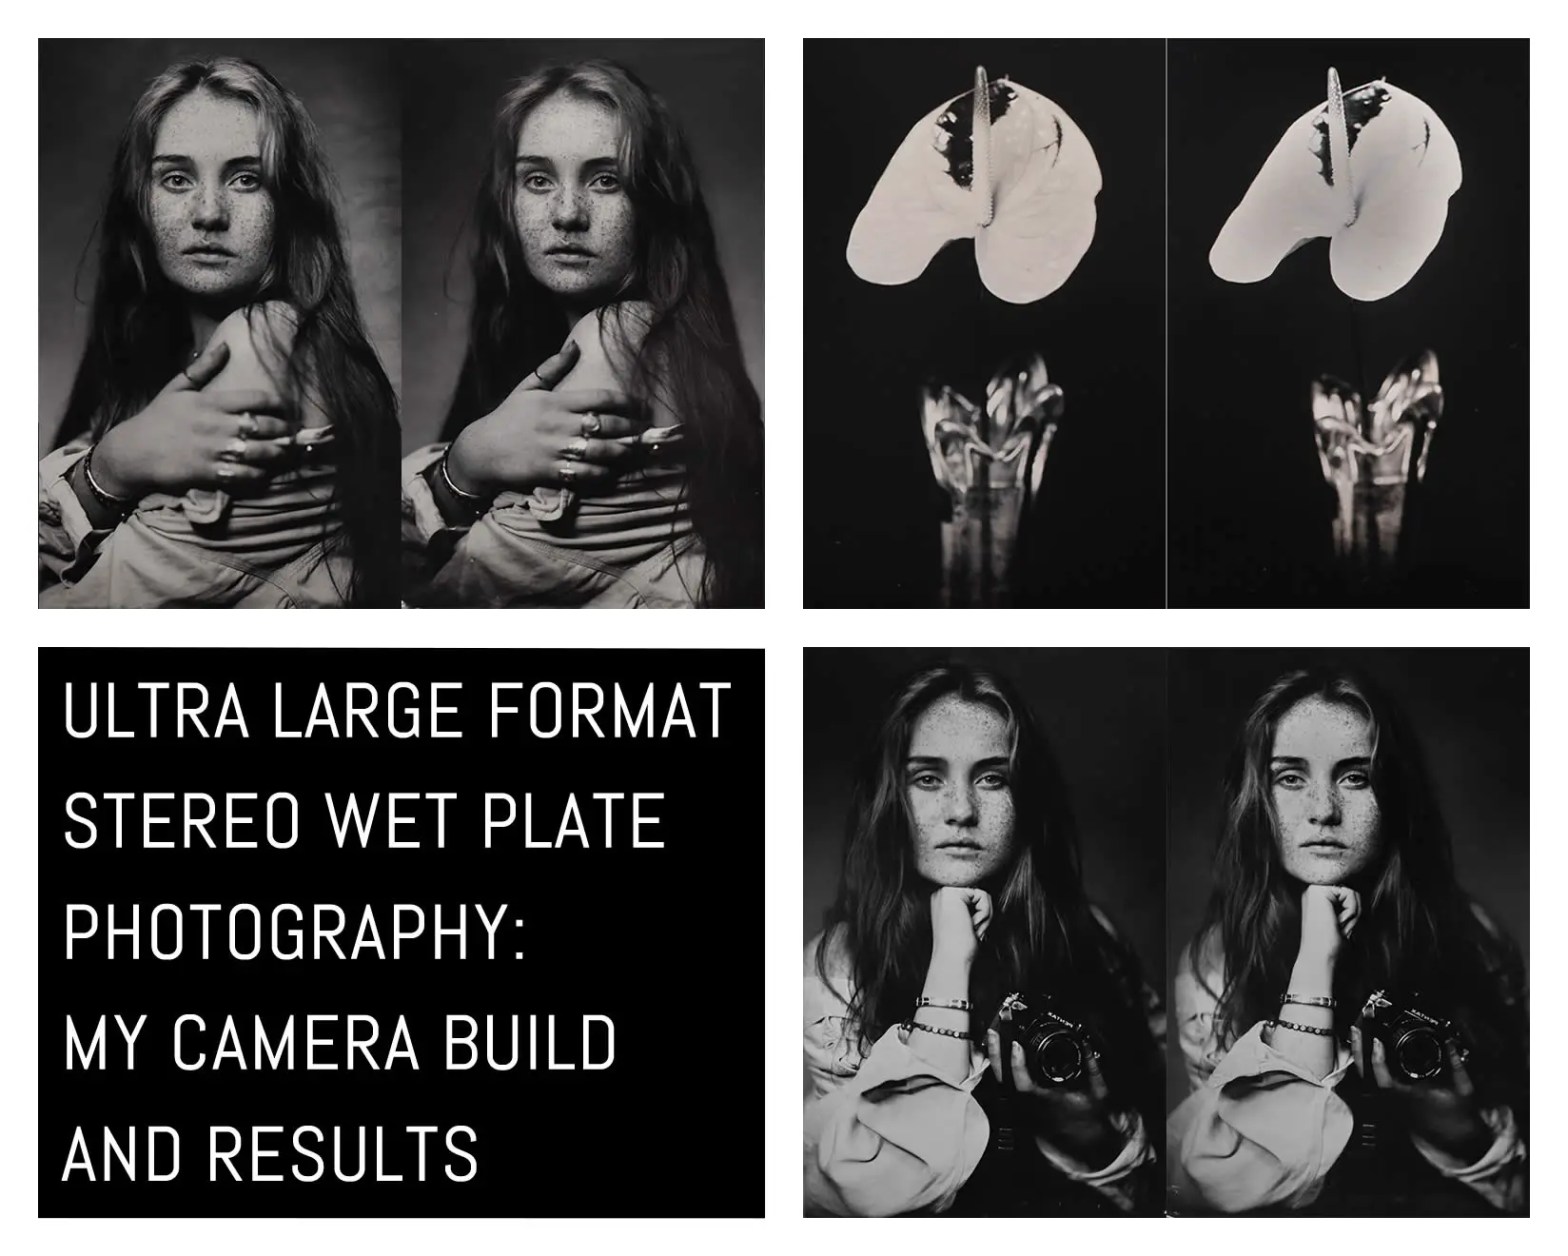
3D Portraits
I guess it was obvious for all of you who know me that I would end this project with portraits.
Clarissa was a great model for this portrait and luckily she was very patient too. If you guys think that this shoot must have been easier then the other ones because I knew what I was doing you are terribly wrong.
I love to shoot simple portraits, but in the stereographic world, simple portraits just don’t pop.
That was why I told Clarissa to bring a wrinkly shirt to the shoot. The more little things sticking out of your model, the more interesting the final plate is to view. With this thought in my mind I had to be careful. I really had to control the depth of field. Ultra large format cameras produce a shallow depth of field and with stopping down the lenses too much (depending on the light modifier) I could end up with not having enough power for the exposure. Just do the math: f/12 @ ISO 0.5
Still, I was able to overcome this obstacle and produce a clean 3D plate (with a nasty little accident as you can see in the video linked below)

Ready to shoot 
Ready to shoot 
Clarissa on the ground glass 
Finsihed plates 
Quality inspection 
A very happy model
The anaglyph version (3D glasses needed, see info above!)

Clarissa anaglyph
The version for the crossed-eye method.

Clarissa side-by-side
I felt the second portrait should include a photography topic. So I brought several cameras into the picture. We tried different poses but ended up with the small Pentax ME one because all the other cameras were too big and the main subject was obviously Clarissa.
After 7 hours (again!) I finished this project with my second 3D portrait. I love how these plates turned out, both of them pop out of the tintype (ok its an alumitype) when you use the goggles. Besides the 3D effect, I am also very happy with the lightning and the pose we were going for.

Clarissa with Pentax ME 
Clarissa on the ground glass 
Clarissa and Pentax ME 
Another happy model
The anaglyph Version you can enjoy with those 3D glasses.

Clarissa Pentax ME anaglyph
The version for the crossed-eye method.
You can find more behind the scenes photos on my blog.
Quick aside: Polaroid Miniportrait wet plates
As you maybe have seen already in this article, I did some stereo wet plate tests with a Polaroid Miniportrait camera. But the 3D effect was not that great, because there is no option to try different distances with these fixed focused lenses (the set focus distance is 120cm).

Clarissa Polaroid wet plate 
Clarissa Polaroid wet plate (single frame) 
Clarissa Polaroid wet plate (close-up) 
Clarissa Polaroid wet plate (closER-up)
Besides that, we had lots of fun with it and I was amazed how much detail these lenses can resolve. Because this camera is so much fun, I will use it during my workshops, too.
Final thoughts
It was a hard but rewarding project. From the portrait session with Clarissa, the second one below was a bit more tricky, because of the extra light I had to direct to the camera. Still, this is my favorite plate and it will be hard to let go because all of these plates are for sale (you can also buy one of 10 fine art prints on high-end luster paper there).
So, will I go on with stereo wet plates? Maybe with the right motivation for an interesting portrait….for example Brian May 🙂
Here’s the video I promised!
~ Markus
Share your knowledge, story or project
The transfer of knowledge across the film photography community is the heart of EMULSIVE. You can add your support by contributing your thoughts, work, experiences and ideas to inspire the hundreds of thousands of people who read these pages each month. Check out the submission guide here.
If you like what you’re reading you can also help this passion project by heading over to the EMULSIVE Patreon page and contributing as little as a dollar a month. There’s also print and apparel over at Society 6, currently showcasing over two dozen t-shirt designs and over a dozen unique photographs available for purchase.


7 responses to “Ultra large format stereo wet plate photography: my camera build and results”
@mhaustria When you’ve finished playing with cyanotypes, @SchatzRoman …
@mhaustria Three challenges in one! O.O
Thanks so much for putting this together,it’s an amazing piece of photography. Would love to talk to you.
Great content and a great build! I enjoyed reading !
Thank you Markus. Great article !
Thanks for featuring my work EM!!
Thank you for this fascinating piece! I too have been experimenting with large-format 3D, but have not made as much progress as you have. Your work is beautiful!
It occurs to me that an aerial stereoscope might be great way to show off the quality of your full-sized final photographs. They are made for pairs that are approximately 20cm wide, and are antiquated military technology. I’m sure you can find something similar in Austria:
https://www.ebay.com/itm/C-E-U-S-Army-MS-1-Mirror-Stereoscope-Aerial-Photo-Viewer-in-Box-CIA/163365917754?hash=item26095e143a:g:os8AAOSwtKlb5sbv