It must have been getting close to Christmas 2019 when I first started to sketch the rudimentary designs of what would become my first homemade wet plate camera. I’d previously built an Afghani Box Camera for my friend and fellow wet plate photographer, Simon Riddell, so I had some sense of how to go about building what I wanted, although I can’t deny it was a daunting project, at least at first.

The homemade 8×10 wet place lockdown camera 
My homemade 8×10 wet plate Lockdown Camera assembled and ready to go 
The homemade 8×10 wet place lockdown camera
But that shouldn’t put anyone off tackling this for themselves, especially when the challenge is part of the fun in my book. Stripped down to its essentials, a camera is a box with some form of focusing mechanism, a lens, and a viewing screen or ground glass (gg) on which to view the image. Simplifying further, the most basic form of camera is the pinhole, which doesn’t even have a focusing mechanism, so you could refine my initial statement to this: a camera is just a box with a hole in it! The only other component is some form of substrate, like film or, in this case, a sensitised photographic plate on which to capture your image.

An ambrotype (glass negative) of my partner. Plates are typically made either from glass or black aluminium. They used to be made from tin, hence the term “tintype.”
This much had been made abundantly clear in my Afghani build, and having enjoyed that project I had sufficient confidence to graduate onto this more ambitious project. I’m also fortunate to have a working knowledge of carpentry along with a good selection of tools, but I want to stress that everything in this build could be simplified further still by using softwood, screws, and liberal amounts of wood glue.
In other words: no need for complicated woodworking joints or prior experience, just some patience and a willingness to accept that mistakes are part of the making process. It’s even possible to make a working camera out of a cardboard box.

8×10 plate holder from eBay 
8×10 plate holder from eBay 
My 8×10 ground glass
The most critical aspect of the entire build is the relationship between the plate holder and the ground glass. Design everything around the plate holder and you can’t really go wrong. What is absolutely critical is that the distance from the surface of the plate and the frosted side of the ground glass must be the same. This way, when the image on the ground glass is in focus and you swap it out for your plate holder, you know that those two surfaces are in the same position, and therefore in focus. That’s the foundation of the entire camera.
I initially made my own plate holder, but to be honest it wasn’t great, so I searched eBay for something large enough to hold 8×10 plates. I then made a ground glass frame to the same dimensions and built the rear standard around that. It’s a surprisingly simple idea, but you do need to be precise in your measurements. The plate holder and ground glass frame slide into runners attached to a square board that fits into the back of the rear standard, with a rectangular opening large enough to accommodate the exposed plate. I made this component square so that I could easily pop it out, rotate through 90º and thereby have portrait and landscape options. This rear section is held in place with a couple of brass turn plates.
To make a plate I simply insert the ground glass frame into the back of the camera as shown in the video above and, once the image is focused on the ground glass, I swap it out for the plate holder. I then remove the dark slide and using the lens cover as a shutter, expose the plate.
To make the focusing mechanism I used a combination of T-track and large M8 thumb screws which in turn thread into a slider that runs freely along the T-track. When tightened down, this same system locks all the different movements of the camera in place. I used a router to cut slots into the frame that contains the front and rear standards and bolted it all together. This system gives me rise, fall, shift and tilt movements, and by loosening the T-track nuts I can fine-focus the image on the ground glass.
Focusing can be a little fiddly at first, but I’ve found it to work just fine. In fact, many of the early wet plate cameras were of a tailboard design which is basically what I have here; only I have additional movements and the final product is strong enough to cope with the heavier lenses demanded of wet plate photography.

Front and rear standards prior to assembly. 
Front and rear standards during assembly. 
My 8×10 ground glass 
Focusing rail!
You can’t have a focusing system like this without bellows, and there’s no getting away from the fact that making bellows is difficult and time-consuming. It was actually the part of the build that I found most intimidating. To prepare for this I watched countless YouTube videos and downloaded free templates and beginner’s guides, slowly building my knowledge and confidence. I found Scott Wittenburg’s video, “How I Built an 11×14 View Camera” especially useful, and it was his bellows design that I followed in my own build. He uses an old enlarger rack and pinion as a focusing system which is frankly an inspired upcycle.
Before I attempted to make the full size canvas bellows I also chose to make a paper prototype to test the process and double-check my measurements. It took several hours of patient scoring, cutting, gluing and folding but was worth the effort since by the end I had a much clearer sense of the build process and was able to make some valuable refinements. I would highly recommend that anyone attempting this for the first time should make a paper bellows first. It doesn’t have to be full size, but I definitely needed to run through each step and see it in 3D before I could properly conceptualise the design.
I used basic black waterproof canvas – another eBay purchase – heavy black card for the internal ribs or “stiffeners” that help to give the thing its shape, and super strength carpet spray-on adhesive to stick it together. I liked the canvas idea because it was cheap, strong, waterproof and, most importantly, light-tight. The stiffeners add another layer of light leak protection as well which is an added bonus. You also want to make sure that you have sufficient bellows extension for the lens you want to use, and to calculate that length it’s important to factor in all those folds, which means it’s better to be on the generous side.
My one regret is that I didn’t spend more money on the glue, since it was poor quality and I had to re-stick the stiffeners many times while it was drying. I also purchased good quality book binding fabric tape which is needed to joint the four sections of the bellows together along the seams. Note that it’s important to subtract the width of the fabric tape joints (the gap between sections) from the overall dimensions when measuring your bellows to ensure that it will fit the front and rear standards.

Bellows build – Close up of the taped seam using fabric book binding tape
It took me an entire Sunday to make them. The folding alone must have taken three hours, not helped by my aforementioned glue issue, but by the end I had a working set of bellows. One downside to my bellows build is that they are rather stiff and heavy, which is fine for most part, but can be difficult when closing the bellows down for shorter focal lengths. Over time, however, this has proved to be less of an issue since regular use soon softens the materials and I actually like the robust feel of the camera and nobody wants droopy bellows.

Bellows build – laid out and nearly ready for folding 
Bellows build – Standing to attention 
Focus rail test
The lens, of course, needs to be as bright as possible, 300mm at f4.0 at a minimum for a camera of this size. However, I did buy an old 400mm process lens that did the job, along with a large brass magic lantern lens that I picked up cheap because the glass was chipped, but even this worked well enough for still life photography and the chip had no discernible effect on the image.

Wray (London) “Lustrar” f.10 18” APO process lens. It worked up to a point, but like all things wet plate, more light is better and the Lustrar was just too small. 
My magic lantern lens. This also worked, but like the Lustrar was limited by the aperture size. I shoot wide open and even with eye-searing Falcon Eyes lighting, exposures were in the 30 second range
One thing to keep in mind is that when photographing living, moving, breathing subjects you need the exposure times to be as short as possible, and therefore the larger the lens, the more light pours into the camera, thus reducing exposure times. If you’re just shooting still life then you could probably get away with a smaller lens, but even so, you need to be sure it will cover the size of the plate you want to shoot, be that 4×5, 5×7, 8×10 and so on. Those beautiful, oversized Victorian brass lens are the subject of much envy on my part, but they are extremely expensive and difficult to come by, although I recently read about a photographer who makes his own lens using cake moulds and epoxy resin. This isn’t something that I have tried, but I’m certainly intrigued and could be an innovative way to get what you want and opens the door to all kinds of wizardry.

My go-to lens is a Carl Zeiss Jena Tessar 4.5:300 shown here mounted on my Devere
In terms of the woods used I opted for what I had in my workshop, which was a mix of purple heart, walnut, beech and a few other bits and pieces that I had lying around. In retrospect those beautiful hardwoods might look nice and add a lot of reassuring heft to the camera, especially with a heavy lens on the front, but such luxuries does add extra weight which could be a factor for some. This is an undeniably bulky camera, which is fine for studio work but perhaps less ideal when on the road. I actually made it bigger than I needed to give me some options should I wish to make larger plates or modify the camera at a later date. I also made Perspex inserts for the plate holders which allow me to easily change between formats (4×5 etc). Perspex works very well in this context since it is easy to clean and won’t rust when it comes into contact with the collodion chems.

The ground glass in position for focusing 01 
My first test shot using paper negatives 
The ground glass in position for focusing 02 
Obligatory wet plate skull arrangement
Making the ground glass was actually very simple and there are numerous videos online explaining the process, such as this one by Tony Santo. The key thing to remember when making a gg is that you can’t check how your grinding is progressing without first drying the plate, so make sure you grind for 10 mins, dry, check and repeat. I used standard 3mm “float” glass that I picked up from a local double glazing firm. It’s thicker than most gg but works fine for my purposes.
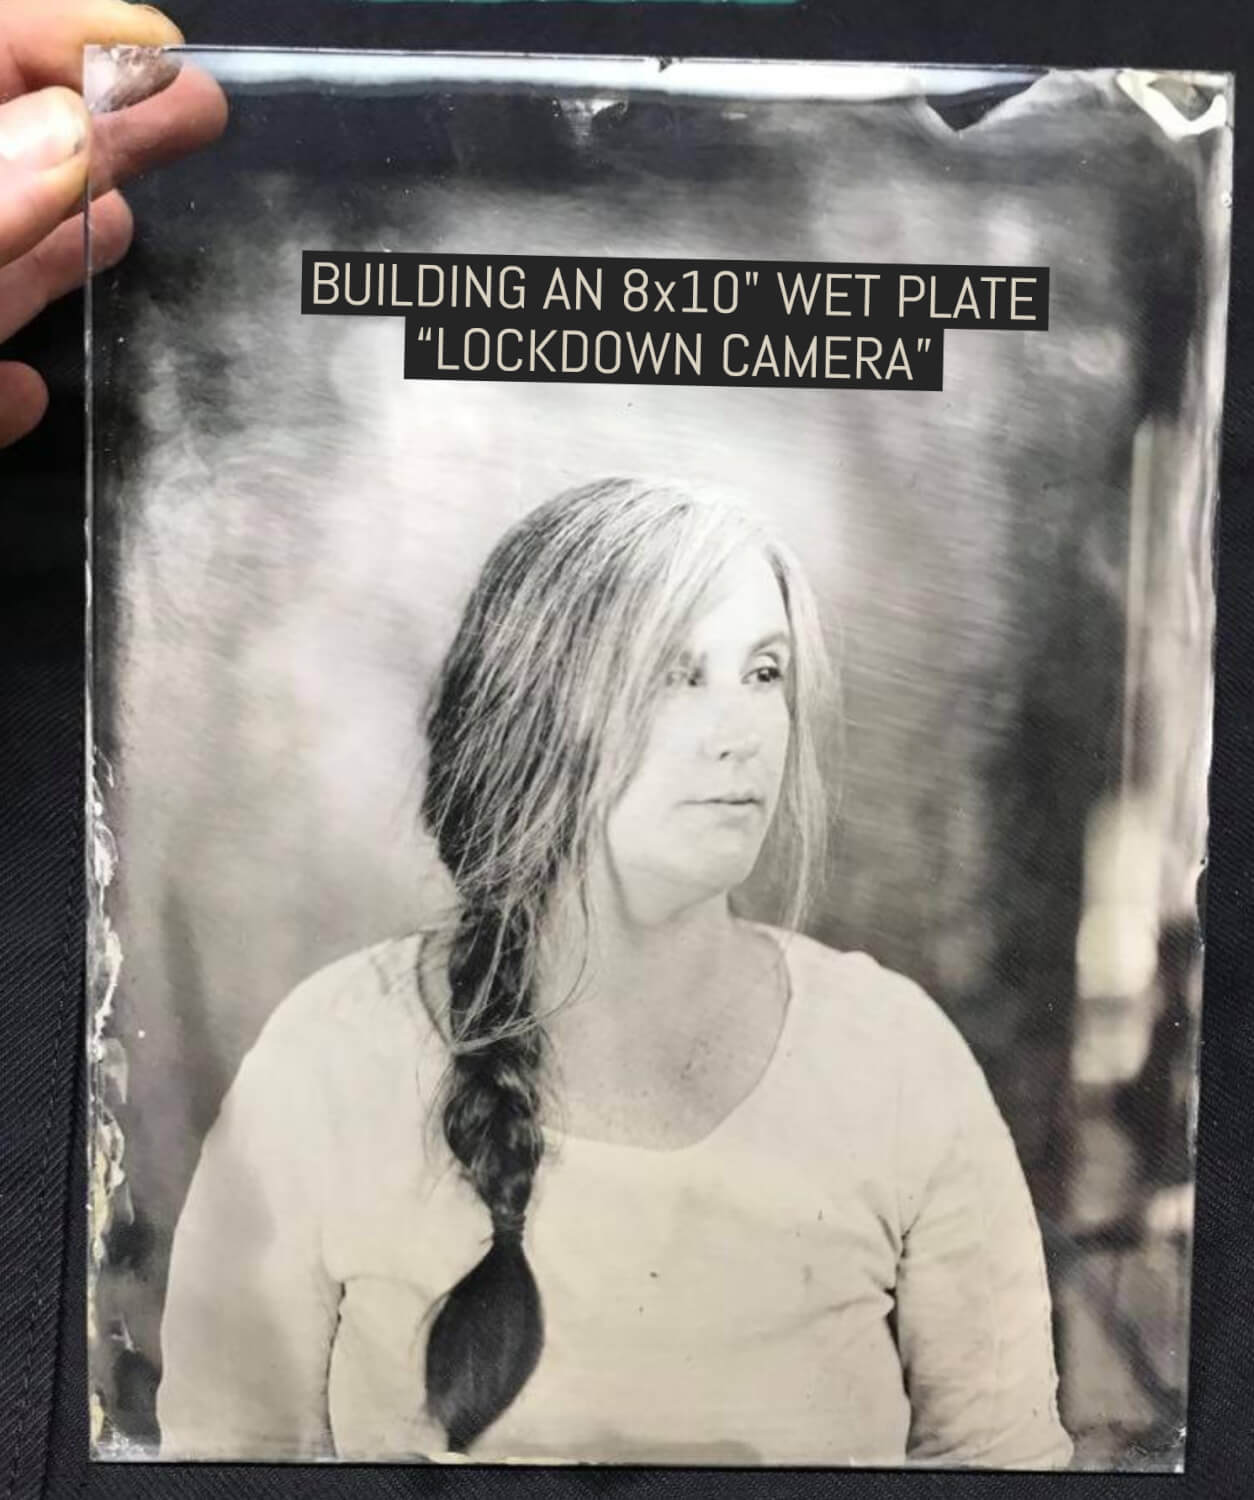
And this is the final output!

My trusty Dalek
I also took my homemade camera along to one of my friend Dave Shrimpton’s excellent wet plate workshops as can be seen in the video below. In this video you see me using the prototype homemade plate holder that I later exchanged the antique plate holder described above:
As a final touch I added a small brass plate engraved with a favourite Kurt Vonnegut quote.

A favourite Kurt Vonnegut quote
Hope you take some inspiration from my homemade camera project and try it for yourself!
~ Paul
Share your knowledge, story or project
The transfer of knowledge across the film photography community is the heart of EMULSIVE. You can add your support by contributing your thoughts, work, experiences and ideas to inspire the hundreds of thousands of people who read these pages each month. Check out the submission guide here.
If you like what you’re reading you can also help this passion project by heading over to the EMULSIVE Patreon page and contributing as little as a dollar a month. There’s also print and apparel over at Society 6, currently showcasing over two dozen t-shirt designs and over a dozen unique photographs available for purchase.


5 responses to “Building an 8×10″ wet plate “Lockdown Camera””
Thanks for putting this article together, what an inspiring build. Wish I had time to emulate it but in the meantime it’s a pleasure itself just to read about and look at the images.
You’re obviously pretty comfortable with the wet plate process too, those photos are great. Everything you’d hope for in return for going with a laborious oldschool technique. I agree with the previous comment in that even just the portrait alone was worth the work.
Thanks Peter, it was a great project and not overly complicated should you find the time.
Love the article! Building stuff is so much fun. Glad to see this kind of thing on Emulsive. I bought a FKD 18×24 and stuck, literally a brass lens on it I got of ebay for my first wet plate. It worked! Mind you I stained the bathtub with silver nitrate Doh! Have you tried reserval process on your view camera yet ?
Gavin
Wow! the beauty of your portrait o fyour partner is worth the amount of work this took! Kudos to you, Paul?
Thank you, Lorraine!