After Fujifilm’s FP instant pack film was discontinued back in 2016, the remaining larger-format instant film choices were few: Impossible Project integral film, which took 30 minutes to develop with unpredictable results, or Fuji Instax wide film. Sure, you can still buy expired pack film, or spring for One Instant, but at over $20/photo, it makes taking pictures a little more nerve-wracking and a little less fun.
The new Polaroid i-type film is much better than earlier versions, so I made my Polaroid “SX-450” camera. But with horizontally-reversed square formatted images, and film that’s around $2.50/photo, I was left looking at the Instax wide option and with a history of camera modding, well…
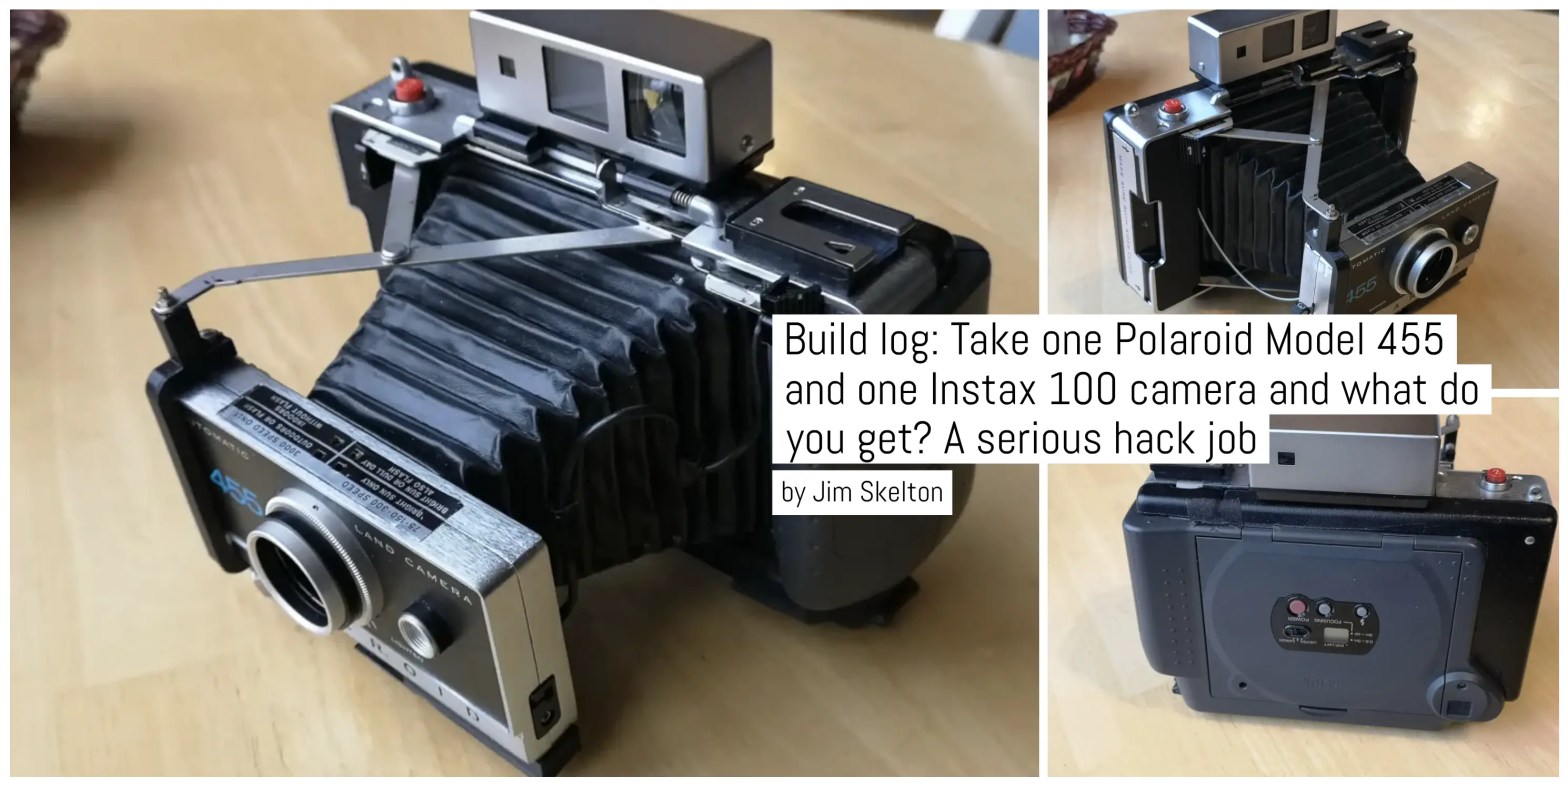
…allow me to introduce you to the Pola Instax 455:


Here’s what I cover in this build article:
Let the hacking begin…
My first step was to find the donor camera, an Instax 100. It was Fujifilm’s first Instax Wide camera and was originally released in 1999. I remembered one had somehow landed in my inventory a few years back, so I dug it out and bought a pack of Instax Wide film.
Wiring the back to eject film was fairly straightforward. The motor is reversible: when it runs in one direction, it powers a set of gears that opens/closes/focuses the lens assembly, and the other direction ejects the film.
The camera worked fine and the pictures were OK, but… well… I don’t want to be too critical, but that Instax wide 100 camera is not only ugly, clumsy, and noisy, but it also doesn’t take the greatest of pictures with that 2-element plastic lens. I was wondering how Instax wide film would do in a Polaroid pack camera, and since I have a few which have become film orphans, I decided it was worth a try mating the two cameras together.


My next step then, was to strip the Instax 100 camera down to just the film handling mechanism..
Taking apart the camera was mostly a matter of removing screws, prying the case apart, and removing all of the electronics (careful with the big capacitor — it can give you a shock!) But I was dismayed to find that the lens barrel needed to be cut off, being molded to the back. This was one of the more difficult tasks using a hack saw blade to cut it off flush with the film plane, keeping the film ejection mechanism intact.
Wiring the back to eject film was fairly straightforward. The motor is reversible: when it runs in one direction, it powers a set of gears that opens/closes/focuses the lens assembly, and the other direction ejects the film.
The key here is to connect the negative battery terminal to the top terminal of the motor (it has a green lead connected to it). The other motor terminal gets connected to the micro-switch located near the bottom of the gear train. The other terminal of the micro-switch is connected to the positive battery terminal, completing the circuit. The micro-switch turns off at the end of the ejection cycle, turning off the motor before it ejects another photo.

But I found out earlier that motors run on after power is removed, and though the micro-switch did turn off at the end of the cycle, the motor ran on with its own momentum, tripping the switch again, creating an endless loop of ejecting film.
I looked at what was happening and determined the easiest way to fix this was to lengthen the time that the micro switch was turned off. I found the cam that controls the micro-switch and doubled the length of the depression in the cam using a knife and file.
While hacking into the 455, I frequently tried fitting the Instax back, noting where it wasn’t fitting, and hacking further. It was brutal.
This turned off the switch a little earlier, giving the motor time to stop. I remembered to use a fresh set of batteries to be sure the cam was modified correctly. A more elegant solution would be to use a relay to switch on the motor which would also short it out when power is removed, acting as an engine brake, but that’s kind of complicated.

I decided to use the existing shutter release on the Instax 100 to act as the eject switch.
The leads from the switch connect to the micro switch in parallel, so when you push the switch, it closes the circuit and starts the motor. The micro-switch takes over and completes the ejection sequence after you lift your finger off of the eject switch. The problem with using the switch is that the switch surface is a piece of graphite that presses against a circuit board.
Orienting the back to eject the film up would be awkward because the rangefinder is in the way, so I chose to orient the Instax back upside down.
The graphite provides enough current to close an electronic circuit, but not enough for a motor — unless you press really hard. A piece of aluminum foil or copper glued under the shutter release button solves this problem, creating a higher amperage connection to start the motor. A wire was soldered to the battery terminal on the Instax back which would provide 3 volts when connected to the negative battery lead, which was led out the front to give power to the Model 455’s shutter.


I found out later, after acquiring an Instax Wide 210, that this model is easier to use as a back: the lens body isn’t attached to the back and is easily removed (doesn’t need to be hacked off), and the shutter button is a micro-switch so no aluminum foil is necessary. The micro-switch also works differently, dropping into a slot on the timing gear, so the gear train needs disassembly and the slot lengthened to prevent motor run on.
Cutting up the Polaroid
Little did I know the easy part was done. After removing the back from the Model 455’s body and trying to fit the Instax back in its place as close to the film plane as possible, I knew this would turn into a serious hack job. Orienting the back to eject the film up would be awkward because the rangefinder is in the way, so I chose to orient the Instax back upside down.
I will always miss pack film, but maybe this is an OK consolation.
The grip on the Instax back protrudes a lot and is fairly close to the film edge, so needs to be mounted close to the edge of the film plane on the 455. The left side of the 455 would have to go, as well as the bottom ridges. Out came the hacksaw and Dremel. I pried off the bellows and removed the lens body before hack sawing the 455, then used the Dremel to do some finishing touches.

While hacking into the 455, I frequently tried fitting the Instax back, noting where it wasn’t fitting, and hacking further. It was brutal.
After all of this cutting/fitting, I managed to mount the Instax back with only a 6 mm rear offset from the original film plane, which I found out later was awkward to offset at the lens body.


But the dirty work was mostly done and the Instax back ended up mounting slightly to the left bottom corner of the Polaroid film area. A layer of 10 mm black closed cell craft foam was cut to size to fit the film area inside the Polaroid and the Instax wide back when mounted. An additional piece of foam was cut to size to seal the rollers area in the Instax back. The Instax case was also cut carefully to fit snugly against the Polaroid.
See what I mean by “a serious hack job?”


Putting it all together
Mounting the back was a matter of cutting straps from a tuna can and attaching them to the camera with the small screws saved from the Instax 100 disassembly. I mounted the back by pre-drilling the holes in the straps, then pre-drilling smaller holes for the screws in the back while pressing down on the back to create a light seal. Three straps were used on the right side, top left, and bottom left.


The leads out of the back which provided the 3 volts for the camera were soldered to the shutter leads on the lens body (below, top left). The old back from the 455 was trimmed to fit the contour of the Instax back, with an additional piece from the battery door cut to complete the trim. Around the front of the camera, the right focus knob (looking at it from the front) was removed and installed upside down so it wouldn’t interfere with the Instax grip, and a small piece of trim was glued into place under the focus knob.


The last step was moving the lens body back around 6 mm. This is an awkward amount, as the minimum distance the lens body can be moved straight back is 18mm, and anything less than 11m will cause the bottom horizontal strut to interfere with the aperture/speed settings. So I decided to try moving it back and to the side 11mm using spacers and a 3/16″ rod.
Although I managed to do this, there are two problems with this: the bellows don’t fold down perfectly, creating kinks, and it’s difficult to change the aperture settings since the horizontal strut is so close to the aperture dial and lever.
I checked focus against the rangefinder by getting an old Instax wide film pack and cutting the back out and taping a piece of acetate sheet which had been sand papered with 600 grit. With tape over the electric eye, and the aperture set to f/8.8, I focused on an object, then opened the film door, inserted the film pack with the “ground glass” and checked focus while pressing down on the shutter release. I found I had to adjust the rangefinder quite a bit since the lens body was 5mm too far back. Some close focusing range would be lost…
I took another look at this problem recently, armed with a 3D printer, and came up with a 3d printed solution. I designed a horizontal strut which gives adequate clearance to the aperture/speed settings, then made a vertical strut which would offset the lens body the correct 6mm. Once I installed them, infinity focus worked, the bellows isn’t kinked anymore, and I can safely take pics at f/8.8.


The moment of truth…
Now to test. I set the ASA dial to 300 and moved the lens setting one mark to darken. These cameras normally underexpose around 1 stop, probably because the electric eye is generating less resistance than when new, so although Instax film is rated ISO 800, setting the Polaroid to around 400 ASA would end up working well. I was impressed with the quality of photos this camera — which I call the Pola-Instax 455 — produces.
I found it a bit challenging working with Instax Wide film, as the dynamic range is quite narrow. But photos indoors with flash cube, and subjects with even lighting outdoors work well.


So now, instead of having to use an ugly, clumsy, noisy, mediocre quality Instax 100 camera, I get to use a deluxe classy Polaroid pack film camera with a high-quality 3 element glass lens to take Instax photos. It’s always fun unfolding the bellows, attaching any accessories like the portrait/closeup attachments or the flash, then focusing with the rangefinder, cocking the shutter, framing the photo and taking the picture.


It’s not completely magical since you don’t get to peel apart the instant photo, but maybe it’s the next best thing: pictures in about 3 minutes with the plastic glossy envelope where you can see it develop. I will always miss pack film, but maybe this is an OK consolation.
~ Jim
Share your knowledge, story or project
The transfer of knowledge across the film photography community is the heart of EMULSIVE. You can add your support by contributing your thoughts, work, experiences and ideas to inspire the hundreds of thousands of people who read these pages each month. Check out the submission guide here.
If you like what you’re reading you can also help this passion project by heading over to the EMULSIVE Patreon page and contributing as little as a dollar a month. There’s also print and apparel over at Society 6, currently showcasing over two dozen t-shirt designs and over a dozen unique photographs available for purchase.


9 responses to “Build log: Take one Polaroid Model 455 and one Instax 100 camera and what do you get? A serious hack job”
The 6mm offset is to compensate for the film plane offset when mounting the Instax back onto the Polaroid. A dioptic correction lens would also work behind the lens, but that would make the image bigger. As for focal lengths, Polaroid film used 114mm, and ideally, Instax film since it’s a smaller format would use a smaller focal length. But changing the lens on the Polaroid would cause the rangefinder to not establish correct focus at all distances.
So the fact that you had to offset the front by 6mm, does that mean that Instax and FP require the same focal length? Fascinating if true. I’ve got a ProPack II for a Nikon F4 that I need to experiment with now…
The 6mm offset is to compensate for the film plane offset when mounting the Instax back onto the Polaroid. A dioptic correction lens would also work behind the lens, but that would make the image bigger. As for focal lengths, Polaroid film used 114mm, and ideally, Instax film since it’s a smaller format would use a smaller focal length. But changing the lens on the Polaroid would cause the rangefinder to not establish correct focus at all distances.
I posted these struts at https://www.thingiverse.com/thing:5559012
Do you have the offset struts on thingiverse by any chance?
Awesome. Please post your address so I can send mine for conversion. Just kidding. (I think.)
Haha, It only took 20+ hours to do the conversion, so it wouldn’t be too expensive (I think). Actually, I’ve been following newlandcamera, which is about to launch a drop in SX-70 back for land cameras–that’ll be interesting to see how it works out!
Bravo! This is impressive and way beyond my abilities.
I’ve seen a 3d printed graflox back for pack cameras that’ll accept the lomograflox Instax back. You’d still have to move back the lens body, and it would cost $$$ to do it (the lomograflox back alone is $175US), but that method would be a lot easier…