What if you had a scanning solution for color negative and black and white film that enabled you to scan and convert a whole roll of 35mm film in less than 15 minutes and all that in next to pro-lab scan quality – at home?
To do such things one must have a Frontier Minilab standing in their living room, right? Although a fantastic concept, very few have such a machine at home and well, neither do I. There is, however, a relatively new solution out there that may allow those of us who scan, or want to scan color negatives at home and produce lab-quality results. It’s called Negative Lab Pro and is nothing less than a revolution – at least in my humble opinion.
Negative Lab Pro is a simple to use plugin for Adobe Lightroom 6 and Lightroom CC Classic, allowing you to work within your existing archives without adding yet another application to your workflow.
It seems that “what if…?” above is actually achievable, so what now? Here’s what I cover:
What is Negative Lab Pro?
Negative Lab Pro (NLP) is a Lightroom plugin to create accurate and visually stunning color negative conversion in an all-RAW Lightroom workflow. NLP produces very good color conversions and it produces them very fast – almost one-click fast. If that wasn’t enough, NLP is also able to batch process as many negatives as you want, either with fully automated settings, half-manual settings or with user-defined settings based on a predefined scene.

NLP Interface in Lightroom- Fully automatic conversion of FUJI 160 NS – done with one click, minor adjustments made to taste.
Right now, NLP is designed to work with RAW reproductions of negatives digitized with your camera of choice, VUEscan RAW DNG files, as well as other types of linear scans from drum scanners for example..
At the time of publication, the plugin had its v2 release less than 24 hours ago. This article is based on NLP v2.
Future plans, according to NLP’s founder Nathan Johnson include: specific scanner calibrations for Epson, Canon and Nikon devices, further custom settings, engine improvements and better compatibility.
Developing my “scanning” workflow
To demonstrate an easy scanning workflow using Negative Lab Pro, let me first tell you a tale of my previous workflow: let’s call it the “never-ending story of my ordeal with a not so perfect Photoshop Plugin called ColorPerfect”.
I’ve always wanted to digitize my film at home: because if I develop my film myself, I should be able to scan by myself, too. My early goal was to establish an easily reproducible “in-house” scanning workflow that delivered good quality at least for small prints and digital presentation and digital archiving. My personal requirement was to be able to process uncut rolls of 120 and 135 films in a timely manner, so Epson Flatbed Scanners were a dead end from the beginning. The same applied for models like the Kodak Pakon 135, because it obviously can scan only 135 formats.
Ultimately, I decided to make digital reproductions of my negatives using a Canon 5D Mk2 DSLR with Canon EF 100mm f/2.8 L Macro lens mounted onto a repro-stand. To hold the negatives in place I use a Kaiser negative carrier for 135 formats and a Lomography Digitaliza mask for 120 formats. The negatives are illuminated by a Kaiser Slimlite Plano 95CRI LED 5000K lightpad.
The camera is being operated in tethered Mode using Canon’s EOS Utility Software and a “hot-folder” in Lightroom, so the captured images are automatically imported.

Digitization Setup: Canon 5D II / 100mm 2.8 L macro on repro-stand; Kaiser negative carrier on Kaiser Slimlight-Plano.
Focusing is not an issue because the camera’s autofocus is accurate enough to pick up grain from Portra 800, most 400-speed black and white films and other higher speed film. With the lens’ aperture stopped-down, grain is picked up even with fine grain films like Kodak Portra 160 and even Kodak Ektar 100.
Note: the process of scanning/digitising film remains the same with both my previous (ColorPerfect) and current (NLP) workflows.

EOS Utility 2: Live View of negative scan; AV exposure +2 stops of overexposure to capture the most data.
Upon importing the images into Lightroom my initial plan was to convert the images using curve adjustments. This works pretty reliably for black and white images, but is next to impossible for color negatives, at least if you put the necessary investment of time into account.
This confronted me with the challenge of how to convert my color negatives. At the time, NLP did not yet exist, which is why I didn’t initially use it. After a while, I realized there was no way to keep the workflow completely inside of Lightroom. I moved over to Photoshop but nonetheless, I wasn’t willing to sacrifice Lightroom’s folders and image organization, so I began to use a dual-program workflow as follows:
Part 1:
After importing the files from my tethered camera into Lightroom, I dialled down the exposure -2 stops, to normalize my in-camera overexposure, applied basic color noise reduction and lens corrections.
Part 2:
Then I exported the negatives into Photoshop (CTRL+E). At first, I used a free negative conversion Action for Photoshop, provided by iamthejeff.com (no longer available as of writing). The action produced conversions, but not very accurate and reproducible ones. Quite a lot had to be edited back in Lightroom in order to achieve a pleasant color – provided the negatives were exposed correctly. Over- or underexposed negatives were too big of a challenge for the action.
Enter ColorPerfect
After a while, and lots of research about this method of scanning, I came across a Photoshop plugin called ColorPerfect, which promised accurate and reproducible scans. Don’t get me wrong, the plugin is not bad, the opposite in fact. The plugin is worth its €80 price tag, as it offers an overwhelming level of control over the negative conversion.
That control, however, is one of ColorPerfect’s biggest problems. It is simply overwhelming, thus, producing a great result takes time and requires quite a steep learning curve. It is also unfortunately not very consistent. To put salty icing on the cake, the plugin was not developed with “camera scanning” in mind and works best with scans from dedicated film scanners.
Here are a few examples from my previous workflow with Color Perfect not too bad on the face of things. We’ll be coming back to these later, so pay close attention…

Fujifilm Fujicolor Pro 400H – ColorPerfect 
Kodak Ektar 100 – ColorPerfect 
Kodak Ektar 100 – ColorPerfect 
Fuji Pro 160S – ColorPerfect 
Fuji NPZ 800 – ColorPerfect 
Kodak VPL2 Type L (expired 1977) – ColorPerfect 
Fuji 400H – ColorPerfect 
Maike – Kodak Portra 160 – ColorPerfect 
Kodak Portra 400 VC – ColorPerfect 
Sarah – Fuji Pro 160S – ColorPerfect
As time passed and I slowly grew tired of ColorPerfect, not only because achieving good looking conversions was a finicky and tedious process but because ColorPerfect seemed to be incapable of dealing with increased highlight density. The resulting scans were too often a mess with blown highlights last seen from the sensors of mid-2000s digital cameras. The beautiful and natural gradients of density rendition of color negative film were replaced by pure digital white blown out areas with hard and pixelated borders.
In fact, I grew so sick of using ColorPerfect that I began to reduce the amount of CN film I was shooting to avoid having to convert the negatives and that’s where my ColorPerfect story ends…almost.
The end of ColorPerfect
When I went to Malta in fall 2018 I decided to take lots of color film with me, even if that meant processing the negatives with CP or giving them to a lab for scanning. I just couldn’t bring myself to limit myself to only black and white film.
I took three rolls of Kodak Ektar 100 and bought two more in Valetta in a little backroom photo lab/store called Darkroom Malta (definitely visit this store and have a nice conversation with Alan, the owner). Add to that: three rolls of Kodak Portra 160, one roll of Agfa CT100, one roll of 1996 expired Fuji Sensia 100, one roll of Fuji PRo400H, two rolls of Kodak Ultramax 400,one roll of Kodak Portra 400, five rolls of Kodak Tri-X 400 and about 15 rolls of self-confectioned and perforated Fuji Super HR microfilm. You get the idea, I was shooting a lot of film.

Holiday Packing
Worse, I had a lot of Ektar 100. It’s one of my most favorite color stocks but having to scan and process ~180 frames with ColorPerfect seemed like an afternoon spent in the 7th circle of hell. ColorPerfect and Ektar is basically like Holy Water and the devil – not a very pleasant match.
When I returned from my trip and was finished with processing my film, I dreadingly looked towards scanning it. After having struggled with the first five frames or so of Ektar, I gave up.
That’s when, in a final frustrated attempt to find some better way to process my film, I googled “color negative conversion lightroom” and to my surprise, a new result came to my attention, the 3rd in line, to be precise.

Google search result: “color negative conversion lightroom”
I clicked the link because I had not seen this search result before – and believe me, I had Googled this phrase countless times before. Upon entering the site, I saw that this seemed to be a Lightroom plugin and the site even provided a free demo version, which I immediately tried.

Kodak Ektar 100 – ColorPerfect 
Kodak Ektar 100 – Negative Lab Pro
Kodak Ektar 100 converted with ColorPerfect (left). Not really faithful. Ektar 100 converted with Negative Lab Pro (right). Much more accurate and faithful rendition of the scene.
I was stunned.
Suddenly, my dreaded Ektar scans seemed to be a one-click cakewalk. After fiddling around with the demo version a bit, I decided to give it a go and paid the heavy price tag of $99 for the plugin. I have not once regretted this purchase.
Working with Negative Lab Pro
One of the best things about Negative Lab Pro (NLP) is the plugin ́s support. The founder and developer, Nathan Johnson – NLP is a one man show – provides excellent support, usually replies quite fast and listens to the community for recommendations about future features of the plugin. Additionally, there is a growing Facebook group and a dedicated Forum for community-based support.
Back to the actual plugin and upon importing my scanned negatives into Lightroom, I click on the NLP button (or use the keyboard shortcut), click on “Convert Negative”, play with easily adjustable sliders a few seconds and have a finished, good looking conversion. It’s that easy.
If I feel the need to do further adjustments aka digital trickery in Lightroom, NLP gives me an option also to save the file as a TIFF directly in Lightroom for further processing.
Here’s a quick side by side comparison of Color Perfect vs Negative Lab Pro with Kodak Ektar 100 in 135 Format, converted with the edges of the Kaiser Negative carrier used for holding the film in place.

Side-by-side, Kodak Ektar 100 – ColorPerfect vs Negative Lab Pro
Here’s another one, again with 135 Ektar 100, a film that is notoriously difficult to convert:

Side-by-side, Kodak Ektar 100 – ColorPerfect vs Negative Lab Pro
As mentioned before, Color Perfect has considerable issues with Ektar 100 while NLP works like a charm. Really, it does. My color workflow has never been easier. Here´s a closer look on the Plugin´s interface:
After opening the plugin in Lightroom CC Classic the initial “Convert” dialogue will open. In this menu, you can define how NLP should interpret the negative. The options include specific scanner color emulations like Noritsu and Fuji Frontier scanners and a presaturation menu that defines how saturated the final conversion will be.

Fuji Pro 160NS EI 160, NLP Convert Interface
After having selected the pre-conversion specifications the conversion starts by the press of the “Apply” button and NLP will begin to analyze the image to give out the best conversion it can.
Then, after about 3-5 seconds, the negative will turn into a positive and a new “Edit” dialogue will open, giving the user a plethora of different control sliders for brightness and contrast, whites and blacks, lights and shadows, but also 10 different options for color balance, that again can be separated into mids, shadows and highlight adjustments if need be.

Fuji Pro 160NS EI 160, NLP Edit Interface
Generally, NLP comes with its own set of color profiles for Lightroom, which enable it to convert the negatives so easily in the first place. Using NLP is virtually foolproof, and that is meant as a predicate I wouldn’t label things with all too often in context of analog photography. Additionally, everything done in NLP is 100% non-destructive and can be reset or adjusted afterwards, if necessary.
To make matters even better, NLP not only works for color negatives but also for black and white negatives as well.

ILFORD HP5 PLUS EI 1600, NLP Convert Interface
For converting a black and white image with NLP, you follow the same steps as you would with color negatives, just select “B+W” in the color model dropdown menu and hit “Apply”. With B+W you don’t need to worry about color saturation for obvious reasons.

ILFORD HP5 PLUS EI 1600, NLP Edit Interface
Converting black and white negatives in NLP is more consistent and faster than fiddling around with inverting tone curves and is a lot more comfortable, to begin with.
Another incredibly useful feature of NLP is its ability to facilitate batch conversions of both black and white and color negatives. To convert multiple images, simply select the negatives you want to have converted and press “Convert x Negatives”, instead of “Apply”. NLP will then, depending on how many negatives you wish to convert take a few minutes to convert everything – for the 34 black and white images below, NLP took about 3 minutes to finish everything.

ILFORD HP5 PLUS EI 1600, NLP before batch conversion

ILFORD HP5 PLUS EI 1600, NLP directly after batch conversion, no changes made at all
The same principles apply for color negative film, of course.

Kodak Ektar 100, Kodak Portra 160, Fuifilm Fujicolor Pro 400H – all shot at box speed. Before NLP color batch conversion.

Kodak Ektar 100, Kodak Portra 160, Fuifilm Fujicolor Pro 400H – aall shot at box speed. After NLP color batch conversion – No changes made at all.
Quick tip: To avoid dust and dirt on your negatives, I recommend using a Kinetronics / ILFORD / Tetenal Antistatic cloth to wipe your negatives before scanning. Since I started using such a cloth, dust has been reduced by about 80%.
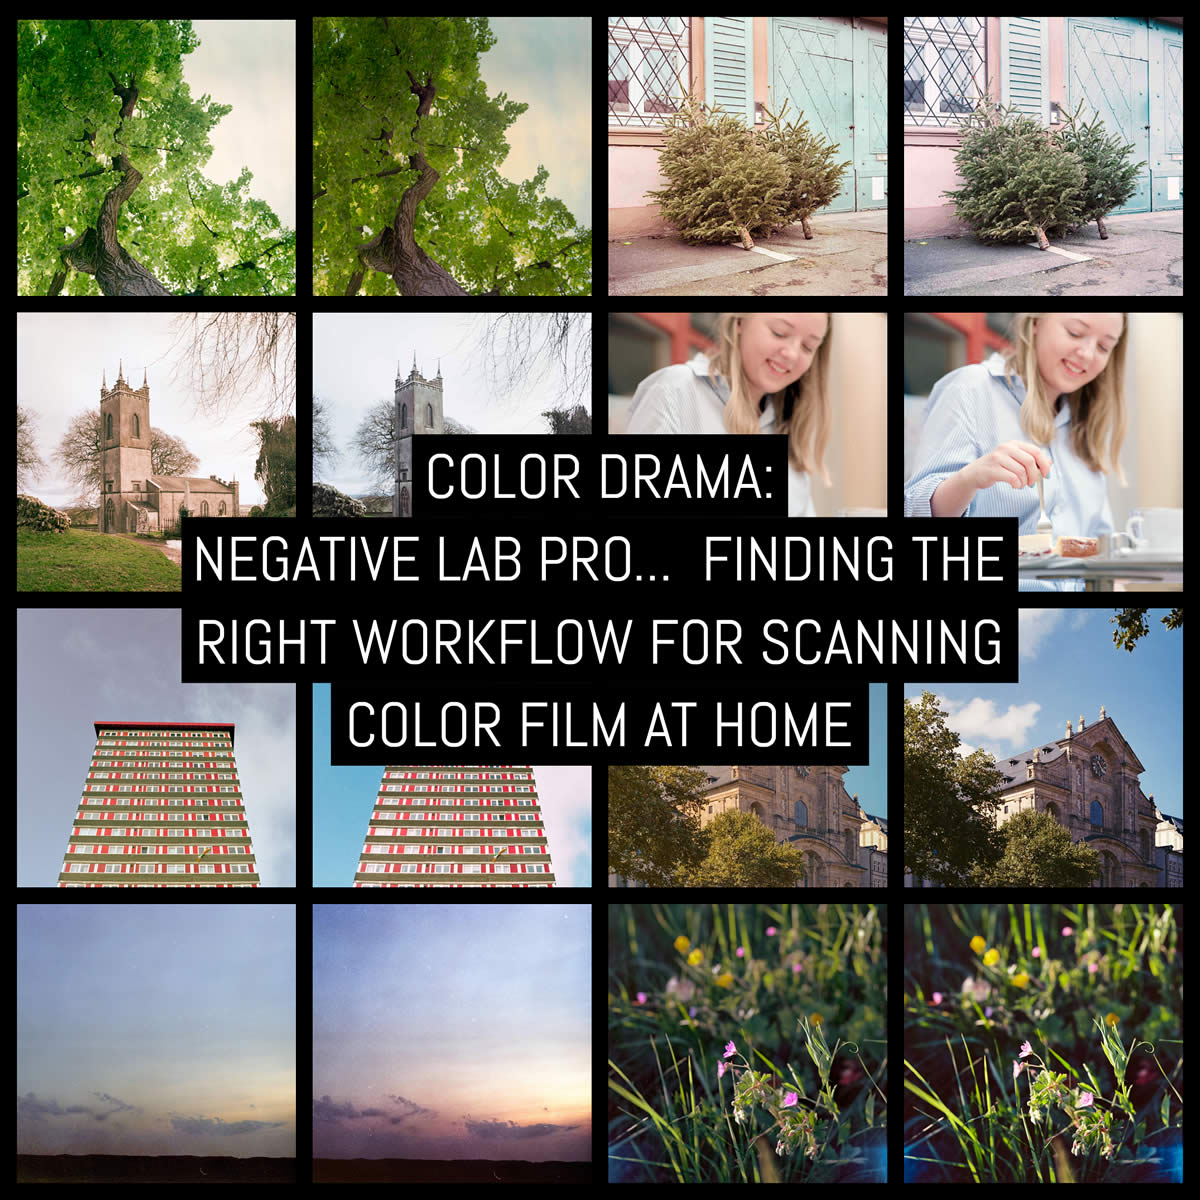
Negative Lab Pro results vs ColorPerfect
Remember that first gallery of color negatives processed in ColorPerfect earlier? Here’s each frame in a side-by-side re-processed in NLP. CP images are on the left, NLP on the right. Click/tap to expand and left/right to switch.
Fujifilm Fujicolor Pro 400H – ColorPerfect 
Fujifilm Fujicolor Pro 400H – Negative Pro Lab
Kodak Ektar 100 – ColorPerfect 
Kodak Ektar 100 – Negative Lab Pro
Kodak Ektar 100 – ColorPerfect 
Kodak Ektar 100 – Negative Lab Pro
Fuji Pro 160S – ColorPerfect 
Fuji Pro 160S – Negative Lab Pro
Fuji NPZ 800 – ColorPerfect 
Fuji NPZ 800 – Negative Lab Pro
Kodak VPL2 Type L (expired 1977) – ColorPerfect 
Kodak VPL2 Type L (expired 1977) – Negative Lab Pro
Fuji 400H – ColorPerfect 
Fuji 400H – Negative Lab Pro
Maike – Kodak Portra 160 – ColorPerfect 
Maike – Kodak Portra 160 – Negative Lab Pro
Kodak Portra 400 VC – ColorPerfect 
Kodak Portra 400 VC – Negative Lab Pro
Sarah – Fuji Pro 160S – ColorPerfect 
Sarah – Fuji Pro 160S – Negative Lab Pro
Seeing the ColorPerfect-processed images in the first gallery above may have left you feeling, “these are acceptable”. I hope that seeing the difference side-by-side here has helped change your mind about that.
The differences range from subtle to slap-you-in-the-face huge. Colour rendition is incredibly accurate – the two examples of brickwork and stone especially. Skin tones are much more natural, colour cast is reduced/eliminated and the images are much more consistent.
Final thoughts
If you are looking for a better or easier way to convert color and black and white negatives at home, you should try Negative Lab Pro. The demo is free and allows for 12 unwatermarked, full resolution conversions before asking you to put your money down.
To conclude my brief introduction to Negative Lab Pro, here is a quick glance of the underlying methodology, in order to provide an unbiased basis for judgement: All negatives were re-scanned under identical conditions for this article. The conversions are a starting point and show what both plugins can deliver if one is not interested in investing too much time in every single conversion. Not more than 45s were invested in every conversion.
More Negative Lab Pro examples follow:

Kodak Portra 160 – Negative Lab Pro 
Kodak Portra 160 – Negative Lab Pro 
Kodak Portra 160 – Negative Lab Pro 
Kodak Portra 160 – Negative Lab Pro 
Kodak Pro Image 100 – Negative Lab Pro 
Kodak Pro Image 100 – Negative Lab Pro 
Kodak Portra 160 – Negative Lab Pro 
Kodak Ektar 100 – Negative Lab Pro 
Kodak Portra 160 – Negative Lab Pro 
Kodak Pro Image 100 – Negative Lab Pro 
Kodak Portra 160 – Negative Lab Pro 
Kodak Portra 160 – Negative Lab Pro 
Kodak Pro Image 100 – Negative Lab Pro 
Kodak Ektar 100 – Negative Lab Pro 
Kodak Ektar 100 – Negative Lab Pro 
ILFORD HP5 PLUS, EI 1600 – Negative Lab Pro 
Kodak Portra 160 – Negative Lab Pro 
ILFORD HP5 PLUS, EI 1600 – Negative Lab Pro 
Fujifilm Fujicolor Pro 160NS – Negative Lab Pro 
Fujifilm Fujicolor Pro 160NS – Negative Lab Pro 
ILFORD HP5 PLUS, EI 1600 – Negative Lab Pro 
ILFORD HP5 PLUS, EI 1600 – Negative Lab Pro 
Fujifilm Fujicolor Pro 400H – Negative Lab Pro 
Fujifilm Fujicolor C200, EI 800 – Negative Lab Pro 
Fujifilm Fujicolor Pro 160NS – Negative Lab Pro 
Fujifilm Fujicolor Pro 160NS – Drumscan – Negative Lab Pro 
Fujifilm Fujicolor Pro 160NS – Caon EOS – Negative Lab Pro 
Fujifilm Fujicolor C200, EI 800 – Negative Lab Pro 
Fujifilm Fujicolor C200, EI 800 – Negative Lab Pro 
Fujifilm Fujicolor C200, EI 800 – Negative Lab Pro
One of the best things about NLP is the plugin’s support. Nathan provides excellent support, usually replies quite fast and listens to the community for recommendations about future features of the plugin. Additionally, there is a growing Facebook group and a dedicated Forum for community-based support.
I feel the need to clarify that I’m in no way affiliated with NLP or Nathan Johnson. My opinion about NLP is purely based on my own experience. I paid the full $99 and must say that the plugin is worth every cent. A few months have passed since I bought v1.2 of NLP and in the meantime it has been updated to v2 – at no additional cost – and many features users have asked for have been integrated. Overall, the software’s conversion mechanisms have been overhauled and work even better and are more reliable than before.
As always, thank you very much for reading!
~ Ludwig
P.S. Should you feel the urge to view more images from Malta, converted with NLP, head to my portfolio and view the gallery with further selected photographs.
Share your knowledge, story or project
The transfer of knowledge across the film photography community is the heart of EMULSIVE. You can add your support by contributing your thoughts, work, experiences and ideas to inspire the hundreds of thousands of people who read these pages each month. Check out the submission guide here.
If you like what you’re reading you can also help this passion project by heading over to the EMULSIVE Patreon page and contributing as little as a dollar a month. There’s also print and apparel over at Society 6, currently showcasing over two dozen t-shirt designs and over a dozen unique photographs available for purchase.


30 responses to “Color drama: Negative Lab Pro v2… Finding the right workflow for scanning color film at home”
“ColorPerfect seemed to be incapable of dealing with increased highlight density. The resulting scans were too often a mess with blown highlights last seen from the sensors of mid-2000s digital cameras. The beautiful and natural gradients of density rendition of color negative film were replaced by pure digital white blown out areas with hard and pixelated borders.”
Thank you for curing me of a GAS attack. I was considering replacing my scanner with a dslr and copy stand etc. Having used ColorPerfect for years, I have never had unrecoverable highlights. I figure you saved me at least a $1000.00.
Agreed. I would say no more than 10% of the bloggers who write on emulsive and other similar outlets really know what they’re talking about.
Feel free to raise the bar.
Fabrizio, I have no opinion about Emulsive. I got here on a search for information on dslr ‘scanning’. It is possible Ludwig and I get different results due to, for example, different versions of software. My take away was that perhaps a dslr ‘scanner’ would not work for me — or would not work unless I invested, as well, in new software (NLP).
I do not shoot Ektar; for a slow color film I shoot Portra 160. Ludwig and my choice of film is very different and we may have very different expectations regarding the results of scanning. I went to my log and saw I had shot two rolls of Ektar in 2009. I scanned three frames with plenty of white (sunny day, white clouds) and opened them in Photoshop and then the Color Perfect filter. No blown highlights.
I use three of the sliders in CP (for bw or c41): lightness, shadow, and gamma. Considering that making a print or web display version requires conversion to 8 bit jpeg, srgb, and resizing, some prep editing (curves, sharpening etc) is necessary and that may blow out highlights. Anticipating that, I notch down a few clicks of the lightness slider in CP.
Don
I have been using Colorperfect for donkey’s years. I will readily admit that the tool is not the most user-friendly and that it has a steep learning curve – it takes time to master it, and to make the best of all its functions a you, Don, will know.
My point was that, whether the starting point is a DSLR shot or a raw scan out of, for instance, Vuescan, Colorperfect will not – if used correctly – have problems with highlight density. Actually, fine tuning of highlight management is one of the strengths of the tool.
If Colorperfect is returning blown highlights, I can guarantee that it’s not Colorperfect’s fault.
Totally agree. CP does not blow highlights.
An excellent review, thank you, and it persuaded me to buy NLP. I’ve used it for the first time today on both black and white, and colour negative, and I’m delighted. It integrates beautifully with Lightroom, and the non destructive editing is a game changer. Fantastic!
I found this plug-in just as I embarked on a lockdown project to digitise my family’s negative archive. I can only imagine the pain and disappointment involved in the process before this software was developed. It’s nothing short of miraculous to see a beautifully balanced 1962 Kodacolor positive effortlessly appear at the press of a button… a few adjustment clicks later and you’re done. I am extremely grateful to the developer for this work – he made a 95 year-old mother gasp with delight. My only issue is that there is no stand-alone version of it and requires an Adobe subscription for Lightroom… presumably because it taps into some of LR’s functionality. I only use LR for this and have no need of Adobe’s other CC products that I have to pay for. A stand-alone version outputting TIFFs would sell like hot cakes, I suspect. Highly recommended.
Quick question: did you remove all trace of your negative boarder before you hit process. The lightroom images above indicates that you did not. (….However I have yet to use the software so maybe a dumb comment).
I wish they would release this software for all the other raw photo editors, including Exposure
Here’s my endorsement of NLP. It makes money for me. My clients absolutely love the images converted by it and I’ll never look back. And not only are the results great, but it really is so much fun and easy to use!
No affiliation, just a very happy customer.
Nice work Ludwig, and as a long time user of Colorperfect I have to say my findings match with yours in terms of the erratic results I get with it.
I’m not really sure however, the alternative software you’re testing is really worth it. Personally, I have found I can get the most consistent and satisfactory results using essentially one of Vuescan’s recommended advanced workflows.
Briefly, you subtract the orange mask of the roll of film you’re processing, and you do this once per film. This method does not use presets for film brands and stock type, and simply removes whichever orange mask your current film shows. Two rolls of Ektar 100 might show slightly different orange masks depending on film age, processing chemicals used, age/expiry date of the chemicals, film batch differences and so on. This means that a ‘bottled’ film preset is often sub-optimal, as some of the colour casts you have in your Negative Lab Pro conversions show.
Here’s a link describing the principles of this method (note that the author says he doesn’t use this anymore and prefers Colorperfect, I have done the opposite, having stopped using Colorperfect and preferring this)
http://benneh.net/techshit/better-colour-neg-scanning-with-vuescan/
Hi, Nate here, maker of Negative Lab Pro. Just a few thoughts on workflow and my intent with Negative Lab Pro.
There are plenty of other ways you *could* invert and edit a negative, but I really want Negative Lab Pro to make it a *joy* to do.
Specifically, that means:
**Separating Capture from Editing**
It sucks having to go back and forth in the “preview > edit > scan > save” cycle of hell that is proposed in your link. Being freed from this cycle is a game-changer. (You may not even realize how awful it is until you don’t have to do it anymore!)
**Non-Destructive, RAW Workflow**
I really hated how other methods destroyed the underlying negative in the conversion and editing process. What if I wanted to go back and reconvert or edit in a different way from scratch? I would either have to retain multiple copies of every negative, or go back and rescan if I forget to save as a copy. In Negative Lab Pro, the underlying, original negative is always there, ready for you to change the conversion assumptions, or fine-tune the edits without any data loss. Not only does this save on hard disk space, but it makes it easier to edit and re-edit negatives without creating any new files.
**True Batch-Processing**
Even if you use something like Color Perfect to separate capture from editing, the batch editing is essentially non-existent. And having to go through a roll of 35mm one shot at a time is a real drag. With Negative Lab Pro, you can convert 100s of negatives at once if you want. Or, you can use features like “Sync Scene” to copy and paste the settings from one negative to the next – things that are all but impossible in any other workflow. (Also working on some new stuff that will make this unique feature even more powerful).
**Initial conversions that get you 90% there (with simple tools for the last 10%)**
I’ve built a lot into the color and tone engines that automate the conversion process, and they should get you reasonably close to a finished image automatically. BUT, a lot of it will just come down to preference and artistic vision. Do you want your tones to be light and airy, or dark and ominous? Do you want a cooler or warmer palette? Negative Lab Pro gives you that control. Things that take minutes to do in other solutions, you can now do in seconds, with a level of precision that enables you to emulate specific lab scan setups if you want.
Anyway….
A long-winded way to say that I hope you’ll at least check out the free 12 shot trial, and see all that it has to offer vs other options.
Cheers,
-Nate
https://www.negativelabpro.com
annnnnnd this is why the Pakon is still so great haha. If someone made a scanner that can take rolls and use the pakon (or simillar) look up tables they would have an excellent product for modern day film shooters. This is way too much work in post production for the majority of people who want to dabble in film. Their biggest barrier to entry isn’t the film stock, its everything after.
I have no problem with the price of the features themselves that this plugin provides. It’s the same as for example Vue Scan.
If have a problem though, with paying monthly rent for Light Room. A piece of software I have absolutely no use for otherwise.
NLP does seem to be giving better results, but still some (cooler) colour casts to be corrected. To be honest your actual scans are not brilliant, poor sharpness and resolution on most images (or is that the original camera?). I also suspect that your exposures are not very accurate, leading to the random colour variations we see in both sets of samples.
Hey Edmund, I don´t really think you can properly judge sharpness and detail by the images here in the article. The site´s image management seems to compress them quite a bit. I made a small gallery with comparison images and according crops. What do you mean by random colour variation btw ?
here´s the link to the gallery:
https://ludwig-hagelstein.de/negatives-in-detail/
Thanks for that link, I definitely misjudged the quality of your photographs, some very nice work there! Your camera negative scanning method is way better than the Epson V700 I use on occasion.
I actually prefer a few of the scans on this page which you processed in ColorPerfect, some of the NLP versions being too cold/ cyan biased. I mostly do RA-4 darkroom colour prints, where it’s all about correcting colour casts, so I’ve become very aware of this aspect.
Went out and tried the demo with their sample files of Negative Lab Pro 2.0 – bought a license. Have the film holders and light panel on the way. Really wanted to shoot a lot more this year in film, and only facing the cost of processing locally instead of pro lab scanning makes a huge difference in the pocket book – excited and hoping it works as well in practice for me as it has for you. Great article and thanks for sharing.
Mark
Nice article, Ludwig! Very helpful to see your process.
$100 for a plugin is a bit steep, but this does look like a massive time saver. really seems to beat the way I was doing it in photoshop
This is actually super fucking cool. @alkanphel @GenkiGenki @jermso @nicshields ….. now to get a fu… https://t.co/yAnEciWoZR
Very interesting article. Your comparison between CP and NLP strikes me as quite convincing, especially the direct comparison of various scans you made. I will definitely try out NLP, as you maintain that the workflow is more straightforward and better suited to DSLR-“scans”.
One question, however, remains: which software – and which adjustments made manually – actually do justice to the original “look” of a particular film. How are these particular “looks” defined? Do they even exist? And does it all matter?
Thank for putting all this information together.
About the looks… That´s a good question. Use a Fuji negative film, print it on a Fuji negative paper like Crystal Archvie and play a bit with Cyan and Yellow. You´ll get an approximation of what would be a true representation of the scene. If you want 100%, shoot slide film. I think look is the wron expression, though. It´s more about how a particular film behaves in a particular scene and to use that to your advantage, imo.
Oh-kay! Looked through the comparisons. Looks to me like both “workflows” score equally. To give an example: On the high-rise image, NP does a much better job with the sky, although the clouds are pink. On the church, CP is a bit warm, but NP renders the church b/w and loses a lot of shadow detail. BTW, how were you getting your linear TIFFs for Color Perfect?
Hi Les, I can´t seem to follow you on the church thing. Could you elaborate a bit where it loses shadow detail? Additionally, the church was actually grey. The scene rendered in NLP is much more accurate than CP. It was a heavily overcast grey bad weather day at Tara, Ireland, when I took the image. In my opinion, the scene is much more faithful. I have no time right now, but I will upload a full res comparison on my server to enable you to judge the shadow detail thing properly 🙂 CP comes with a small maketiff.exe program that converts DNGs to linear .tiff files.
On the church. I imported your Color Perfect image into LR. I allowed myself one click only. My image looks an awful lot like your NP version. In CP, I would have single-left-clicked on the church. I did the same thing in LR with the white balance tool. Apparently I can’t upload the image here.
Have you tested as well photographing negatives in sections and stitching them together to boost resolution? I’m curious about this as well.
That is certainly possible through Photoshop and it works well for medium or large format negatives. Stitch the image in Photoshop with the Automate feature and then run the PNG file through NLP in LIghtroom. I’m not sure there would be a perceptible (or any) boost in resolution for 35mm film when digitizing with a full frame camera as long as the macro is working at 1:1. It would be very time-consuming to do on a large scale though.
Wow, Ludwig – gorgeous example gallery! Really stunning to see what you are able to do with Negative Lab Pro v2.0! Cheers! – Nate