Traditional photographic processes require forethought, preparation and involvement on the part of the photographer. To demonstrate this, I made crumpets from scratch and then made cyanotypes using them. Because, obviously.
With my confusing lead-in out of the way, let me rewind a little.
In early 2019, 100 members of the analogue photography movement were randomly selected to take part in a survey. In it, one simple question was asked – What’s your favourite thing about the film community?
A record was set when just one person responded before the deadline. Their response?
Crumpets.
So, if you want to hold someone responsible for what you are about to witness, blame the 1%.
Preparing your cyanotype paper
The first step was to coat my own cyanotype paper. The recipe I used for this experiment is from ‘Cyanotype – Historical and Alternative Photography’ by Pete Mrhar and is the modern formula emulsion.
Creating the two required solutions involves weighing the raw chemicals, adding distilled water and putting them into storage bottles. All pretty simple stuff, but buy the book (or follow similar instructions) and make sure you adhere to all the safety procedures.
Once the two solutions are prepared they are then combined in equal quantities and painted (using a soft brush) over the required paper/material, which is then left to dry overnight.
In this case, I used Daler Rowney 300gsm watercolour paper. It’s nice and thick and will look lovely when attached to the fridge with a magnet, used as a bookmark or given as a gift to a special friend you no longer want.
There are plenty of ways of getting started with Cyanotypes without going through this process, you can buy pre-coated paper, pre-mixed chemicals, or a starter kit from Little Vintage Photography.
My advice would be to not use Crumpets as your first print as that’s been done a million times before.
Preparing the crumpets
For completeness, and as we’re all fans of doing things manually here, the crumpets were handmade using the crumpet recipe provided in episode 6 of The Hypersensitive Photographers Podcast. Surely the finest version of the recipe in the world today.


Do not get confused when making the crumpets and cyanotype chemistry. Inevitably, any unused crumpets will be eaten and you do not want any cross-contamination.
Crumpet + Cyanotype = Crumpotype
Making Cyanotypes requires sunshine (or a UV lamp) but there’s no better time than summer to get your paper ready and crumpet mix on the go. If you live in a climate where the sun always shines there’s nothing stopping you making Crumpotypes all year round. Imagine the joy.
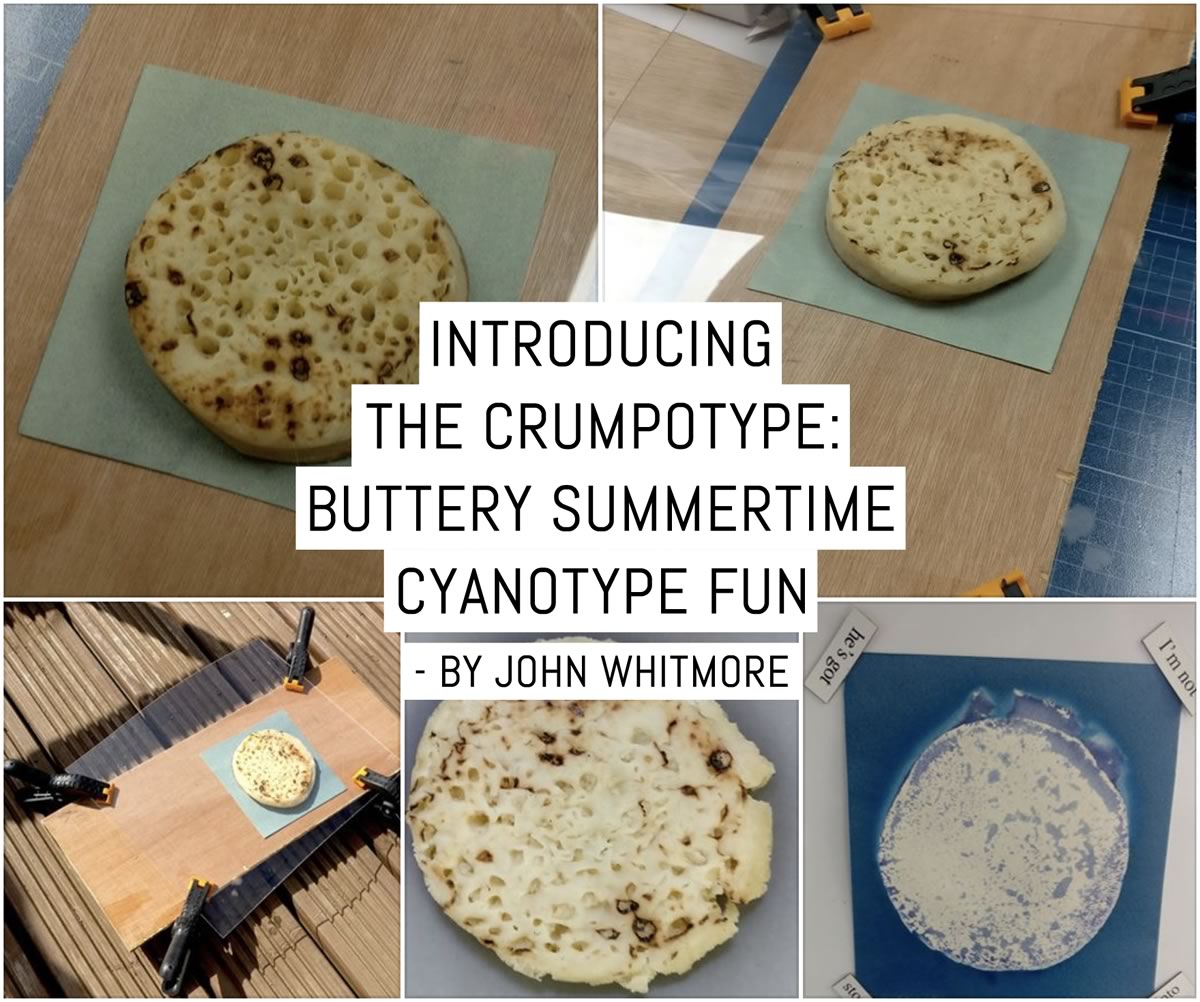
First up, you will need a full, untoasted (fairly soft) crumpet.
The crumpet is placed between a piece of the cyanotype paper and a plexiglass sheet, which is clamped down to prevent it from being eaten by birds.

Next, the assembly is placed in bright sunlight and left for approx 30mins (midday sun, late June, UK)

After, the exposed paper is washed under gently running water for 15mins.

The result of this, although having the distinct shape and actual size, was lacking somewhat in the all-important central, bubble holes.

This was nice but not optimal.
The next test was produced by carefully slicing off the top of the crumpet, as it was the crumpet base that was preventing light from reaching the paper through the crumpet bubble holes (technical term).
For this experiment, these were spread using a cocktail stick.

I really wanted an image that represented the holey goodness of a crumpet, as this is the most important part, allowing the butter to soak deep into the depths.
Test 2 was on a cloudy day so decided to leave it to expose for 1 hour.

I felt it still wasn’t representing crumpets to their maximum potential, so it was time for test 3. The final images you see below were made from two crumpets with the most potential and their ‘tops off’. To further ensure my new crumpet holes were not squashed shut, the slices were then returned to the frying pan and crisped.
This meant that the holes would remain well-formed and rigid during the exposure but unfortunately, it made them shrink.

It was a ridiculously sunny day and left them to expose for only 20 mins.
SUCCESS!

The final exposures are currently displayed on the fridge waiting to be purchased/stolen/thrown in the bin.
And there we have it, a new art form is made: the Crumpotype. The final image will depend on a combination of your culinary skills (both cooking and knife-work. And although I can recommend eating left over (unused) crumpets, I’m not so sure about eating those used for making the Crumpotypes.
Best check with your medical healthcare professional…or just throw them away to once you’re done.
Have fun!
~ John
Share your knowledge, story or project
The transfer of knowledge across the film photography community is the heart of EMULSIVE. You can add your support by contributing your thoughts, work, experiences and ideas to inspire the hundreds of thousands of people who read these pages each month. Check out the submission guide here.
If you like what you’re reading you can also help this passion project by heading over to the EMULSIVE Patreon page and contributing as little as a dollar a month. There’s also print and apparel over at Society 6, currently showcasing over two dozen t-shirt designs and over a dozen unique photographs available for purchase.


5 responses to “Introducing the Crumpotype : Buttery Summertime cyanotype fun”
This made me laugh…I am considering to use cyanotype visuals for logo creation for my tiny sourdough start up home bakery as I love it…and would you believe it…I did consider to give it a go with a nice open crumb slice of bread…so not so far fetched at all…however..might maybe stick with some barley, wheat spike ones and give it a go…I feel heartened that it is doable and would be great to have a logo or artwork from myself that relates to what I am doing and where the flour comes from…sun….. water…so actually similarities in the process which I find beautiful….
This is goofy beyond belief! Your crumpotype images resemble NASA close-ups of asteroids!
@thedarkshed Just judging by the title I though this was going to be about some crumpet-based emulsio… https://t.co/MBlPyJJ61Q
and now I’m both hungry and willing to print cyanotypes again soonest: are you proud of yourselves?
@thedarkshed So much fun. This article gave me a big smile. I appreciate how thorough John’s approach was.