Black and white printing is (obviously) fun, and easy to get into. I hope this introduction will help those that haven’t yet taken the step, to search out their nearest darkroom and get into printing.
I would like to point out that this is a generalised introduction – since I first learnt how to print in a black and white darkroom 10 years ago in high school, I’ve found that darkrooms can differ ever so slightly depending on who runs it.
Whether you join a shared darkroom or decide to build your own – always follow the procedure and rules of where you are printing and what brand chemicals you are using.
What you need to know in order to print from negatives
There are some basics things you will need in order to make prints in the darkroom;
- A bit of patience
- Negatives
- Photographic paper
An overview of photographic paper
When handling your paper in the darkroom, remember that like rolls of film, photographic paper is sensitive to light.
Black and white darkrooms are often fitted with safe lights – this will give you some light to work in, while at the same time be safe for handling black and white paper. Safe lights are not safe for unexposed film, however, as film is more sensitive to light than paper.
Photographic paper usually comes in a box, and inside there’s a black, light tight bag containing the paper. The bag guards your paper from light but the box does not – never leave paper loose in the box.
Papers come in different sizes, textures and grades. With graded paper, the number indicates their range in contrast. Grade 1 offers low contrast and grade 4 high contrast. This can be limiting, as you can’t really adjust the contrast of the paper itself.
With multigrade papers, you will have a larger tonal range, and can adjust the contrast by using graded filters in the enlarger instead. I’ve used a multigrade matt paper from Ilford.
The darkroom – dry & wet area
There are typically two areas in a darkroom – a dry area and a wet area.
The dry area is where you will most likely work first. It includes the enlarger and is where you will be exposing your negatives onto photographic paper. The wet area is where you develop your photographic paper after exposure, handling chemicals and washing your prints.
Wet area; developing prints
The paper goes through four stages known as baths:
- Developer – this develops your print
- Stop – stops the developer process
- Fix – fixates your print
- Rinse – don’t forget to properly rinse your print in water to avoid chemical residue
Some darkrooms have replaced the bath process with developer machines – wet printing vs dry printing. This can be beneficial if you don’t have much space or time, as the machine goes through the process quicker, but a machine can be expensive to maintain and limiting in what types of paper you can use. It also takes away some of the fun of printing.
Tip 1# – When wet printing, agitate the bath of developer once your print is in – careful not to spill! This gives you fresh developer “washing” over your print each time you agitate.
Tip 2# – When taking your print out of the developer bath, hold it above the bath to let it drain/drip rather than shaking it to get rid of excess dev. Shaking the print will spread chemicals to where you least need it, and it won’t speed up the process.
Enlargers and the exposing process
As with most photographic equipment, there are a variety of enlargers but they usually work following the same principal:
- Light shines through a lens and then through your negative, which is placed in a designated holder.
- Your image is projected onto photographic paper placed below.
Just remember to place your negative in the holder with its emulsion side down (dull side facing the paper).
It’s easiest to control the light and exposure time of the enlarger with a timer rather than manually turning it on and off. A timer will automatically turn the light on and off after the duration you set.
Enlargers can have interchangeable lenses, which together with adjusting the height of the enlarger can change how big or small you want your final print to be.
The most important part on the lens though, will be its aperture. Just like with a camera lens, the width of the aperture will determine how much light hits your paper and impact your exposure time.
Finding the settings for your final print is like shooting – creating a balance between time and aperture.
Start with your enlarger lens’ aperture wide open. This way, once you start making test strips, if the strip comes out overexposed (too light), you can stop down the aperture to restrict the amount of light coming out, rather than having to add long lengths of exposure time.
Making contact sheets
The first thing you will need to do towards making prints is create a contact sheet.
This is done by placing your cut rows of negatives onto a single piece of paper, either freestyle or in a see-through negative sleeve.
Designated contact sheet holders are available, but you can get away with using a clean sheet of glass that lays on top of the negatives, flattening them onto the paper.

First make an additive test strip to find the correct exposure time for your contact sheet. To to this, start by cutting a piece of paper into smaller strips.
Place a strip diagonally under your negatives, to cover a broader range of frames. This way you can see the difference in exposure across your negatives.
Set your timer to 5 seconds (generally a good interval to start at), and cover most of your strip with black card or board, only leaving a smaller part visible.
This is where the additive part comes in – by partially covering the strip, and exposing it 5 seconds, we will move the black card down to reveal more of the strip, exposing each new part for 5 more seconds.
You can see the results of this additive method in the image above, as the dark and light bands in the final 15 second strip on the right.
Depending on how big your photographic paper is, splitting it into 4 or 5 segments tends to give a good range of exposure.

Out of these intervals, you should either find one closest to a good exposure, or it will give you an indication that you need a longer time / smaller (more closed) aperture.
Take notes of any adjustments you need to make on each test strip – changes in time, aperture or contrast grade. Once you’ve found a good exposure time, you’re ready to create your contact sheet. Place a whole sheet of paper underneath the negatives, expose it and go through the development process.
With the contact sheet finished you can start picking out which gems you want to print larger.

Creating a large print involves the same steps, but this time you put the negatives into the negative holder, close to the lens of the enlarger. Make a test strip to find your exposure time (this will differ from that of the contact sheet; the sheet is a visual reference, not a technical reference) and work your way from there.
My process
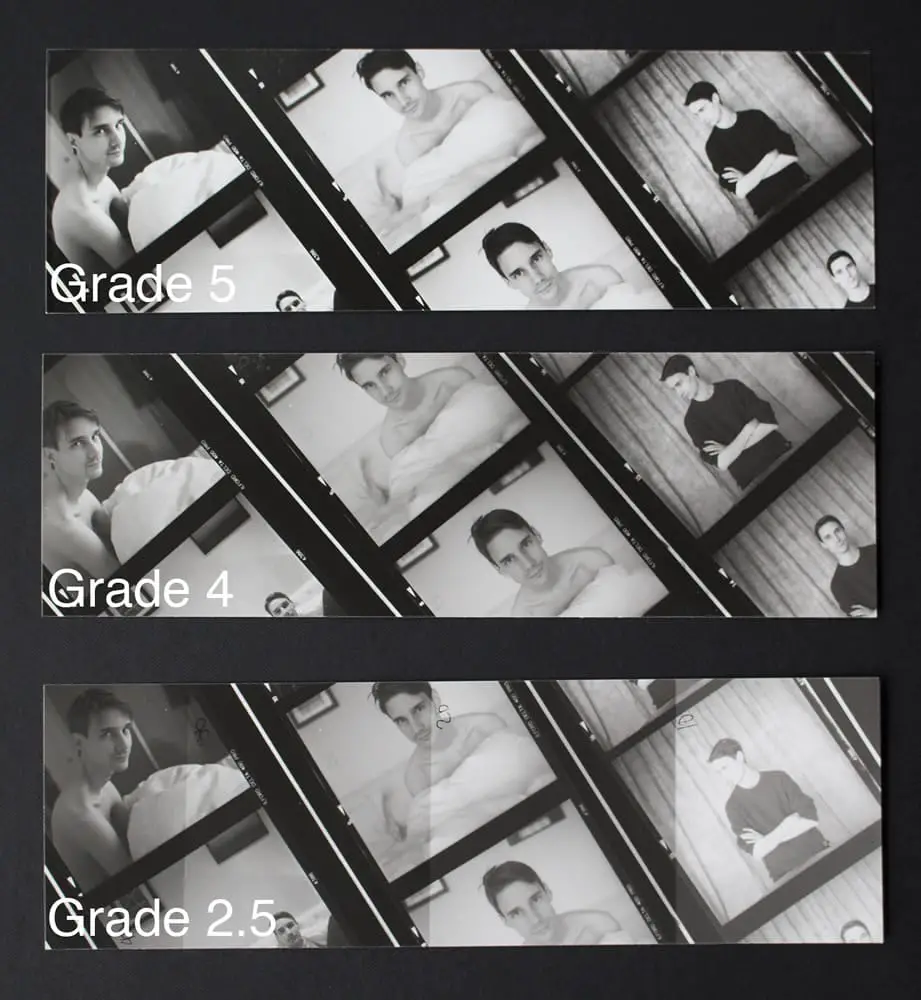
When I made the test strips for this introduction, I wanted more contrast in my final contact sheet. The enlarger I was working on had contrast filters built in, meaning I only had to turn a dial from 1 (low contrast) to 5 (high) to make that adjustment.
Depending on the enlarger you work on, you might need to place filters into the enlarger separately. The images below provide a few examples of the effect of these contrast filters on my test strips.


Once I had my contact sheet ready, I choose the frame I wanted to make a larger print of, and started the test strip process with selected negative placed in the enlarger.
Using 5 second intervals, I quickly found an exposure time that looked good to me, creating another test strip with a 7 second exposure.

Using a grade 4 contrast filter, I made a final print.

A decent outcome from one printing session!
Returning to the print a few days later, I would probably work on it a bit more before calling it a day.
In the darkroom I used, there’s both wet and dry printing. For this session I combined the two – dry printing my contact sheet and the test strips for it, I could work quickly having the machine develop my strips. For that, I used a resin coated, slightly glossy paper.
When I had my finished contact sheet, and could choose what I wanted to print larger, I switched over to the wet process – using a fibre based, matte paper, for a more final print.
Even though I quickly found a good exposure during this round, it took longer to print using the wet baths as the prints had to be in part of the baths for several minutes.
Now what?
Hopefully this has shed some light on black and white printing for those who have never experienced it. If you want to give printing at home a try, there is a multitude of resources online in terms of home darkrooms and what equipment and chemicals to get.
Otherwise, finding a local darkroom is the best place to start – participate in a workshop and see whether this is something for you. As a film photographer, there’s nothing more rewarding than printing your images with your own hands. Black and white offers a easy way in to printing, with plenty of room for experimenting and more advanced techniques available once you’re ready.
Thanks for reading!
~ Marta
Share your knowledge, story or project
The transfer of knowledge across the film photography community is the heart of EMULSIVE. You can add your support by contributing your thoughts, work, experiences and ideas to inspire the hundreds of thousands of people who read these pages each month. Check out the submission guide here.
If you like what you’re reading you can also help this passion project by heading over to the EMULSIVE Patreon page and contributing as little as a dollar a month. There’s also print and apparel over at Society 6, currently showcasing over two dozen t-shirt designs and over a dozen unique photographs available for purchase.


3 responses to “An introduction to black and white darkroom printing”
Thanks for sharing this, indeed its avjoy to work in the darkroom.
@walterrothwell Always great stuff from you and your people! 🙂
Looking forward to reading this. I just got my first enlarger and have never darkroom printed before.