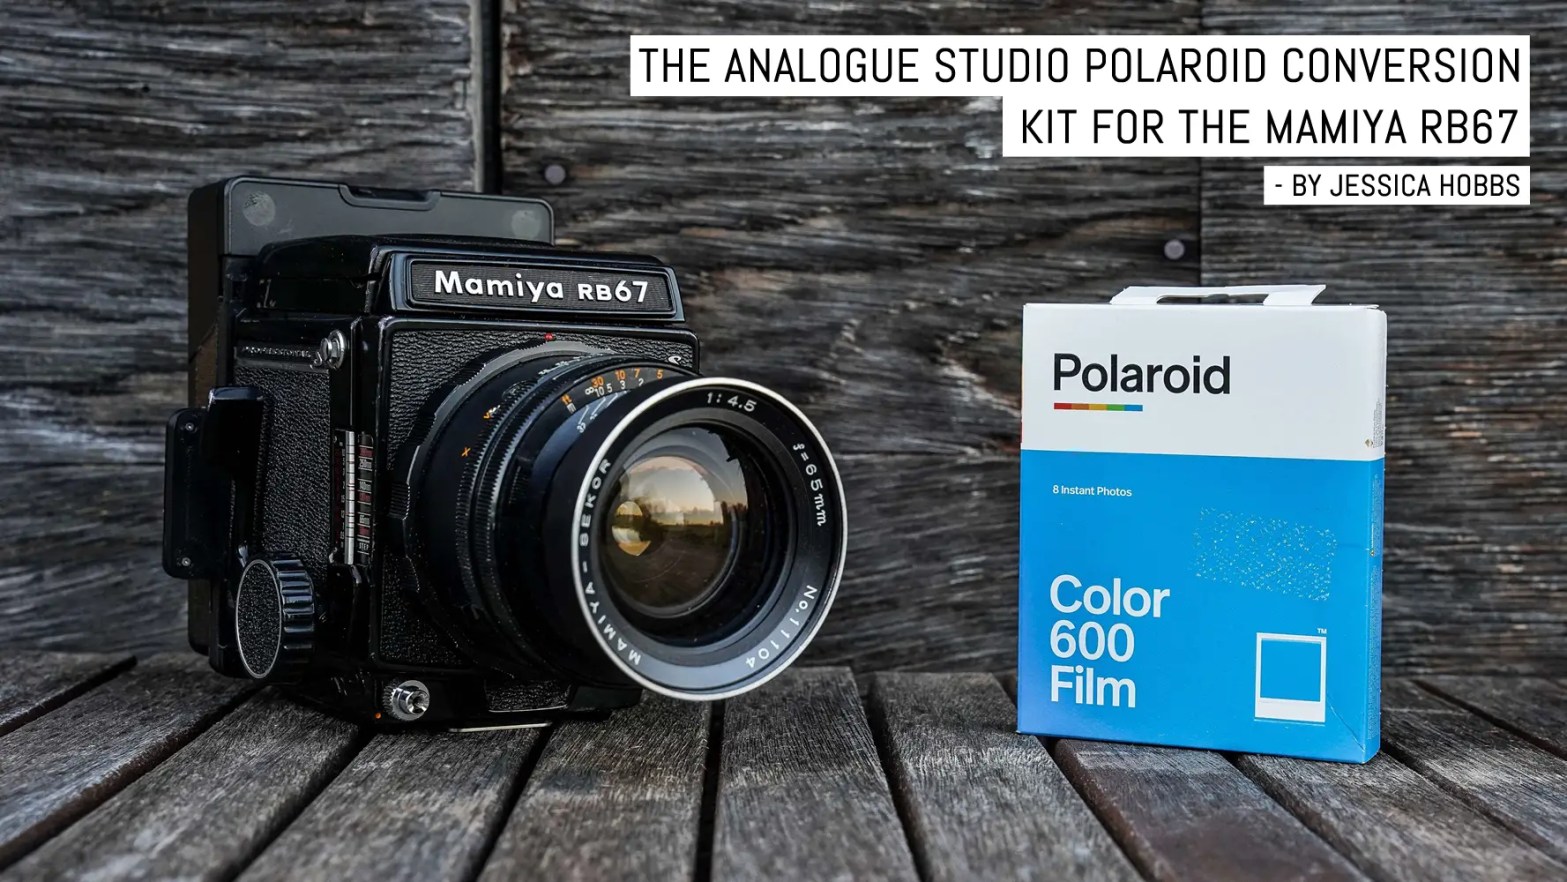
I get easily excited about the little things. Whether it’s a new film stock, a film stock revived from the dead (come on Agfa Vista 400!), a new camera, a newly discovered old camera, or literally anything with the word Mamiya in it, my creativity starts rolling and I get my butt off the couch and out the door! A prime example of this — and the focus of this article — was when I purchased a conversion kit that allows me to shoot Integral Polaroid film on my beloved Mamiya RB67.
Okay, two different conversion kits, I bought two… I admit it.

In October 2020 I wrote a 5 Frames article for EMULSIVE and uploaded a video to my YouTube channel in celebration of Fall Polaroid Week, an annual tradition that I eagerly await each year. Even though they are so much fun for me to film, those type of videos are among my least viewed, a stat which I am happy to disregard, as they consistently create great conversations with those who love Polaroid as much as I do, and that’s really the whole point of Polaroid Week, isn’t it?
This last video, however, got a much bigger response than I expected. In fact, it’s now become one of my most viewed. So, what was different about it? I shot Polaroids on my RB67 using the Rezivot/Impossible Instant Lab conversion back.
While the feedback was incredible, there was an undeniable undercurrent of disappointment, as it was stated that Rezivot no longer made these conversion kits and, to the best of everyone’s knowledge, there weren’t any alternatives. When asked where people could find a similar product, the most I could do was refer them back to Rezivot in the hopes that they would re-release it if the demand was there.
Enter Alin Tolea; founder of Analogue Studio
I met Alin in a conversation thread in the Mamiya RB67 Facebook group, where he mentioned that he was selling his own version of an Impossible Instant Lab conversion kit through his online shop, based in Washington, DC. Being a photographer and instant film lover himself, Alin clearly has a passion for creating and revamping products for the community, and his vision for the studio itself is to be a “source for instant photography hardware, facilitating the analogue journey for fellow light magicians and memory makers.” (Quote taken from his website.)
He seems to be continuously dreaming up new products while, at the same time, working on refining his current ideas. In my experience so far, his customer service is fantastic, and if you get a chance to check out his astrophotography, you are in for a treat!
Comparing the kits: quality, functionality, and price
Since the Analogue Studio conversion kit looked almost identical to the one made by Rezivot, I thought this would be a great opportunity to try out a product that is still being made, and hopefully reassure my fellow Polaroid shooters that there was indeed an alternative out there.
I sourced another Lab locally, ordered an Analogue Studio kit, and built myself a second back. There isn’t much of a point in comparing the two side-by-side because the Rezivot back is no longer available, but being so similar, there are obviously parallels as well as a few differences.

The main distinction is that the Rezivot version is injection-molded plastic, giving it a very clean and refined look, while the Analogue Studio model is 3D printed, so it’s a little rougher around the edges. And aside from the obvious difference that the Analogue Studio kit is still actually available today, it was also less expensive than the Rezivot ($125USD for the Analogue Studio conversion kit vs $220USD for the Rezivot), even when comparing the price of buying fully assembled backs, which is a huge plus in my book. Otherwise, they both essentially function in exactly the same way, even to the point of re-routing the eject button. The bottom line is that the Analogue Studio kit is, in my opinion, a suitable option if you are looking to shoot integral Polaroid film on your RB67.

The build: experiences, issues, and workarounds
The Analogue Studio back can either be purchased as a fully assembled functioning back, or as a kit you can build yourself. As I mentioned before, I chose to source my own Instant lab and assemble the back myself, so let’s take a moment to discuss my experiences with the build, should you be thinking of picking one of these up for yourself.
First things first; I am not much of a tinkerer, and while I do enjoy working with my hands, I don’t really build things. That said, I was able to put this all together, and it does work, so it is a relatively easy project to handle. Once you get past the fact of feeling like you’re monumentally screwing this up by viciously ripping pieces apart, it goes pretty smoothly.

One thing that I found phenomenally better with the Analogue Studio kit versus the Rezivot were the instructional videos that Alin has graciously filmed for us to follow along with. They are easy, clear, and concise. These videos made my job less stressful, and reassured me that yes, I’m supposed to rip it apart with my bare hands. Written instructions were emailed to me from Rezivot for their kit, and although some of them weren’t quite as clear as I would have liked, I did ultimately survive the process, but Alin’s videos were definitely a major upgrade.
I won’t bore you with a step-by-step recount of the process, but I will mention a few details that stuck with me:
First, prepping the conversion kit. Stray filaments are very common with 3D printed plastic parts, and while this is probably an unnecessary step, I didn’t want to take any chances of little hairs obstructing my images or mucking up the works, so I removed as many of them as I could to avoid possible future problems.
Second, cleaning up the rollers on the Instant Lab. Like Polaroid cameras, Impossible Project Instant Labs are old and need a little maintenance from time to time. Since I don’t know how they were taken care of or stored when I buy them, I always like to clean up the rollers with some isopropyl alcohol and a Q-tip to avoid uneven development or markings on my images; it might take a few runs to get it right, but then you’re good to go!
Now, not all Instant Labs are created equal, and this is where the confusion of short screws vs long screws comes in. When disassembling the Instant Lab, you will be left with 4 screws to be reused during the build; two short and two long screws. When attaching the 3D printed conversion kit to what’s left of the Instant lab, you are supposed to use short screws, and here’s why: when I disassembled my lab, my screws were all the same size. Yup, uh-oh.

I’d like to think that I proceeded to use my long screws in the build for the sake of this article and as a means to inform you, the reader, on the do’s and don’t’s of building your own Polaroid back, but we all know that’s not true. I ended up over-tightening the screw and accidentally broke off the piece that holds it in place, therefore no longer being able to attach the two components. I managed to Crazy Glue the broken component back together but was still left with a big question mark on what to do, as I now realized that all of my screws were, in fact, too long.
As film photographers, a lot of us are HUGE fans of the gear, and sometimes a thrift store camera is just too hard to pass on. We’ve all got them, and I’m sure we’ve all experienced the excitement of bringing a new find home only to find out that the camera is broken beyond repair. But even in death, these classic bodies hold great value, as tiny screws, springs, and gears are hard to source, and so that is why I have several “parts” bodies on hand that I use to breathe new life into my working gear, if issues arise. In this case, I used a tiny washer as a spacer for my long screw, salvaged from an old and broken Pentax K1000 that I keep for spare parts (seriously, is there anything more reliable than a K1000?? Even when torn apart it comes in handy!).

A little side note: I have spoken with Alin since, and I believe he has been able to source spare small screws, so he will be including a couple in case this should happen to anyone else.
The rest of the build was pretty straightforward after that, although I did experience light leaks from my first few test shots. Example:

The problem was coming from the dark slide, as I had neglected to test its ease of motion before fully assembling the back. Extremely hard to reinsert, my constant jiggling and bending of it caused light to sneak in and fog the images, however, after disassembling and loosening the tension on the infamous long screws, the dark slide moves in and out much easier and the light leaks have since disappeared.
Field test: The Analogue Studio Polaroid back in action Alin Tolea, founder of Analogue Studio
Now that we’ve gotten the more stressful part of this out of the way, let’s move on to the fun stuff!
As much as I do love my classic SX-70 camera in her beautiful brown leatherette, shooting Polaroids on a Mamiya RB67 is an incomparable experience. For starters, I now have the choice between any of available film options, 600, SX-70, or i-Type, without having to use any ND filters (unless I want to). The built-in battery on the Instant Lab means that I can opt for the eco-friendlier i-Type film, although I do have a personal penchant for the more saturated SX-70.
One of my favourite characteristics of the film is the ethereal, dreamy quality it has, and pairing it up with the beautiful range of Mamiya glass means I can now have technically sharp, but delightfully atmospheric images.
Another little side note: Alin also supplies replacement batteries, which is great because now we don’t need to worry that our labs will become obsolete due to old batteries unable to hold their charge.

Being able to focus easily, the RB67 and its bellows focusing system also allows me to get in much closer with my subjects so I can capture tiny details in a way that I simply can’t with my SX-70 camera. Having full manual control over my exposures is another obvious benefit over a traditional Polaroid camera, as I end up wasting fewer shots and have all kinds of creative control for techniques such as long exposures, double exposures, and even star trails!
I can now shoot Polaroids in just about any situation where I can shoot with my RB67, and that is really exciting to me… I am literally only limited by own imagination.


Yes, okay… but why???
And now comes the big question: why Polaroid when Fujifilm Instax is cheaper and almost as good?
While shooting instant film on an RB67 is by no means new or ground-breaking, it’s still a hot topic floating around the community. For the most part, unless you were one of the lucky ones to have stockpiled the film before it was discontinued, the original Mamiya backs that used peel-apart film are now unfortunately gathering dust in the bottom of boxes filled with obsolete flash bulbs, retro camera straps, and heaps of Instamatic and other unused cameras.
Lately, however, I’ve seen a lot of posts in various film photography related Facebook groups by those who are searching for other options, and the most commonly recommended solution seems to be an Instax Square camera hack, but for photographers who prefer the look and feel of Polaroid, as I do, it’s just not good enough.


Personally, although I do use Instax film in a variety of situations, I find the frames to be thinner and a bit flimsy. I find the saturation of Polaroid film is so much more suited to my style. Maybe I’m a little biased since some of my baby pictures were taken on Polaroids, so I have an added layer of affection for the film, but to me, there’s just nothing quite like a Polaroid. While Instax might be cheaper, –and you get two extra frames per pack — you can’t do emulsion lifts with them, which simply adds a whole other wonderfully creative aspect to an already pretty cool film.
In closing: a few final points
Before you start to think I’m all about the lollypops and rainbows, there are a couple of things to keep in mind when shooting Polaroid film on an RB67. The most important thing to remember, and I really can’t stress this enough, is to remember to remove the dark slide! The reason it is important to mention is that, on a standard Mamiya roll film back, the dark slide is pulled out to the side, whereas on the Polaroid back it’s actually removed towards the ground, so it can happen that you completely forget about the dark slide simply because you don’t see it.
Of course, I’m mentioning this for a reason… which may or may not be that I burned through an entire pack of Polaroid on my Rezivot back without having taken out the dark slide. $4 bills don’t exist in Canada, but that day, it sure felt like I had just thrown 8 of them in the trash! Thankfully Alin thought about this point, and he includes a very bright visual reminder to tape to the back.

Earlier I mentioned the ability to shoot long exposures when using the RB67, due not only to the bulb function on my RB, but also to the fact that I can control when to eject the image, which I can’t do when using my SX-70 camera as it happens automatically. This is really handy for me since I love shooting star trails, especially in late fall or early spring when there is no snow on the ground and the sky gets dark early, like, REALLY early in Canada. Additionally, Polaroid and cold temperatures do not mix well so being able to bring my camera indoors to warm up overnight before ejecting the frame helps ensure I’ll get an even development without artifacts caused by the cold. Of course, there can also be more possibilities for some really creative images if you want to try developing the film when it’s cold, but it’s an aspect that is harder to control, so you might not always get the results you are hoping for.

I still really enjoy using the Rezivot back, but now I also have another great option from Analogue Studio, which I would absolutely recommend to anyone who wants to shoot Polaroids on their RB67. I know that Impossible Instant Labs are getting harder to source as there was only a finite number produced, and so products like this might stop being made one day, but I do believe that there will always be someone, like Alin, who will find a solution to help us on our photographic journeys. I am always astounded by the sheer creativity that some people have to dream up and create these tools, and their desire to share it with the larger community never fails to inspire me.


If you are interested in purchasing a kit or a fully assembled back, here is the link to the Analogue Studio website: analogue.studio … and Alin’s photography can be found on his Instagram page.
If you’d like to see this back and the build in action, you can check out the video on my YouTube channel here:
Any questions, just leave me a note in the comments below or over on YouTube!
~ Jess
Share your knowledge, story or project
The transfer of knowledge across the film photography community is the heart of EMULSIVE. You can add your support by contributing your thoughts, work, experiences and ideas to inspire the hundreds of thousands of people who read these pages each month. Check out the submission guide here.
If you like what you’re reading you can also help this passion project by heading over to the EMULSIVE Patreon page and contributing as little as a dollar a month. There’s also print and apparel over at Society 6, currently showcasing over two dozen t-shirt designs and over a dozen unique photographs available for purchase.


2 responses to “The Analogue Studio Polaroid conversion kit for the Mamiya RB67”
What I know about Polaroid shooting would fit into a thimble, Jess, but your images for this article are SUPERB!!
You are missed, Lorraine. Sorry for not being in touch more from here at EMULSIVE HQ 🙏