In 1900, Eastman Kodak introduced the original Brownie camera, the first in a long-running series of affordable, easy-to-use cameras for the general public. The original Brownie sold for $1 and a roll of film for $0.15 (approximately $30 and $5 respectively, adjusted for inflation in 2019).
The original Brownie was simple in its construction, essentially a leatherette-covered box made from cardstock. Over time, as production methods improved and new materials became available, many more Brownie models were brought to market.

Cover of Kodak Brownie Hawkeye Flash Model manual 
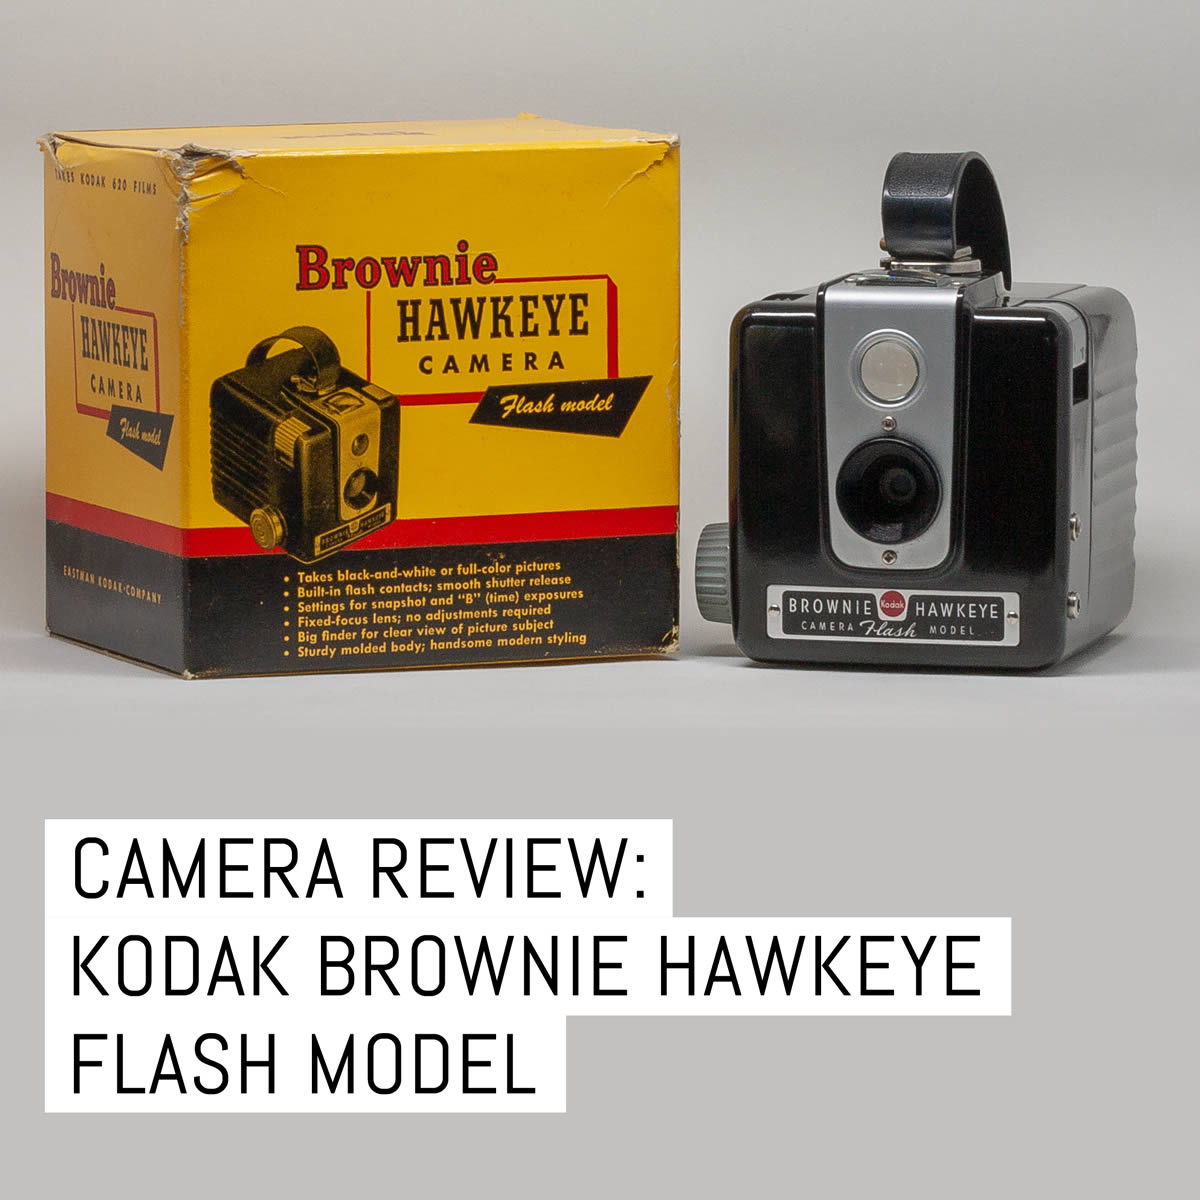
Kodak Brownie Hawkeye Flash Model with packaging
In 1949, Kodak released the Brownie Hawkeye Camera, one of the most successful and iconic cameras ever made, which was produced until 1951 at which point it was updated to become the Brownie Hawkeye Camera, Flash Model. Production of this model ceased in 1961.
This review is exclusively about the flash model, which differs from the original Hawkeye by allowing the photographer to attach an external flash unit, which is synchronized with the camera.
In pictures

The Hawkeye is a medium-format box camera that utilizes 620 format film (more on that later). Each roll of 620 film gives you 12 exposures, with each negative being 6x6cm (2 ¼ x 2 ¼ inches).
The camera lens is a single element meniscus lens (glass or plastic) with a focusing distance fixed from 5 feet to infinity. The lens has a fixed aperture in the range around f/16 and the focal length of the lens is somewhere in the 80mm range (these are my estimations, sources on the internet vary on this).
The camera’s shutter is fixed somewhere in the range from 1/30th to 1/60th of a second (also more on this later) and has the ability to take long (bulb) exposures. The shutter is based on a rotary mechanism, in that it rotates around to expose the film.


The body of the camera is manufactured from molded Bakelite plastic and has a convenient carry strap integrated into the top of the body. Forward of the handle is the viewfinder, which is the waist-level, uncorrected (reversed) image type. The camera body separates into two pieces and is held together by a lock that rotates around the handle stud. There are no foam seals that can degrade on the camera.
Film advance is facilitated by the small knob on the lower right side of the body, which only spins in one direction. A small red window is inset into the rear of the body for keeping track of the frame numbers printed on the paper backing of the film.
Accessories
Box cameras are not particularly known for their accessories – they are simplicity itself. that said, Kodak did produce a number of handy options for the flash model, including a close-up lens, flash options, a leather “field case” and a “cloud filter”.
Kodak Close-Up Attachment No.13


Kodak produced a series of interchangeable lens attachments for their cameras. According to the manual, Kodak marketed two attachments for the Hawkeye, a cloud filter and the Close-up attachment. Of these two, I only own the close-up attachment although I don’t see why any of the other “No. 13” sized attachments wouldn’t also fit on this camera.
The Close-up attachment slips over the front housing of the lens and is kept on via friction fit. Normally, the Hawkeye has a fixed focusing range of 5 feet to infinity. With the Close-up attachment on, the focusing range changes to between 3 and 4½ feet. There is no parallax compensation on this camera so the closer you are to your subject, the higher you’ll have to tilt your camera upwards (otherwise you would cut-off the top of whatever you have in the viewfinder).
The Close-up attachment is a neat accessory to have. In practice, it requires you to carry one more thing in addition to the camera and it is a tight fit to attach it. It is also easy to forget it’s attached because it looks like a part of the camera. Unless you regularly practice eyeballing distances to things or carry some sort of measuring device, most people will have a little trouble getting the subject within that 3-4½ foot “sweet spot”. However, when you do get your distance correct, the Close-up attachment works nicely.
Kodalite flash
As mentioned in the introduction, the original Hawkeye model did not have any means for the attachment of a synchronized flash unit to the camera. The Hawkeye flash models were modified from the original to have two ports on the left side, one threaded and one straight, for the flash unit to attach to. The first flash unit marketed for the Hawkeye was the Kodalite Flasholder (pictured on the front cover of the manual).

The Kodalite Flasholder was quite large compared to the Hawkeye. It used two size C batteries and accepted several of the larger sized flashbulbs. Later, Kodak released the smaller Kodalite Midget Flasholder (above), which used two AA sized batteries and accepted the smaller M2 flashbulbs as well as the larger #5 and #25 (an M2 flashbulb is pictured above and below).
Both of these flash units are synchronized with the camera, which means when you press the shutter button it also fires the flash at the correct time to maximize the brightness of the flash with the opening and closing of the shutter. I prefer to use the smaller M2 bulbs instead of the larger bulbs because the M2 bulbs are cheaper and more widely available in the present day. The M2 bulbs were also made in two varieties: the standard, clear, bulbs and another with a blue coating, the M2B flashbulb.

The blue tinted light emitted by the M2B (and other blue-tinted flashbulbs) is intended to be used with color film to correct the more yellowish light cast by the clear bulbs.
On the topic of flashbulbs (From my Mamiya Super 23 review):
“For those unfamiliar with the difference between electronic flash and flashbulbs, an Internet search can easily provide you with a detailed explanation on both. In general, modern electronic flash units use a small tube filled with a gas. When a high voltage current is passed through the tube, the gas ionizes and produces a bright flash of light. The total light output is variable and the flash unit is reusable, meaning it can be flashed over and over again.”
“Flashbulbs, by comparison, only have one output, full. They produce their light by burning foil or thin wire crammed inside of a glass bulb. They can be used only once before needing to be replaced by a new bulb. They burn quite brightly for their size and being on the receiving end of an ignited flashbulb up close is kind of like looking at the sun. You will be seeing a spot in your vision for a while afterwards.”
“For tasks which many current-day photographers would use a camera with flash to accomplish, an electronic flash unit is more versatile and cost-effective than using one-time-use flashbulbs that can be difficult and expensive to source. However, if you want to dump a ton (scientific measurements here) of light at something, a flashbulb is the way to go.”
It is important to keep in mind that since you cannot change the shutter speed or aperture on the Hawkeye, the only way to moderate the amount of light reaching your film is to move yourself closer or farther away from your subject, use a less powerful flashbulb, or attach something to the flash unit to diffuse or block the light. Of these three options, simply changing your distance to the subject is the easiest to do. For easy reference, there is a table printed on the back of the Kodalite Midget Flash with recommended distances for specific flashbulbs.
Kodak Field Case
The Kodak field case fits over the Hawkeye and has a hinged cover with snaps on top. When you unsnap the cover, the front swings down. There is a notch cut out on the left side that allows you to keep the flash attached while the case is on. The rear of the case has a small hole punched out so you can see what frame number you are on through the red window on the camera. Finally, a non-adjustable neck strap is permanently attached for ease of carry.

From a visual standpoint, I really like it. The embossed Kodak logo on the front is a nice touch as is the contrasting stitching. From a practical perspective, I don’t like it at all. I’m not sure the material it is made of is actually leather. If it is, then it is the lowest quality bonded leather. The snaps on the hinged cover are difficult to put on and take off and the leather cracks easily. If you finish a roll of film and want to insert another, you have to take the entire camera out of the case, which is also difficult to do.
If you want a fashionable case and want to have the convenience of a neck strap to carry your camera, by all means, get the field case. It keeps the shutter button covered up when the front is attached so there shouldn’t be any accidental exposures, however, the winding wheel is fully exposed so you still have to be careful to not accidentally advance the film.
Kodak No.13 Cloud Filter

This is a 25.5mm friction-mounted Series V filter for the Kodak Brownie Hawkeye, Flash Model. It’s a medium yellow colored filter and other Series V filters will fit the Brownie Hawkeye.
Using 120 film in the Brownie
The Hawkeye box pictured at the top of this article states that only 620 film can be used in this camera. Likewise, when the camera is opened, it clearly states to load only with Kodak 620 film and cannot be used with 120 film.
The bad news is Kodak discontinued 620 film in the 1990’s. The good news is 120 film can easily be used in the Hawkeye. The only difference between 120 and 620 film is the size of the spool.
The 620 spool (pictured on the left) has a narrower core along with thinner and smaller ends than the 120 spool (pictured on the right). The same film can easily be wound onto either spool. Early Hawkeye cameras could use both sizes interchangeably until Kodak made the decision to modify the film holders on the camera to only accept the 620 film. My guess for this move is so Kodak could further capitalize on sales of their film with their own brand of cameras, whereas 120 film was produced by a variety of manufacturers.

If you have one of the earlier Hawkeye cameras, no modifications are needed for you to use any type of 120 film. If you have one of the later Hawkeyes (like mine), it might require you to make your own modifications. On mine, I bent back a small metal tab on the upper film holder (where the new roll of film goes). I also use a 620 spool to take-up the film on the bottom. Thankfully, 620 spools are easily available on the Internet and through enthusiast shops. If making a modification to a camera isn’t something you’re comfortable doing, it’s simple enough (using a darkroom or a film changing bag) to take the film off of a 120 spool and re-roll it onto a 620 spool. Also, hand-rolled 620 film is available through some online sources (most notably, The Film Photography Project).
In practical use, having a roll of 120 film in a modified Hawkeye can cause some challenges. Because the spool is a different shape, I tend to get resistance when winding the spool at the beginning until I’ve gone through enough of the backing paper and the film actually starts. The film also has a tendency to wind in a slightly diagonal direction because of the different shape of the 120 spool. Occasionally, I’ll end up with a “fat roll” on the 620 take-up spool.
Sample photos


In practical use and other conclusions
It is important to keep in mind the hard limitations of this camera when using it. You cannot change the shutter speed and you cannot change the aperture. The leaves film type and speed as the only variables you can alter. This makes it very important that you take your subject and the environment it is in under consideration.
Thankfully, most film has a wide exposure latitude, somewhat negating the physical limitations of the camera. I’ve used Kodak Portra (160 and 800), Kodak Ektar 100, Kodak TMax 100, and Fujifilm Acros 100 on sunny and partially overcast days in my Hawkeye without any problems.
For basic use, any 100-speed film on a sunny or bright cloudy day should work well for you.
I’ve used some slide film in this camera but it’s more of a gamble when using this type of film because of its inherent narrow exposure latitude. While there is a switch you can pull out on the camera to take long, untimed (bulb) exposures, there is no tripod mount on the body so you have to find something to mount or brace the camera against to prevent a blurry image. There is no way to attach a cable shutter release to help counter my unsteady hand.
The Hawkeye is probably not a good choice if you wish to take clear photographs of fast-moving subjects. Because of the slow shutter speed, it is easy to blur moving objects and likewise if you don’t have steady hands when taking the shot. Your subject might also come out a bit soft when photographed at the closer distances. Because the lens is a simple meniscus design, you’ll end up with some distortion and loss of sharpness around the edges of the frame. There is also no interlock to prevent double or multiple exposures.
Creative photographers can turn these limitations into advantages. For example, the Hawkeye is relatively easy to take apart in order to access the internal mechanisms. Some photographers intentionally take the lens out and reinsert it facing the other direction. This results in images with a relatively sharp center with the rest of the frame being out-of-focus. Double (or multiple) exposed images are also an easy thing to create. Some people who have knowledge of 3D printing and design have come up with customized accessories for their Hawkeyes, like brackets to hold it in a tripod, cable release setups, filter holders, and so on. Those who are more willing to modify the camera itself can build their own integrated cable release and tripod sockets. An Internet search can show plenty of examples of these things.
If you are equipped to make your own darkroom prints, contact prints from the negatives from the Hawkeye look great. If making enlargements, 4×4 inch prints also excellent. Naturally, you can enlarge these to bigger sizes as medium format film preserves more detail that could possibly be lost through using a smaller format.
Do not forget that these cameras are all quite old now. As a result, they behave like old cameras. Most have never been serviced and many show a considerable amount of wear and tear. Some might have sticky (very slow) or inoperative shutters, non-functional flash synchronization, or other broken internals.
Kodak never intended these cameras to be high-end professional tools; they were meant to make photography more accessible to the amateur who was more interested in taking a picture of the family vacation or a child’s birthday party. Because so many were manufactured they are acquired for a relatively low price. Mine cost less than $20 and can frequently be had for much cheaper when acquired through a flea market or found hidden away perhaps in the basement or attic of a relative’s house.
Finally, don’t overthink it when using the Hawkeye! By not having to worry about adjusting camera settings you can concentrate entirely on your subject and what message you want to convey with your photograph. While this seems intimidating at first, it is also incredibly freeing once you get used to it. Get out there and take pictures!
Thanks for reading,
~ Kikie
Kodak Brownie Hawkeye, Flash Model technical specifications
| Camera name | Kodak Brownie Hawkeye Flash Model |
| Camera type | Box camera |
| Format | 620 rollfilm or 120 film |
| Image format | 6×6 (2 1/4 X 2 1/4″), 12 exposures per roll |
| Manufacturer | Eastman Kodak Company |
| Manufacture dates | 1950 – 1961 |
| Shutter | Appx 1/30 sec to 1/60 sec |
| Lens | Meniscis (glass or plastic) 5ft – infinity |
| Accessories | Kodak Close-Up Attachment No.13 (3-4.5ft focusing distance) Kodak Cloud Filter No.13 Kodak Field Case |
| Metering | None |
| Flash | Kodak pin and screw – B-C Flashpack/Kodalite Flasholder (SM, SF, No.5 or No.25) |
| Power | N/A |
| Weight | Appx 16 oz / 450g (without case) |
| Dimensions (WxHxD appx) | 3.75″ x 3.9″ x 4.5″ 95mm x 100mm x 115mm |
Share your knowledge, story or project
The transfer of knowledge across the film photography community is the heart of EMULSIVE. You can add your support by contributing your thoughts, work, experiences and ideas to inspire the hundreds of thousands of people who read these pages each month. Check out the submission guide here.
If you like what you’re reading you can also help this passion project by heading over to the EMULSIVE Patreon page and contributing as little as a dollar a month. There’s also print and apparel over at Society 6, currently showcasing over two dozen t-shirt designs and over a dozen unique photographs available for purchase.


8 responses to “Camera Review: Kodak Brownie Hawkeye, Flash Model”
Today, Sep 3, 2019, I was walking along the creek by my house (in the Black Hills of South Dakota) which has been running full blast all summer due to all the rain we’ve had this year. Standing at my favorite spot I happened to look down at the wet rocks below and spotted a small round discolored case that said KODAK on top. The constant torrent of water must have uncovered it or washed it down my way from somewhere upstream. I retrieved it and took it home. I had to use two channel locks to screw the top off but inside was a thoroughly soaked “NO. 13 KODAK CLOSE-UP ATTACHMENT.” Some unfortunate amateur photographer must have lost it in the creek some 60 (or more!) years ago when this property had a now-defunct rail line running through it. The inside of the case lid was still the original bright yellow. Glad to have found this page which helped me determine what this little lens was for and from what era it had come from.
If you have a 120 roll that’s too tight in a 620-based camera, sand or file down the ends of the spool a little. It doesn’t take much. Just lay the sandpaper or file flat and rub each end on it.
Thank you so much for the review. Great and valuable information.
Thank you for reading my review!
Hey Kikie, I have one of these and yours takes a lot sharper photos than mine does 🙂
Great read!
Thank you for taking the time to read my review! My Hawkeye gets temperamental from time to time. I had to give it a good cleaning when I bought it!
Some absolutely fantastic shots from the most rudimentary of cameras. Really enjoyed this review – thanks for posting.
Thank you for reading! It really is a great camera.