“Are you drilling?” asked my bleary-eyed wife, coming out of the bedroom of our small apartment at 1:30am. My desk was cluttered with tools, plastic shavings, and a half-completed CAMERADACTYL Brancopan 3D-printed camera. Of course I was drilling: the Brancopan has 27 fasteners with 1,094 thread revolutions, and there was no way that I was tightening them all by hand. I have standards. Reason prevailed though, and I packed it up for the night. The next morning I pulled the artillery back out and sent all of the M3 socket head cap screws to their nylon homes, thus completing the assembly of the camera.
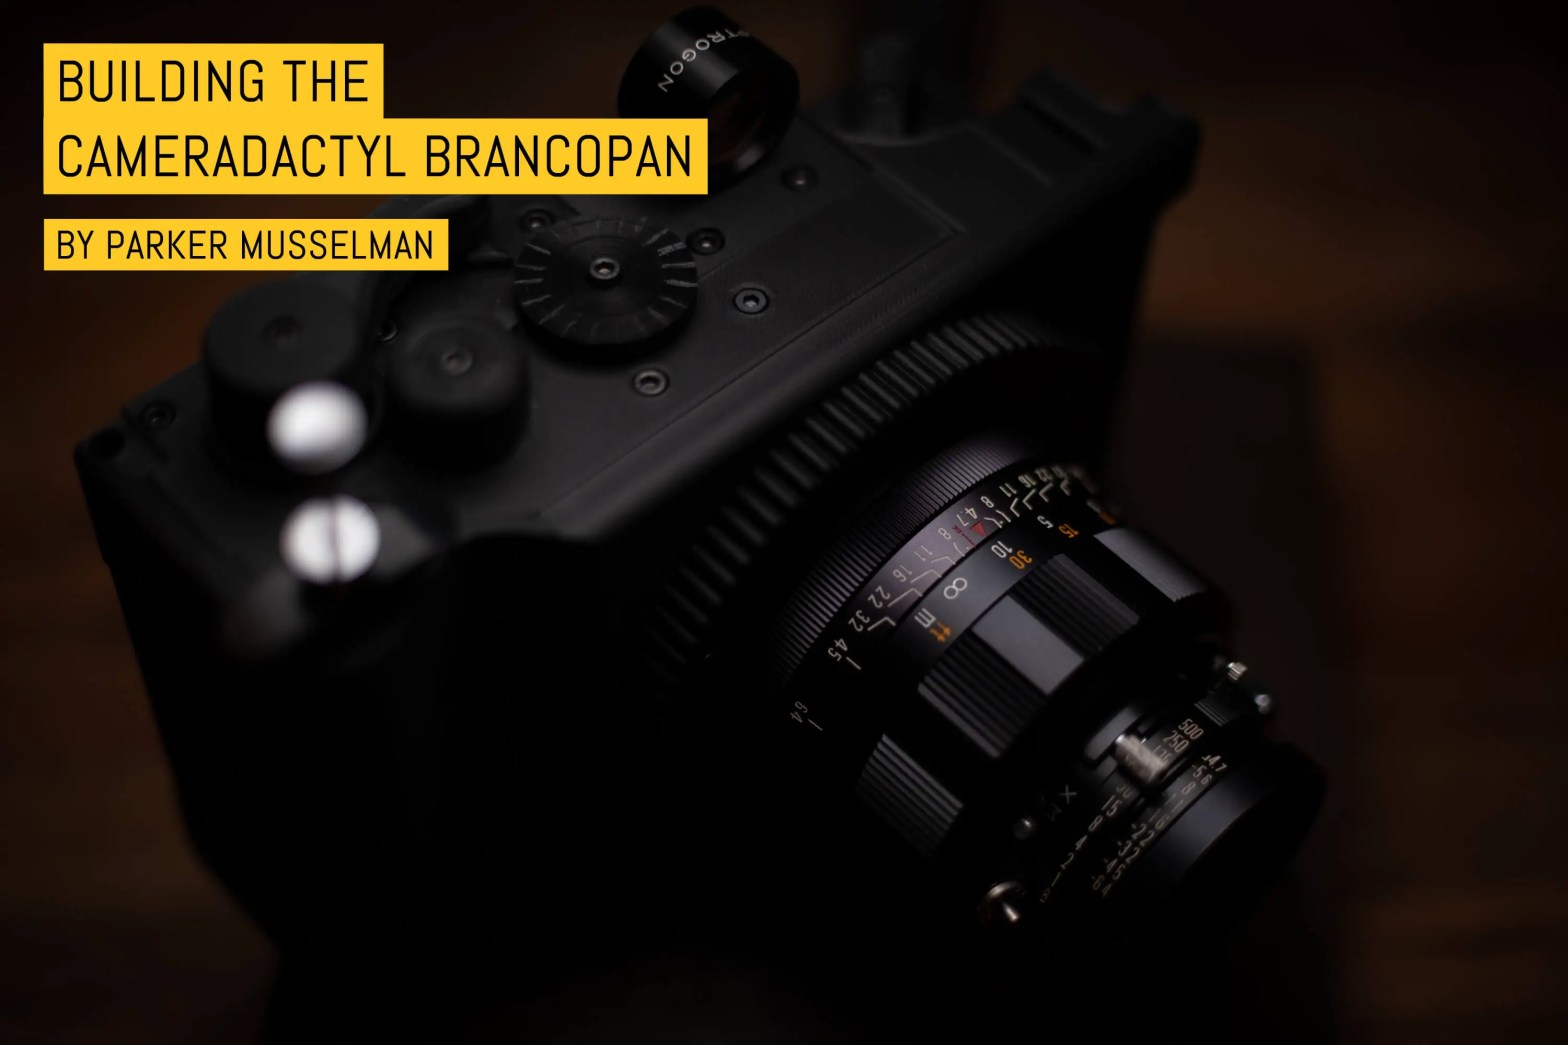
As you may know, the Brancopan is a 3D-printed camera designed by @ethan-moses of CAMERADACTYL fame, first released as a Kickstarter campaign. It shoots 35mm film at a 1:2.4 aspect ratio (20x 24x58mm frames per 36 exposure roll), similar to that of the Hasselblad XPan (64x24mm or 1:2.66), for that cinematic V I B E.
To use the Brancopan, you will need to be comfortable with zone focus or use an external rangefinder, as there is no built-in focusing system (I love the diminutive Blik rangefinder for this task). The camera represents an evolution in the Cameradactly ecosystem with the development of a unique and entirely printed film advance and counter mechanism.

On this note, creating a functional 3D-printed gear train for the hobbyist-grade FDM masses is a non-trivial task. Tolerances need to be blown out, parts need to get large, and most features need to be “applied directly to the forehead.” This is not a Ferrari, but it’s very appropriately designed for its fabrication format. It’s like a Land Rover Defender: simple, easy to fix, but finicky at times. The Brancopan uses only standard hardware, cap screws and two pen springs to energize the door release and frame advance. 3D-printed cameras, like the high-zoot offerings from Panomicron, require much higher tolerance prints from machines inaccessible to mortals.
This is the people’s 3D printed camera.
The shutter, aperture, and lensing duties of the Brancopan are all shared by the Mamiya Press line of lenses, common to other 3D printed cameras like the Goodman designs and Argent Eye, due to the system’s short flange focal distance (FFD) and leaf shutter lens design that can be easily cocked and triggered without connection to a body.

While prices have reached soaring heights with the current interest in 3D printed cameras, you can still find an entire Press camera for under $200. The lenses aren’t any cheaper by themselves, so I’d advise getting the whole camera. It’s fun to shoot, and you can impress your friends with one of the oddest looking cameras out there.
The result of the lens size combined with the Rubenesque film advance mechanism is an absolutely massive chunk of plastic.
The body alone takes 29 hours and 400g of filament to print. My first body tragically failed after 25 hours of printing, but I took my woes to Instagram where a pitying friend from Markforged offered to print the system for me (thank you, Nick!). I believe that the difficulty that one will have in assembling the camera is directly correlated to print quality, and I was very spoiled with the top-quality of these prints. That said, with the stunning parts I started with, it was still an ~8-hour project….which I’ve condensed into a short, sub-30 second video for you below. You’re welcome.
Bring your drill and channel your inner sculptor, as each Brancopan will need to be uniquely scraped, shaved and whittled into creation.
Once you have all the gears spinning smoothly, and the frame advance mechanism working, it’s time to test the lens focus with a piece of ground glass on the film plane. I would say this is not an optional step. As this is a zone-focus type camera the markings on the lens need to match reality. I found that the FFD — Flange Focal Distance — the distance from the lens to sensor, was not correct on my camera. With the lens set to infinity, the focus was behind the film plane.
In order to test the camera, I found where infinity focus was on the stroke of the zoom, something like 6m. At this point, I was also able to approximate where the frame lines would be in a little cold shoe viewfinder. Ethan also provides a 3D Model for a printable sportfinder.


Shooting with the camera is fairly straightforward, though there are a few “gotchas.” The process of loading film resembles most 35mm cameras, but keeping the film from slipping out of the take-up spool requires some active management. The film advance lever is the opposite of your silky smooth SLR: rugged, clunky and clicky, though it gets the job done most of the time. You cock the shutter, set the aperture, shutter speed and focus on the lens, compose in your chosen viewfinder, and let ‘er rip with a cable release jammed in the grip.
After a few shots, the motions become quite routine and drama-free and shooting becomes more fluid. While the lens is on the heavier side (it covers a 6×9 medium format frame), the camera is actually relatively light and the ergonomics suit it’s robust size. Though its dimensions are larger, it’s half the weight of my Bronica S2.
I’ve only shot one roll through the camera, but I can say that it was a completely original experience for me. To test the camera, I went for a short walk around my block and came home with some truly novel glimpses of a familiar view. I used the Mamiya Sekor 127mm f/4.7 lens, mostly because it was the only functional Press piece I own, but after seeing the results, I’m excited to continue exploring the focal length.
Most people trend towards the wider (and increasingly more expensive) 50mm and 65mm, but I would encourage taking a look at the 127MM. You can’t take portraits wide open and easily hit critical focus, but smaller apertures (f/22-32) make it easy to nail focus in bright light. The resolution is really incredible.


I shot my test roll (above) with Fomopan 100 Classic, which I developed in CineStill DF96 and scanned with a mirrorless camera; and I was pretty pleased with the results. One or two missed frames, most likely due to user error in winding. No obvious light leaks. I think the sprocket hole ghosting on a few of the images is due to over-agitation in developing, not necessarily an artefact from the camera. These were the first frames with the Brancopan as well as the Fomapan and I was really taken by the resolution and contrast that the two come out with.
This is certainly not a camera for everyone. It’s massive and impossible to conceal for those discrete street shooters. It takes hours of fiddling to assemble, not to mention the 3D-printing time. These hours are also required to learn to operate the camera without destroying it.
That said, with some patience (this project took me months to fully realize – LAZY) the Brancopan is a worthwhile camera to add to your collection.
~ Parker
Editor’s note: As of a few days prior to publication, Ethan at Cameradactyl has released the Brancopan source files under a CC BY-SA NC open source licence. For full details and to download and build your own camera, please visit Cameradactyl! ~ EM
Share your knowledge, story or project
The transfer of knowledge across the film photography community is the heart of EMULSIVE. You can add your support by contributing your thoughts, work, experiences and ideas to inspire the hundreds of thousands of people who read these pages each month. Check out the submission guide here.
If you like what you’re reading you can also help this passion project by heading over to the EMULSIVE Patreon page and contributing as little as a dollar a month. There’s also print and apparel over at Society 6, currently showcasing over two dozen t-shirt designs and over a dozen unique photographs available for purchase.


One response to “Building the CAMERADACTYL Brancopan”
Nice write-up, and that under-bridge shot is exceptional!