NASA’s photographic documentation of their 20th century race to the Moon forms part of one of the most significant historical records of our time. The photographic films and cameras used were arguably the best of their day, so why is it then, that the vast majority of the photographs appear to be of a low resolution, fuzzy and poorly exposed?
Historically, most of the photographs presented in the media have been based on decades-old, low-resolution scans/digitisation. This has been remedied somewhat by efforts to create high-resolution scans of the negatives, although many of the ~35,000 frames from NASA’s Apollo archive at the Johnson Space Center still need work to bring out the detail we all know is stored in those amazing Kodak negatives and slides.
This is where Andy Saunders comes in. Over the past few years, Andy has worked tirelessly to remaster both high- and low-resolution scans from NASA’s archive, bringing many 16mm, 35mm and 70mm slides and negatives from the Apollo missions into sharp relief for the first time.
His work is, for lack of a better word, astounding, and includes the use of stack images, upscaling and laborious colourisation to name just a few techniques.

For this mini-interview, released exactly 51 years after Neil Armstrong first set foot on the moon, I spoke with Andy about his work, its history and his plans for the future. As you may expect, this article is peppered with numerous examples of original NASA photography from before and during Apollo missions 11 to 17, as well as Andy’s work.
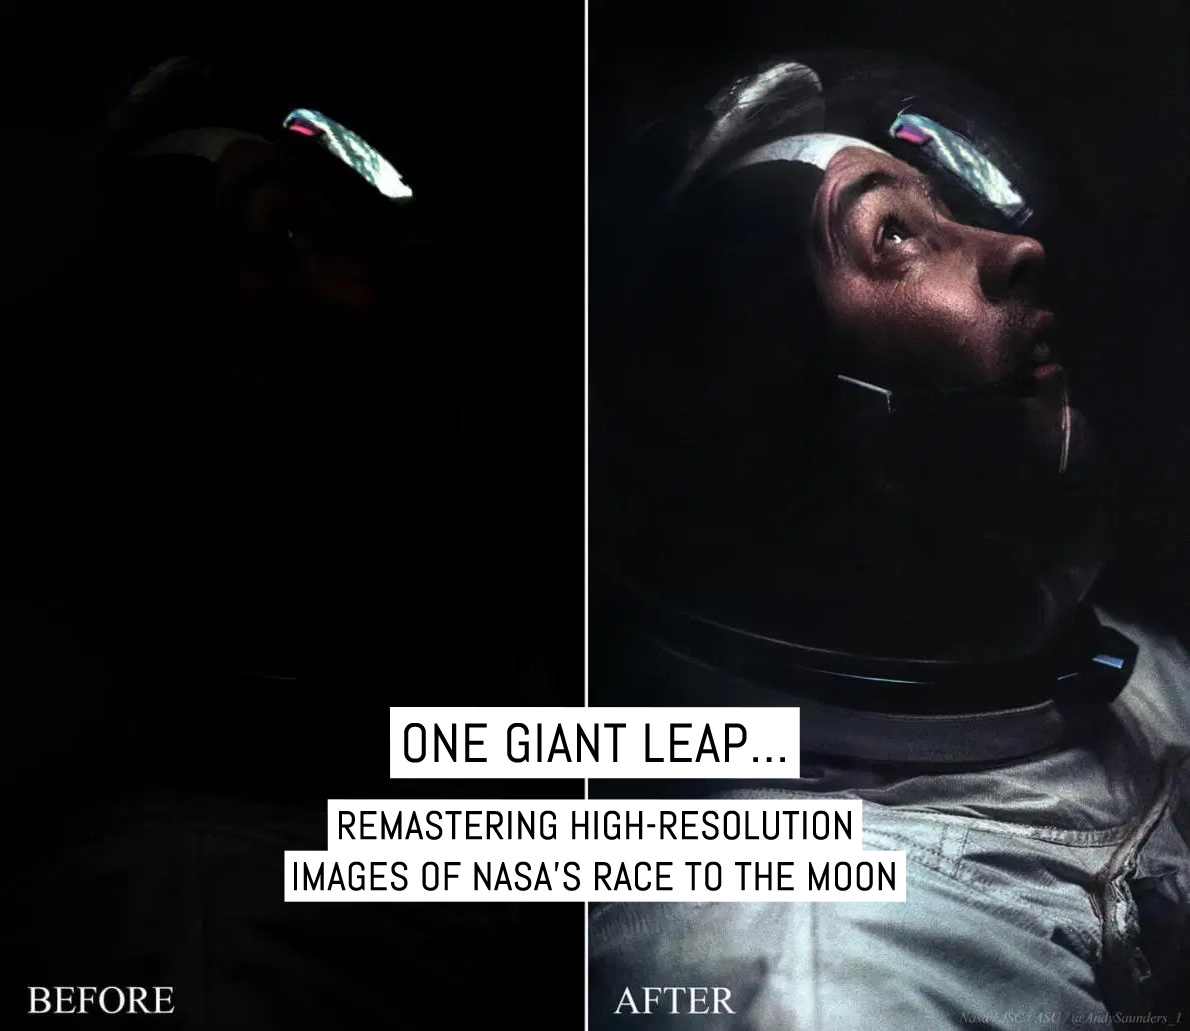
While some of the photographs Andy has remastered over the years need simple, almost light touches to bring them “up to spec”, there are many, many examples of poorly exposed photographs, which might have otherwise been lost in the edit had NASA not decided to archive every single roll ever shot. Those — of which the above is one — show that with care, insight and the application of modern technology, it is possible to recover previously “lost” frames, which would otherwise not have seen the light of day.
As to why some of the photographs are more miss than hit, it’s worth bearing in mind that although NASA’s Apollo and Gemini astronauts came from technically-disciplined backgrounds as (mostly) engineers and pilots, they were not always born photographers. According to NASA, Apollo astronauts underwent intensive training in preparation for their Moon exploration over several years prior to the missions themselves:
Astronauts were encouraged to take training cameras on trips to become more familiar with the camera operation and to enhance their photographic technique.


While practice does make perfect, there’s no such thing as a perfect roll of film when you’re either hurtling through space, walking on the moon or, in the case of Apollo 13, doing your very best not to freeze to death. On the surface of the moon, Neil Armstrong and Buzz Aldrin used a specially designed light meter to take readings which were manually transferred to their cameras; the Minolta space Meter 1°. This odd-looking device had its uses but could easily be used incorrectly.
The Apollo missions used some of the best cameras and photographic film stocks available at the time and NASA had some incredibly stringent processes for film handling (and specific requirements for its manufacture). If you’re interested in some further reading, I highly recommend reading this excerpt from the NASA document, “Photography Equipments and Techniques” (PDF).
In this article, most of the photographs were created using one of three specially manufactured Kodak films:
- Kodak EKTACHROME MS SO-368 ASA 64 colour slide film: 80 lines/mm resolution, intended for Lunar terrain and general photography.
- Kodak EKTACHROME EF SO-168 ASA 160 color slide film: 80 lines/mm resolution, capable of being exposed/developed at ASA 160 or ASA 1000. It was intended for Lunar surface and interior photography “at low light levels”.
- Kodak Panatomic-X ASA 80 black and white film: 170 lines/mm, intended for high-resolution Lunar terrain photography — easily beating Fuji Velvia’s 160 lines/mm resolution.
More on the cameras follows in the Q&A below. Before we moving on, please note that for the images above and below, you may click/tap to view them in full screen. The images have been resized to 1200px on the long edge using a highly optimised and relatively lossless method. They are best viewed on a desktop/laptop, or tablet in landscape orientation. For the original images, please visit Andy on Twitter and Instagram.
On to the interview…
EM: It’s an obvious opening question but needs to be asked. Why on Earth did you start this project?
AS: I’ve had a fascination with the lunar landings since childhood, and as I’ve got older it’s become a growing appreciation for just how incredible this achievement was. As time goes by — and we’re now into the 50th anniversaries of the missions — the more and more amazing it becomes; all achieved before the computer age, with manual calculations, slide-rules, hand-drawn diagrams, charts and a huge dash of boldness, determination and indeed bravery.
I’ve always had a strong interest in photography too, which has become a more serious endeavour over the years and here was an opportunity to combine the two.
EM: Was there a specific image that started it all?
AS: The real driver, and the thing that started it all was my frustration for many decades with the absence of a decent image of Neil Armstrong undertaking arguably the most important event in the history of humankind! As he held the camera during EVA (Extra Vehicular Activity) on the Lunar surface, all the photographs, bar a few glimpses of Neil’s back, or foot etc., are of Buzz Aldrin. Also, the video footage we typically see is the air-to-ground live footage which is notoriously fuzzy/ghostly.
How could this be? Can you imagine if this happened today, especially in this selfie/image-driven era?
Fortunately one more source existed — one of two Maurer 16mm DACs (Data Acquisition Cameras) recorded the EVA from the window of the Lunar Module (LM). When this was transferred to HD by Stephen Slater in the early 2000s, a glimpse of a face I’d noticed years earlier on SD copies of this small format film lead me to re-examine the film, frame by frame.

I found a magic moment where Neil’s gold visor is briefly up (as he’s partly in shadow) and his head is tilted forward in his visor — it’s right at the beginning of the moon walk. He’s also close to the LM / camera and the angle of the sunlight illuminates his face such that subtle facial details are briefly visible. This still wasn’t enough for a decent image but crucially he’s so focused on the task that he remains almost motionless long enough for me to be able to lift several separate clean frames from the film.
I then had the idea of stacking the frames on top of each other and optimising the image by improving the signal-to-noise ratio. This is a technique used by astronomers to reveal details of distant objects. If it works for Mars why not for Neil Armstrong!? When I then started to process and enhance the output, I simply couldn’t believe the detail that I was able to reveal — I could even see his eyelid.
More importantly, I could recognise Neil himself. It was an amazing moment and I almost felt like I’d gone back in time and was the only person watching this incredible historic moment unfold. Perhaps a little like an archaeologist brushing the dust off some long forgotten artefact.

Above, the image created from a stack of multiple 16mm ‘movie’ frames. The recognisable features of Neil Armstrong can be seen clearly for the first time, 50 years later.
I became hooked on improving more of the imagery from this incredible era and when it became front page news I realised there continues to be a fascination among the wider public too.
EM: Were you always working toward a fully envisioned final stage?
AS: It was only after producing further images that were really well received, and the realisation that actually most of the photographs from Apollo, unfortunately, are really poorly represented in most cases, that I set myself the mission to improve as many as possible.
In doing so, I found I could restore images that would otherwise never be seen, reveal detail in others that has never been apparent before, and I also want to try to reveal the human side to these missions — rather than the puffy, faceless spacesuits we’re used to.
Above, many of the original image scans are very under-exposed. Here, Apollo 9 Commander Jim McDivitt is undertaking the first US docking of 2 crewed spacecraft, Gemini VII and VI-A, in 1969. Jim looks up though the LM window – Earth and the COAS guidance sight clearly seen in his helmet reflection.

Above, this image of Jack Schmitt at the Lunar Rover on Apollo 17 is probably the clearest known of an Apollo astronauts face on the moon. Reprocessing reveals this detail more clearly.
What source images are you using? I know high-res images exist for some aspects of NASA’s online archive but did they all come from there or do you have access to other sources?
AS: The original NASA photographic film from the Apollo missions is some of the most important and valuable film in existence. It is securely stored in a freezer to maintain its condition in Building 8 at Johnson Space Center (JSC). It never leaves JSC — in fact, the film rarely leaves the freezer. The vast majority of Apollo images seen by the public over the last half-century have been copies of master-duplicates, or copies of copies, leading to the gradual degradation in the quality of the images we see.
Over the last several years, however, the film for each mission has been removed, thawed, cleaned, and digitally scanned to an unprecedented resolution. It’s these incredible 1.3GB raw files that are the source of most of my remastered versions. Although there’s a tremendous amount of goodness in these scans, unfortunately most of them are very difficult to process.
They’re usually significantly under-exposed and any significant gain/levels increase introduces a whole host of artefacts and glare from the scanning process. It’s a time consuming, painstaking process to optimise the whole frame and make the original film really sing, but the reward is to see these incredible moments in history represented in unprecedented clarity. There’s a treasure trove of around 35,000 images to get through….and I will!
The two images shown in comparison below help to provide an idea of some of the more extreme “before and afters”.


Left: a typically underexposed image from the Apollo 17 archive. Right: Now painstakingly remastered to reveal stunning detail of a tired but content-looking Jack Schmitt in the Lunar Module, covered in Moon dust after his exhausting EVA.
Most of the photographs were taken on medium format film with modified Hasselblad EL cameras known as the Hasselblad Data Camera (HDC). These cameras were adapted to make them easier to use by astronauts in weightless or low-gravity environments while wearing a bulky spacesuit and gloves.

Above, Victor Hasselblad with Hasselblad Data Camera (HDC) outside of Hasselblad Headquarters in Gothenburg, Sweden.
The photographic equipment carried by Apollo 11 consisted of:
- 1x Hasselblad Electric Camera (a modified Hasselblad EL500) with an 80mm Carl Zeiss Planar lens, which used in the Command Module.
- 2x Hasselblad Lunar Surface Super Wide Angle (SWA) cameras with 38mm Carl Zeiss Biogon lenses, which were carried aboard the Lunar Module.
- 1x Hasselblad Data Camera, as seen above, which used a 60mm Biogon lens. This was carried aboard the Lunar Module and was mounted directly to an astronaut’s suit. Niel Armstrong was the primary user of this camera.
- 2x Maurer 16mm data acquisition cameras.
- 1x 35mm lunar surface close-up stereoscopic camera.
All three Hasselblad models were fitted with 70mm film magazines, which were loaded with custom manufactured film by Kodak. During the Gemini missions, Hasselblad 12-exposure film magazines were used alongside standard film rolls. For Apollo, the film was specially designed on request to be as thin as possible in order to yield up to 200 exposures from a single magazine normally capable of producing “only” 70.

Above, the Apollo 17 Lunar Rover. Remastered Kodak EKTACHROME SO-368 slide fillm, 70mm, shot with Hasselblad Data Camera (HDC). The full frame was remastered, highlighting a great portrait of the Lunar Rover.
Below, Rusty Schweickart floating outside the Lunar Module window on Apollo 9 in a pin-sharp photo taken by Jim McDivitt. Schweickart was the first to test the PLSS (Portable Life Support System backpack) that would ultimately be worn on the Moon.

Another source for my work includes the HD transfers of the 16mm Maurer ‘movie’ film. Stephen Slater, who was Archive Producer on the incredible award-winning movie Apollo 11 has kindly supplied me with many of the originals. This is where I can utilise the stacking technique I developed for the Armstrong image, a technique that has evolved over time.
The images I produced recently to show life on board the stricken Apollo 13 mission were complicated by a fish-eye lens, things floating around the spacecraft (within the frame) in zero-G, and whilst the camera bobs up and down or pans across the shot. This plays havoc when trying to stack frames.
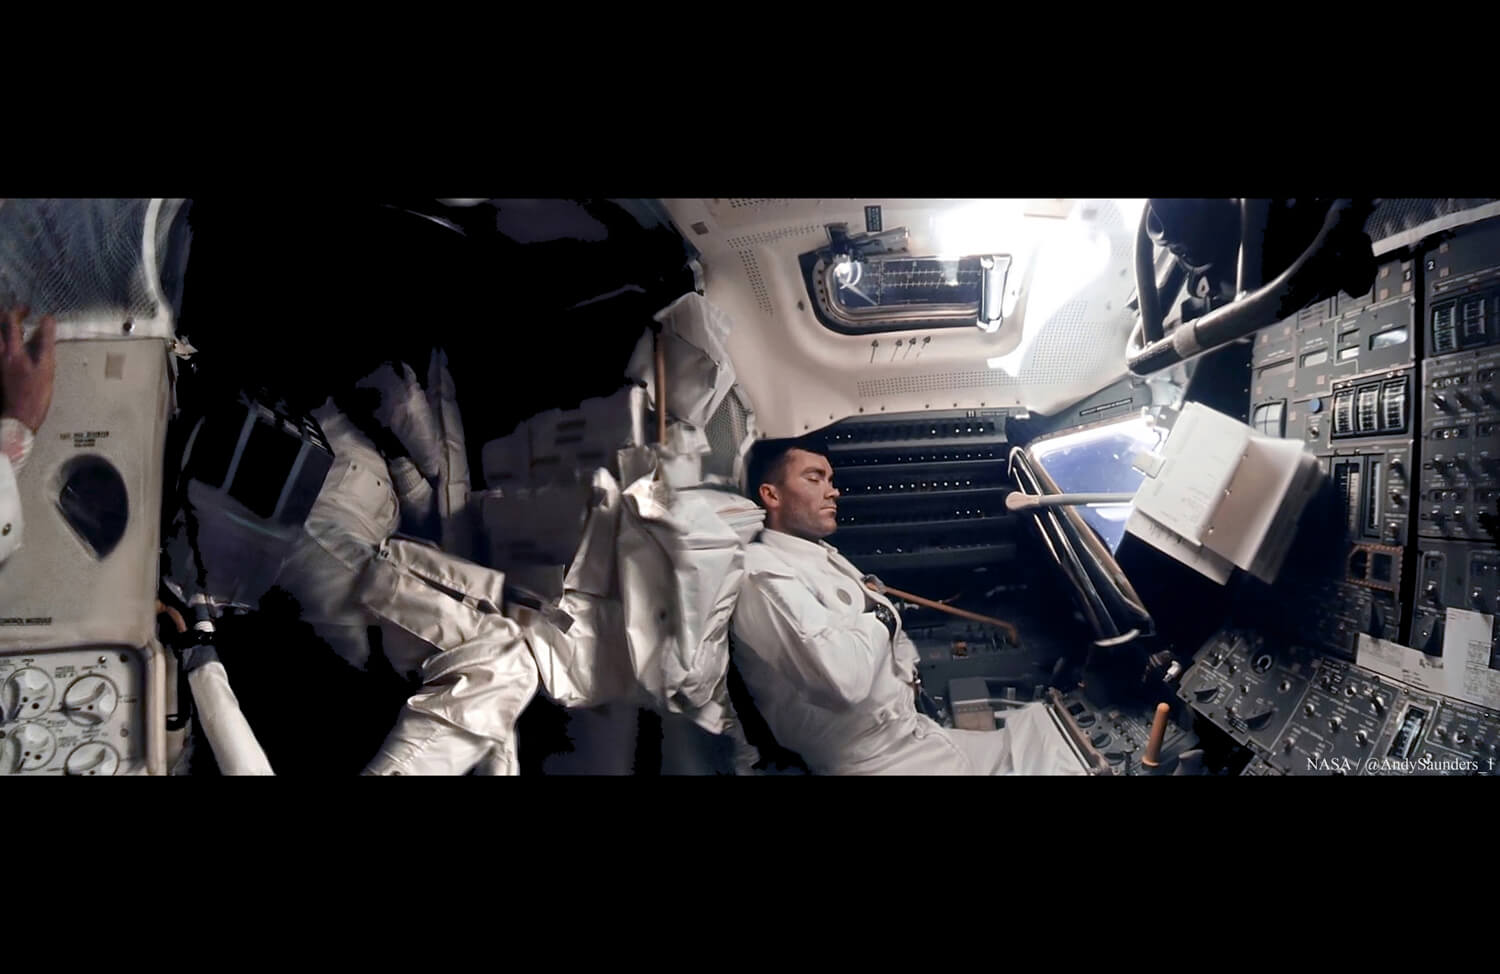

The panorama above (and associated close-up) consists of over 1,000 image samples. Taken on board the Lunar Module Aquarius, Apollo 13, Commander Jim Lovell (hand, left) watches over his cold, resting crew in 1970.
EM: I noticed that some of the images you’ve shared have been colourised by you. How close are these to reality and what was involved during remastering?
AS: As you correctly guessed, another aspect of remastering/processing I like to undertake is the colourisation of some of the stunning black and white images. There are some people who take a dim view of colourising historical images, but that’s due in part to the fact that the restorer has to take an (often educated) guess as to the colours that were likely present.
With the early NASA film, however, we typically have accompanying colour film too, as both were carried on the missions. I can then directly sample the colours from the colour film and transfer them to the black and white shots. As the colour is transparent, none of the underlying detail is lost or changed.
Some of the most stunning photographs were taken with black and white film and they’re wonderful as they are but in some circumstances, adding the colour really brings them to life. Adding layer after layer of colour is a painstaking and time-consuming process — there are up to 20 separate colours in skin tone alone — but the results are great.
An early example is the frame below, a before and after of celebrations at Mission Control following the first successful space rendezvous of two crewed craft, Gemini VII and Gemini VI-A. Flight Dir Kraft (left), MSC Dir Gilruth (right), Mercury astronaut Cooper (centre).


According to NASA, the frame below, image “AS12-48-7136”, was taken by Apollo 12 Lunar Module pilot Alan Bean and shows Apollo 12 Commander Charles “Pete” Conrad Jr. as he examines the unmanned Surveyor III spacecraft during the second extravehicular activity (EVA-2).
Although… that source isn’t quite right, as it assumes the series of four images area all of Conrad, but if you check AS12-48-7136 in the archive, the image was taken after Conrad and Bean swapped the camera so they could both be pictured with Surveyor.
You have to look hard at the series to spot it’s two different astronauts – interestingly the next mission introduced the red stripes on the helmet/suits to show clearly who was mission commander.
As an aside, the crew of Apollo 12 actually sneaked onboard an auto-release so they could take a picture of the two of them together at Surveyor but they couldn’t find it at the time. They planned to not tell anyone until the film was developed to throw everyone into a confused frenzy! Such a shame, as no photograph exists of two astronauts together on the moon.
Regarding the image below, Apollo 12 landed in close proximity to Surveyor III (approximately 600 feet distant – LM Intrepid is on the horizon). Bean was recorded as saying: “…most amazing to me is how it’s turned so brown!”. The brown colour has been incorporated based on images of returned museum samples.

Below, a classic black and white of Alan Bean on Apollo 12, digitally remastered from a high-resolution scan of the original camera film exposed on the Moon in 1969. Colourised using directly sampled references. Note too, the reflection of Apollo 11 Commander Conrad taking the photograph with his chest-mounted Hasselblad.


The black and white frame above was digitally remastered from a high-resolution scan of the original camera film exposed on the Moon in 1969. For the curious, the original and my remastered version follow below. This frame is an example of some of the relatively “easier” remasters.

And finally, a comparison between the black and white and colour version of the infamous photograph from Mission Control capturing celebrations following the safe return of the Apollo 13 crew, now in full colour. Flight Director Gene Kranz is in the foreground and Commander Jim Lovell on both the centre foreground and background screens.


EM: What of the amazing panoramas captured by the astronauts? Have you managed to make your way through any yet?
AS: Taking panoramas was a key part of the astronauts’ photographic duties whilst on EVA. They were important to provide references and give context to the location of features relevant to where rock and soil samples were taken, for example.
This original scientific purpose however now provides us with a great opportunity to view the stunning lunar landscape in all its glory. Given the quality of the scans, some of my stitched panoramas would be 20-30ft wide if printed!

Above, the moon isn’t all grey. Schmitt “It’s all over! ORANGE!!” Apollo 17 visited Shorty Crater and discovered orange soil (volcanic glass). Five processed and stitched raw images show Schmitt peering over the edge.
EM: Are you hoping to get a look-in to NASA’s physical archive and do your own scans at some point? What’s the ultimate goal here?
AS: It would be an absolute dream to be able to make inroads into getting some of the film re-scanned, and to be honest there are some sections of film for which that really is long overdue. It’s simply too important not to.
There are also some areas where I think there’s a chance, with a re-scan, of revealing something really quite spectacular, but NASA is a big machine and quite rightly focuses on the science and on the future; including a return to the moon in the next decade.

It’s almost half a century since humankind last set foot on the moon. Above is the last: Commander Gene Cernan during Apollo 17. The blue-ish dot reflected in his visor is, in fact, Earth.
I just want as many people as possible to be able to see the most incredible moments in our history in as high a quality as possible. A simple google image search brings up some truly horrifying versions of these historic images and it really gets to me. It’s nobody’s fault, it’s just how things have developed over time – but things should get better, not worse.
Now, 50 years on seems a great time to revisit these.

Above, the sun-lit crescent Earth rises above the stark, cratered lunar far side on Apollo 14, 1971.

Above, the awkward-looking, angular Lunar Module, ‘Challenger’. A closer look through the window reveals Commander Gene Cernan at the helm – piloting his spacecraft from the Moon for the last time, in December 1972.
The film has been well kept and the technology to digitally lift the detail from this original film has improved. Combined with modern digital enhancement technology, the desire to do it, and some time and patience applied, we can reveal Apollo like never before. My upcoming book, ‘Apollo Remastered’ aims to do just that, and I continue to share them on Twitter / Instagram.
I’m sure it’s obvious by now that I’m a huge fan of space and space exploration, and by extension, a huge fan of Andy’s work. When I first came across it earlier this year I reached out to Andy immediately and can safely say that this effort could have no better steward. As he noted, a book is currently in the works and you can be sure that it will be featured here on EMULSIVE as soon as humanly possible.
Thanks very much for reading and please do take another moment or two to scroll up and absorb this fantastic project. In addition, if you have a project or person you’d like me to interview on these pages, please drop me a line via the contact page.
Until then, keep shooting, folks.
~ EM
Share your knowledge, story or project
The transfer of knowledge across the film photography community is the heart of EMULSIVE. You can add your support by contributing your thoughts, work, experiences and ideas to inspire the hundreds of thousands of people who read these pages each month. Check out the submission guide here.
If you like what you’re reading you can also help this passion project by heading over to the EMULSIVE Patreon page and contributing as little as a dollar a month. There’s also print and apparel over at Society 6, currently showcasing over two dozen t-shirt designs and over a dozen unique photographs available for purchase.


4 responses to “One Giant Leap… Remastering high-resolution images of NASA’s race to the Moon”
Thanks for this interview. It’s a fascinating topic, it will be exciting to see the new details that will emerge as a result. I can’t wait to see more images.
Whilst I don’t by any means consider myself any sort of expert on NASA space imaging, as the long time owner of a Hasselblad and 70mm user I’ve certainly read as much as I could find online on the subject—the NASA photography document you’ve referenced for example, I’m already familiar with. In the interests of seeing your great content perhaps become even better, might I respectfully draw your attention to a few points possibly worth looking into further?
The caption for the amazing image of McDivitt might be conflating details of two flights?
“Here, Apollo 9 Commander Jim McDivitt is undertaking the first US docking of 2 crewed spacecraft, Gemini VII and VI-A, in 1969. Jim looks up though the LM window…”
Of course, McDivitt flew the lunar module Spider during the Apollo 9 tests—but there were no lunar modules during Gemini, yet it’s referenced in the caption? The image shown was actually taken during Apollo 9, correct? Maybe the Gemini reference should be omitted?
“The photographic equipment carried by Apollo 11 consisted of:
* 1x Hasselblad Electric Camera (a modified Hasselblad EL500) with an 80mm Carl Zeiss Planar lens, which used in the Command Module.
* 2x Hasselblad Lunar Surface Super Wide Angle (SWA) cameras with 38mm Carl Zeiss Biogon lenses, which were carried aboard the Lunar Module.
* 1x Hasselblad Data Camera, as seen above, [in the photo of Victor Hasselblad holding it at Göteborg?] which used a 60mm Biogon lens. This was carried aboard the Lunar Module and was mounted directly to an astronaut’s suit. Niel Armstrong was the primary user of this camera.
* 2x Maurer 16mm data acquisition cameras.
* 1x 35mm lunar surface close-up stereoscopic camera.
All three Hasselblad models were fitted with 70mm film magazines, which were loaded with custom manufactured film by Kodak. During the Gemini missions, Hasselblad 12-exposure film magazines were used alongside standard film rolls. For Apollo, the film was specially designed on request to be as thin as possible in order to yield up to 200 exposures from a single magazine normally capable of producing “only” 70.”
Being familiar with the appearance of both a standard C 80mm Planar and the special 60mm/5.6 version of the Biogon made for the EDC—the latter, broadly, has an external resemblance to a production C 50mm Distagon painted silver—I’d suggest that the camera Victor is holding is in fact more like one of the CM electrics fitted with the Planar? That lens looks a lot closer to a C Planar than the 60mm Biogon (versions of which were later adapted to Hasselblad’s customer Mk 70 photogrammetric camera).
I admit I wasn’t aware that any images recorded with Hasselblads during Gemini flights were actually made on 120. (I’m not asserting they weren’t—I just wasn’t aware). But NASA actually embraced 70mm photography before Hasselblad themselves did. In fact, I’d go as far as suggesting that the use of 70mm with Hasselblad cameras was instigated by NASA. Prior to Hasselblad 70mm magazines being produced, NASA astronauts had been shooting 70mm in flight using modified 500C cameras, with custom made 70mm mags which were manufactured by Cine Mechanics of California. It’s been a while since I’ve researched it but from memory, these were used as far back as some Mercury flights. Having the ability to shoot larger numbers of images on 70mm, I don’t know why NASA would have chosen to revert to short 120 rolls—but this doesn’t mean it didn’t happen!
When the familiar Hasselblad 70mm magazines eventually user during Apollo 11 appeared, they were indeed able to accomodate more than the 70 frames worth of film the production Magazine 70 will fit. But remember that a Magazine 70 is designed to feed a Hasselblad 70mm which is wound between two 70mm cassettes. Certainly, the thin film base used boosted the number of frames per load substantially, but this alone was not responsible for the massive increase in quantity—the magazines flown were based on the Hasselblad Magazine 100 (later available to the public), not the Magazine 70, and film was wound spool to spool, darkroom loaded. The extra capacity was partly because of the availability of the additional internal space in a Magazine 100 due to the absence of cassettes.
Thanks again for publishing such an interesting article about a subject that’s of great interest to me and I’m sure, many other readers.
Kind Regards,
Brett Rogers
Outstanding use of modern tech to breathe new life into these important historical photograhs. Well done sir. 🙂
Stunning article. Looks like Andys work is no less complicated than actual landing on the moon…
Thank you is not enough EM and Andy Saunders. Great article !!