The purpose of this article is to guide you through my journey from a random pile of colourful bricks, to a pretty much fully functional 6×12 LEGO pinhole camera. The camera went through various versions, good, bad and ugly, each with their strengths and drawbacks until finally, I got to what I felt to be just about the best it will get to.

Chapter 1: A decision made
All good cameras are alike. Every bad camera is bad in its own way.
~ from Anna Camerina by LEGO Tolstoy
Obviously, this is nonsense. However, this camera is bad in its own way. It began life in the way I imagine all other cameras historically have done: by a father and son randomly stacking colourful interlocking cuboids together with something resembling a mental plan.
Whilst rummaging through the LEGO boxes with my five-year-old son, the idea of a pinhole camera made from LEGO bricks hit me in a quite particular and noetic manner. I chose to follow the inspiration. Suddenly I viddied that thinking was for the gloopy ones. And that the only ones used like inspiration and what Bog sends. So, rather than doing polezny things like “planning,” I decided to follow this inspiration along its winding route.
Bespeckled with adaptation, and evolution, the camera ended up substantially larger and uglier than expected.

For no particular reason (maybe for the sake of purity), I was determined to make the camera entirely out of LEGO. So, except the pinhole and a small amount of electrical tape securing the metal in place, I constructed a pinhole camera entirely of LEGO.
Considering the almost purely LEGO nature of it, there were parts of the original construction I was pretty pleased with. The film advance mechanism was simple, yet effective. It seemed relatively light-tight, wound the film well and the rotating mechanism could be wound either way. Furthermore, the mechanism clicks, allowing you to count the number of clicks required to advance to the next frame accurately and to ensure the film stays taught and does not unwind.

Luckily, as it turns out, the 35mm film canister was clearly designed with LEGO in mind (note: it probably wasn’t). It fits snuggly in a 4×4 piece with cylindrical pillars at the four corners. To hold it in place, a 2×2 piece with one central pip adds extra security at the base.

Having built and added and swapped out pieces for a fair while, I was at a point when it was nearly finished. I had to wait for a single piece from eBay (in the end, I bought only one extra piece for the design) and decided a shutter would be neat. So, I set to work.
The plan (which was realised to a much uglier and bulkier standard, as is my style) was a sliding shutter using smooth LEGO pieces. After a bit of tinkering, it worked in what seemed to be a good enough way. I taped the pinhole in place and attached it and the shutter to the camera itself. You may be saddened to hear that this aspect did not make it to any further versions of the camera.

Making a working LEGO camera might seem a stupid idea, although I wasn’t completely naïve. I knew it was not going to be fully light tight (well, I had no idea really). Something like electrical tape on the inside might have been a good way of achieving a better more light-tight body. However, that misses the point, as I determined this to be as purely LEGO as possible.
One tactic I took was to create two walls around most of the camera, much in the same way one might better secure one’s castle. If something gets through the first wall, hopefully, the second will resist it getting any further. At least, that is what I thought.
I loaded the LEGO pinhole Mk.I with a roll of Polypan F 50. (This was probably a terrible choice to test a camera with, but that was what I had to hand and didn’t mind wasting it).
At this point, I had a completed camera. My plan for the Mk.1 was as follows:
- Shoot a roll to check it works at all.
- Dismantle and rebuild it taking into account what has seemed to work and what hadn’t.
- Remake the camera in one of two ways 35mm panorama or 120.
- Make it reloadable. The Mk.I had to be dismantled a lot to reload.
Having shot, developed and scanned the first roll, I can safely say…not much. Light was getting to the film plane. Or to put it another way, it leaked light. Though the light leaks did at least make made intriguing shapes, there was not much that one might call ‘photographs’.


Chapter 2: Iterate don’t obliterate
It was the best of cameras. It was the worst of cameras
~ a Tale of two cameras, by Charles Brickins
“An unqualified failure”, “a waste of time and space”, “an ugly lump of light leaking LEGO”. These were headlines in the local papers. Everything was not awesome.
Everything is not awesome, but as the song continues, ‘…it doesn’t mean that its hopeless and bleak’: Back to the drawing board, err “LEGO box” and my approach to Mk.2 involved a little less chaos, and a little more preparation.
The Mk.1 parts I trusted:
- The winding mechanism
- The film holder
The parts I had some concerns about:
- The shutter. Though it worked nicely, I am not sure if it was 100% light-tight all the time. Also, I think adding more aperture-like holes in front of the pinhole might have obscured the images.
- Holding the pinhole in place with tape still felt like cheating, after all tape is tape, not LEGO.
The parts I had big concerns about:
- Most of the body (damn).
- Pretty much the whole of the front of the camera. It is the bit I didn’t really check thoroughly before shooting film (don’t ask why, I am not sure).
- The fact the whole camera had to be dismantled to reload: Pretty inconvenient.
So, I made some adjustments. Some of these adjustments were the result of careful planning. Others were simply messing around with different pieces to see what worked. This is LEGO we are talking about, after all.
Here is the slightly adjusted film holder:

The plan then was to create a thoroughly light tight shell and a removable loading part. This was inspired slightly by the Reality So Subtle 6×6 pinhole technique of loading.
The way the Mk.2 loading mechanism worked is as follows:
- Film from the roll being shot is transported to the spool of another 35mm canister.
- This is rewound into the original canister at the end of the roll.
- The film (inside its film holder) is connected and secured to the top plate.
However, the bottom of the pieces which hold the film in place simply rests on smooth LEGO pieces, rather than being connected to them. This allowed the whole thing (in theory) to come out fairly easily with minimal damage to the camera during reloading.
The way in which this version was loaded was as follows:
- The left side of the lid held a 35mm canister securely in place, the right hand side had the core spool part of a 35mm canister which had been salvaged from an old roll. This sie was able to rotate freely.
- After each frame, the right hand spool mechanism was rotated a set number of clicks by the wheel on top. This transported the film from the original canister, in front of the pinhole, and then wound it round the spool the other end.
- Once all frames had been shot, one re-wound into the original canister by rotating the left winding mechanism.
Regarding the body of the camera, the shell itself was already double layered, with the layers staggered both vertically and horizontally, so no corners and (almost) no edges overlap. Nevertheless, this proved effectively impossible to make the Mk.1 fully light-tight. So, the final part in my plan was to put some blocks with side pips in this structure, so that flat pieces could be secured around the edges. Once in place, it seemed largely (or maybe even completely) light-tight — or so I thought.

Next up was the pinhole. Its metal was cut smaller and secured between two circular pieces which were attached to the front, along with lots of other pieces to make that area light-tight. However, upon torch light inspection, this still wasn’t enough. A fair amount of further construction around the pinhole was necessary. The appearance of the camera passed through stages of art deco, futuristic spaceship, and settled somewhere in the middle of the two.
For film testing the Mk.2, I used a roll of ILFORD HP5 PLUS. I figured its exposure latitude would help with my guesstimations of exposure. If I could not rely on the camera, I needed to at least be able to rely on the film. Once developed, much to my excitement, there were actual recognisable images. It was all a bit of a mess, but things can’t be awesome all of the time. It’s an unrealistic expectation. But that doesn’t mean we shouldn’t try.

Chapter 3: The fog of war
It is the time wasted for your Lego pinhole camera that makes your Lego pinhole camera so important.
~ Antoine De Saint Expury
When Antoine wrote these words, he had clearly felt the pain of numerous semi-failed LEGO pinhole cameras. If the time wasted is what makes it important, then this LEGO camera was becoming increasingly, yet frustratingly important. Tweaks and minor rebuilds saw it to what is very likely the best it would ever be.
There were now definite images but light leaks were overpowering. Some were random leaks, but others had an obvious repeated image or pattern. Some had more obvious sources (lines caused by the lid which was only one LEGO piece thick (unlike the double-walled edges). Also, this bit had no front-facing pieces). The negatives were very fogged.
The next roll through the camera was developed and scanned on WPPD. This roll was all shot within 30 mins to minimise base general fogging. There was still fog, but there were also the most successful and clear images to date!


The obvious problem (though it was not initially so obvious to me) was the light leaking into where the film winds around the dismantled canister. I had forgotten to adjust the design to make this properly light-tight.
I decided to replace this with a real canister. Obviously film canisters are light tight, so that felt like an easy win. However, this was rather inconvenient because it needed to be upside-down (unless I redesigned the whole thing — not at this stage! No thanks). So, I did some tinkering and tweaking, keeping what was effectively the same camera and design. Once complete, I loaded it with a roll of Kodak ColorPlus 200 and shot a roll in the garden. Here is one of the colour shots.

The fogging was less extreme, but there was still a lot of it. It wasn’t as much of a drastic improvement on the previous roll, as I had hoped for.
This called for extreme measures.
Chapter 4: If you REbuild it, they will come
I leave Sisyphus at the bottom of the LEGO box… Sisyphus teaches the higher fidelity that negates the gods and raises bricks. He too concludes that all is well…The struggle itself towards the pinhole camera is enough to fill a man’s heart. We must imagine Sisyphus happy
~ Albert Camus
I felt that I had got to the point where I was getting the best results possible without a complete rebuild, and so there was only one possible option. I dismantled the camera entirely and rebuilt with various ideas in the forefront of my mind.
First, I wanted it to be a 120 medium format panoramic pinhole camera instead of 35mm. This had been an ongoing idea and now was the time to do it.
Second, there was a fair amount of fogging in all of the original versions. Something was wrong with my design. Upon investigation, I discovered that various LEGO pieces were not even close to being light-tight. Even some of the darker colours would let through light. Therefore, I planned would use mainly black pieces with other colours that I had tested and I knew were not going to leak light.
Third, I wanted the camera to be genuinely reloadable in the field. The 35mm version had got to a point where it was almost easily reloadable. Yet it still had to be partially broken/dismantled when reloading which was a pain.
However, these things were not that simple. Seeing as the new version would use 120 format film, it was back to the drawing board for several key parts. The winding mechanism had to be changed and a new ‘piece de resistance’ needed to be found.
The part that applies the twisting force to turn the roll has always turned out to be the difficulty. Lots of other aspects can be adapted and changed, but this is the only piece that cannot be swapped out. In the end, this was pure luck. Although LEGO pieces worked very well with 35mm they did not work nearly so well with 120 spools. This required many attempts and fiddling with some really annoyingly complex parts.

In the end, switching to 120 format film was very complex and required very specific pieces but it works, holds the film and allows for movement to wind on. It was at this point that Dan K very kindly created and sent a 3D print a piece which combined two important parts, making this easier. It worked well, though it struggled under the torque pressure involved in the winding on. There are trade-offs and benefits of both the 3D printed piece and the real LEGO pieces.
This was the point at which I knew things were finally going well. This camera was truly reloadable. Nothing broke or came apart (usually). The top slides on and makes a light tight seal. And there was even a (light tight) red window to view the frame counter.


After shooting a roll, developing and scanning, it was a definite (yet imperfect) success. There were images, pretty clearly defined at the edge (no leaking light whilst winding on and no fogging). The images were about 5×9 inset within a space of 6×12. Images below have been cropped to the 5×9 size.

Again, with all the adjustments, it required two attempts at rebuilding the inside wall as this was evidently blocking the light getting to the film (see the edges/corners of previous images). This was annoying but relatively simple.
Below are images from after the first rebuild of the inside wall. I seemed to just make it worse in another way. More fiddling, tweaking, dismantling and rebuilding.


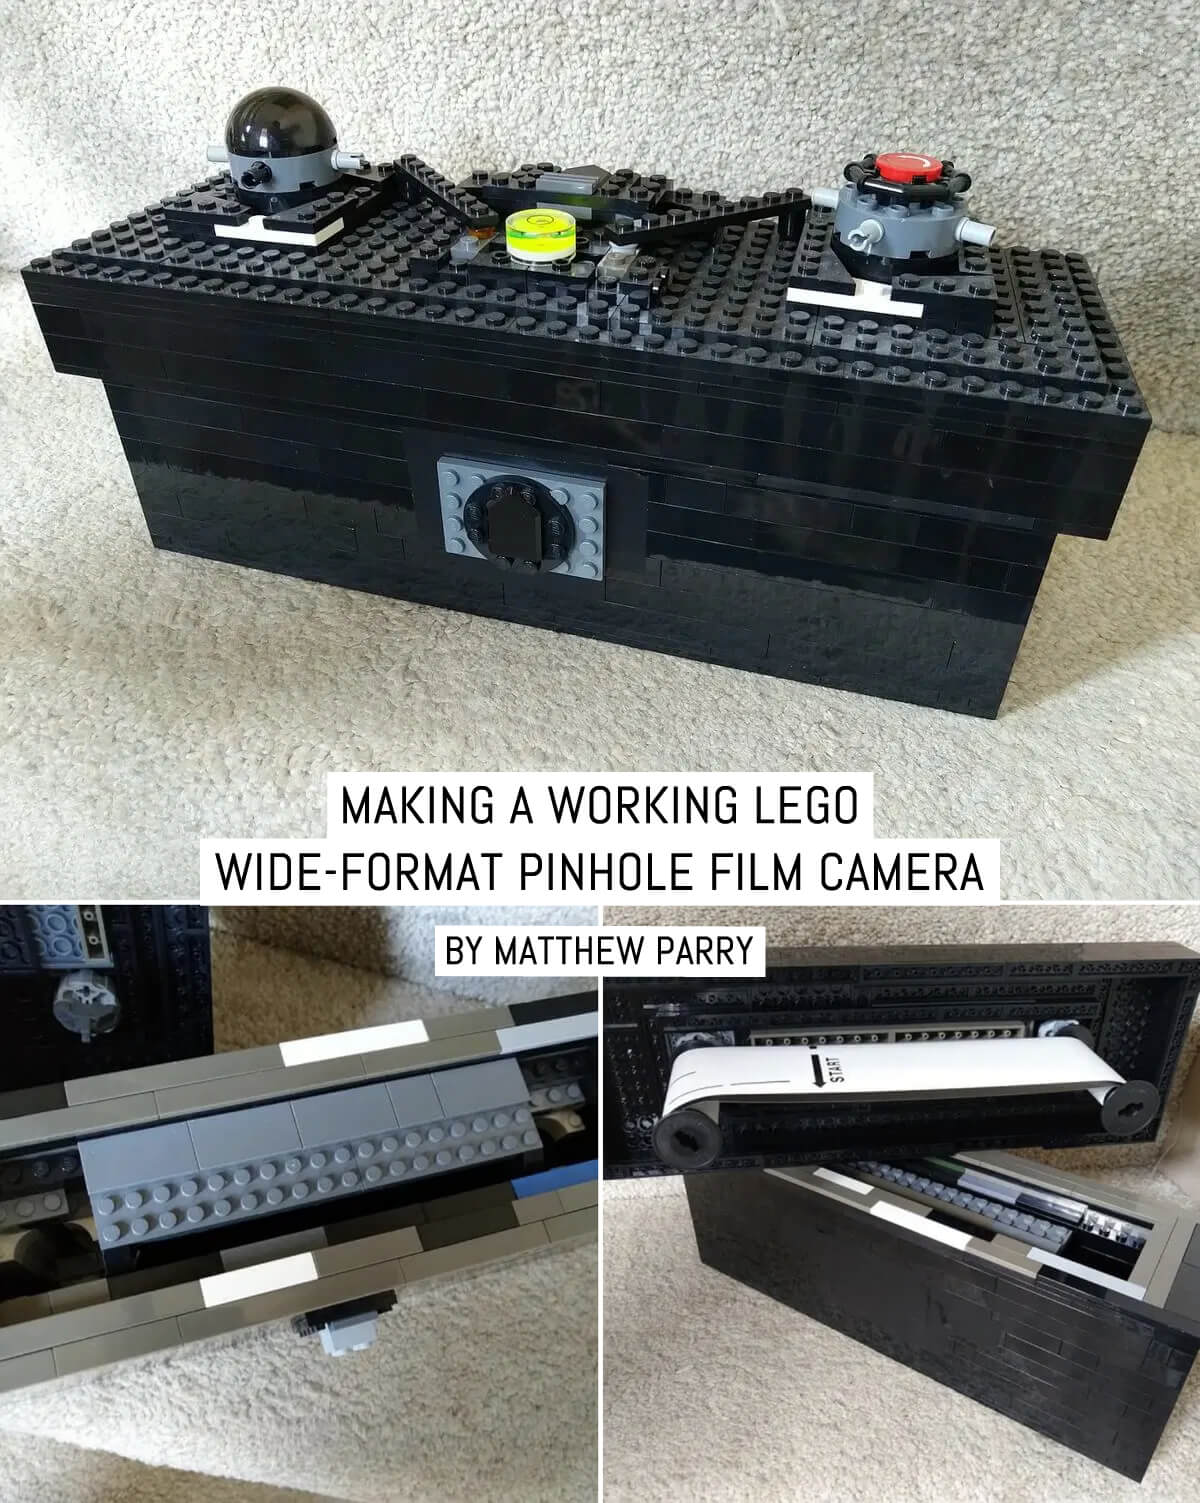
I decided it was best if I added some useful/cosmetic parts. I added a cylindrical spirit level, some framing guides and an attachment that provided a colour-based film selector/identifier:
- Yellow: ILFORD Pan F
- Blue: ILFORD Delta 100 Professional or ILFORD FP4 PLUS
- Black: Fujifilm NEOPAN 100 ACROS
- Grey: other

Another issue I encountered at this point was my film loading system. I was attaching film to the lid, which was then placed inside the body. This was not working for me. It was very fiddly to keep the film taught while guiding both spools into the correct areas simultaneously during loading. Adjustments were made (insert a bunch of time here) so that the film could be loaded into the camera, with the lid being pushed down into place.

Finally, a finished, completed and fully functioning 6×12 LEGO pinhole camera… sort of.
And finally, some perfect images *sigh of relief*… sort of.


Argh, the corners! The frame was 6×12, the picture looked good, the leaks were acceptable, but bricks were blocking the top two corners. Sigh. An annoying rebuild of 50% of the inside of the camera followed this roll. It was surprisingly difficult to adjust just that small bit.
Nevertheless, after this, I finally got the 6×12 image I was after. Whilst on a photowalk in Worcester, organised by Hamish Gill that preceded a showing of Tanky McOneshot (Inchindown) at the Kiln, I took a true 6×12 LEGO pinhole image.
Unfortunately, I forgot to double wind for much of the roll and most frames were double exposures. And to make things worse, I snapped the key piece during wind on mid-roll. However, other than that, it was an unqualified (very much qualified) success.


It worked about as well as could be hoped. The shots still have light leaks but they add something to the image. It is, after all, a film camera made from LEGO. The broken part I mentioned above has since been replaced: I luckily had a spare one and it is one of the easiest pieces to access, remove and replace. However, the question that now remains is what next? Where do I go next with the Lego pinhole camera?
In truth, I am not entirely sure. For now, it sits on the camera shelf next to its non-Lego based pinhole counterparts. In fact, it has sat there for a few months now, ready to shoot and just waiting to be taken out. Perhaps one day soon, I will revisit it, run another roll through it and see what I get.
Perhaps I will take it the next time I go on holiday.
Perhaps.
~ Matt
Ps. For the final build, I spent about £20 on Brickowl (a good source of bricks) for the ~⅓ parts I needed. For someone starting from scratch, it would probably grow to £50-£60 to buy every single brick. I did start the design on a LEGO builder applications but it was taking ages as I don’t know the program well at all. If I get a hang of it and make the files, I’ll be sure to post an update.
Share your knowledge, story or project
The transfer of knowledge across the film photography community is the heart of EMULSIVE. You can add your support by contributing your thoughts, work, experiences and ideas to inspire the hundreds of thousands of people who read these pages each month. Check out the submission guide here.
If you like what you’re reading you can also help this passion project by heading over to the EMULSIVE Patreon page and contributing as little as a dollar a month. There’s also print and apparel over at Society 6, currently showcasing over two dozen t-shirt designs and over a dozen unique photographs available for purchase.


5 responses to “Making a working LEGO wide-format pinhole film camera”
Hi there, first of congrants on building something awesome!! So I used your camera as example in my college paper and was wondering if you could share the size of the camera. Best regards!!
I like your idea, really. Take pictures as and when it is right to. And I agree about it not being perfect. A friend had said a similar thing. What’s the point in a Lego camera if you can’t tell it’s a Lego camera.
I hope your camera is working well!
Thanks very much! I really thought about it. I signed up but it is a lot of support needed (thousands) and it isn’t meant to have any non-lego parts like the metal pinhole and the tape. So I think it might not happen. I might try to make a digital version so people can try to recreate or adapt it. Might be good.
You absolute nutter! This is awesome! Have you thought about submitting it to https://ideas.lego.com/ ?
It’s a shame they don’t produce a mat black brick.
I feel for all your iterations with this 🙂
I have just today completed a 4×5 build from scrap wood, card and foamboard, held together with glue and salvaged screws. The lens is a 186mm Achromat I bought from a chap in Wales, and I ended up ditching the diy negative holder for some actual 4×5 holders. Even the ‘ground glass’ is actually draughting paper…
But to go through the iterations using Paper Negatives, and get to today’s result – It was all worth it.
I’m keen not to now end up getting to the point of a ‘real’ camera, as I feel that would betray some of the diy approach that started this all for me.
I will take pictures with this camera, as I do my others, not all the time, but as the feeling takes me. I think you should do the same with your camera.