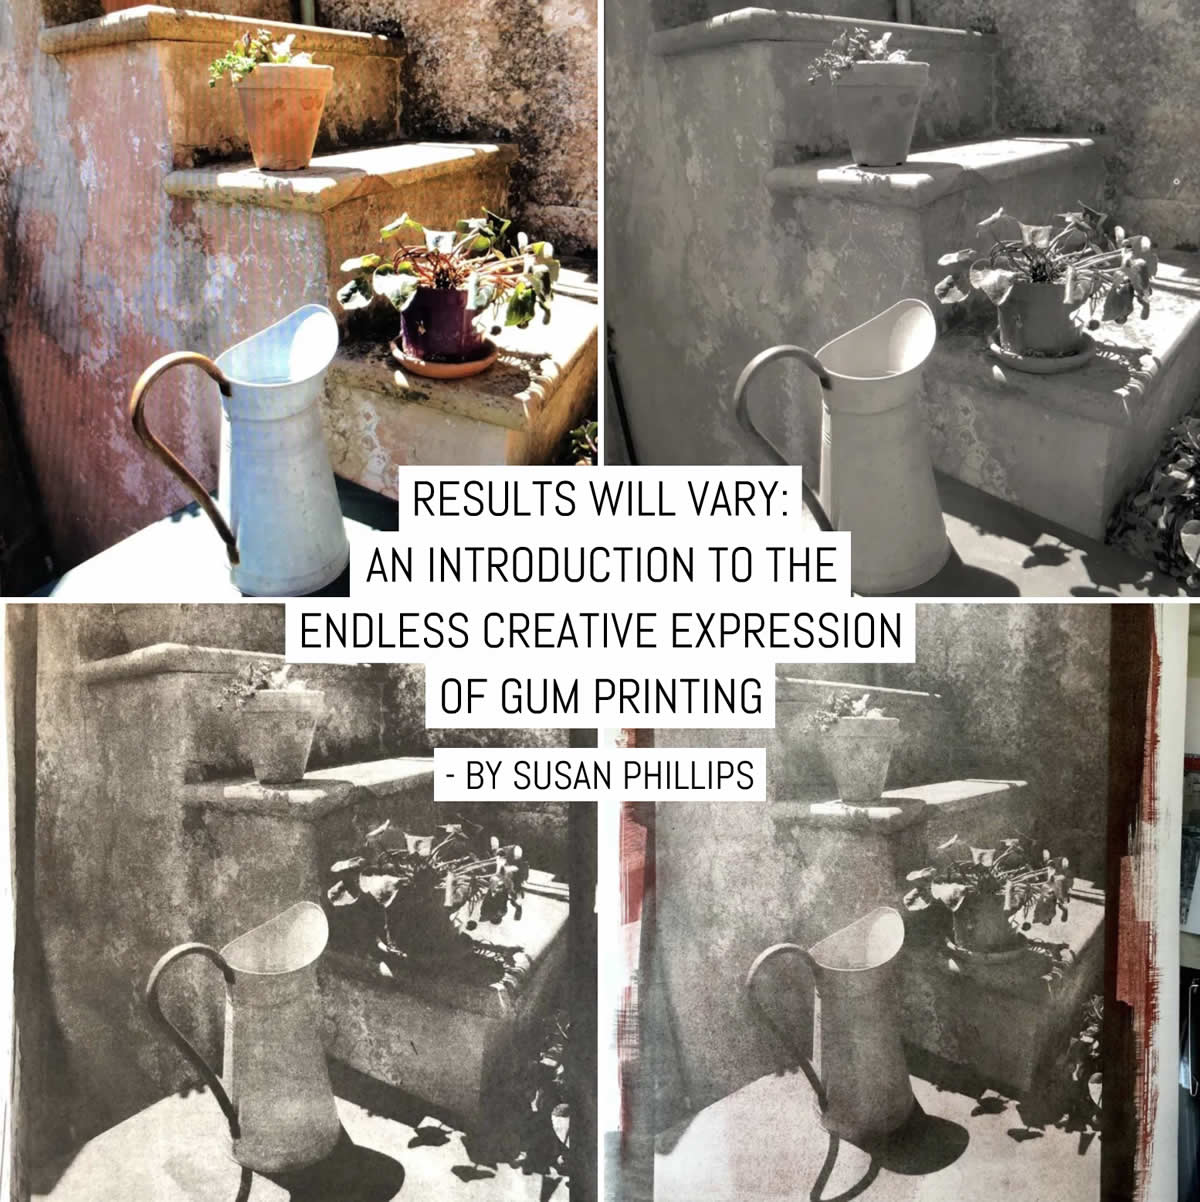
Gum printing or, to give it it’s full name, gum bichromate printing can seem daunting. Certainly, it takes more of commitment in time and materials than cyanotype. But after cyanotype, gum is one of the simplest and most flexible alternative processes to dive into. Gum printing is expressive, painterly and fun; and to show you that gum printing can be simple, for this piece, I set out to choose a digital image, print a contact negative, and make a satisfactory gum print in one day. Below is the image I selected for this article and the final result.


I know, you’re saying, “One whole DAY to make one print?” The express lane of gum printing. Don’t worry, your active time will be much much less, maybe an hour. There’s a lot of waiting for things to soak, and to dry, and you can go on about your life in between the steps.
I’ll walk through my process, and along the way try to point out ways to get a little deeper into what gum printing offers. Many of you will want or need to tweak the process to fit your reality. I just hope to outline a simple workflow you can adjust for a good result. Here’s what I cover:
First, some background
The 19th century was a time when pioneers like Mungo Ponton, Edmund Becquerel, and William Henry Fox Talbot were pushing to find ways to make permanent photographic images. All three had a hand in a series of discoveries that led to gum printing as it came to be practiced in the late 1800s and early 1900s. Their efforts showed that dichromates could be used to create photograms, and Talbot patented a process using gelatin-like gum Arabic — a colloid — in 1853.
In 1855 Alphonse-Louis Poitevin patented a process incorporating pigment into the photosensitive combination of dichromate and colloid, making him the historical father of gum printing. The Pictorialist movement of the early 20th Century provided a moment for the painterly qualities of gum printing to shine, most notably in the work of Robert Demachy.

Demachy took full advantage of the opportunity gum offers to manipulate the print in development by brushing or washing off some of the pigment.
The process as practiced today requires the follwing discreet steps:
- Combining gum Arabic, pigment, and either ammonium or potassium dichromate.
- Brushing the mixture on to paper.
- Drying it in the dark.
- Placing a negative on top.
- Exposing to UV light.
When exposed, the dichromate hardens the gum Arabic. In places where more light reaches the gum mixture, it hardens more, and in places where less light gets through, it hardens less.
When the exposed paper is developed in plain water, the pigmented gum washes away most thoroughly in the highlight areas, where the negative has blocked most of the light, less thoroughly in the mid-tones and less still in the shadows.
What’s so great about gum printing?
If you have been, or still are, a darkroom printer, you’re already clued in to the magic of making photographs with silver-based chemistry.
Gum printing offers a version of that joy…but it differs in important ways.
Applying the photographic emulsion yourself with a brush or roller gives you a new dimension for creative expression. You have a wide range of papers that you can print on, offering options in terms of texture and feel and tone. There are countless watercolor pigments to choose from, and if you want to mix them in any combination that moves you, you can.
Gum is great for iterations: tweaking color and treatment to change the mood. I’ve learned a lot about color from just working the process.


The practical advantages of gum printing include no need for a darkroom — everything can be done in dim room light, except drying the coated paper. In addition, using plain water for development reduces the chemical load of the process — the dichromated pigment mixture is the only chemical of concern that is involved in the process.
There is no other developer, no stop bath, no fixer. And while I usually use a UV box so I can replicate results, the sun is standing by as well, useful for larger prints.
Materials!


You’ll need a few things before you get started. Unfortunately, dichromates are not available for sale to individuals in some countries, including the UK. This underlines the need to treat this chemical with respect!
- A contact negative to print.
- Paper!
- External sizing (priming) for the paper.
- Watercolor pigment.
- Gum Arabic.
- Potassium dichromate.
- Brushes for coating.
- Masking tape.
- A UV lamp or access to direct sunlight.
- A contact print frame.
- Trays to wash your paper.
- Water.
- Tongs/gloves
To get a read on costs, I went online for some prices. Bostick & Sullivan carries potassium dichromate in 10% solution, $6.30 for 100ml and gum Arabic at 14 Baume (a viscosity measure that is suitable for gum printing) at $7.30 for 100ml. Five sheets of Fabriano Artistico, 16″x 20″, runs $15. Gamblin PVA size sells in art and craft stores for about $10 for an 8.5 oz bottle.
A tube of Sennelier Aquarelle Ivory Black, 20ml, runs about $10. Pictorico OHP film is about $20 for $20 sheets, while Fixxons costs $30 for 100 sheets. A contact print frame is expensive, and I recommend using either two sheets of glass or a backing board of some time and a single sheet of glass if you don’t have a frame. Brushes, trays and rollers vary wildly in cost and you may have something at home you can use.
The materials you’ll need in further detail:
A contact negative to print: I will describe how I print my negatives but you can also use a printing service to make yours. The negative needs to be the size of your desired image, ideally printed on overhead projector film (a transparent acetate sheet) or other transparent material. Ideally, your negative will be sized to leave a border all around for taping the negative to the paper.
Paper: Good quality watercolor paper is a traditional choice. Hahnemuhl Platinum Rag is a current favorite with gum printers. I used Fabriano Artistico Hot Pressed for this.
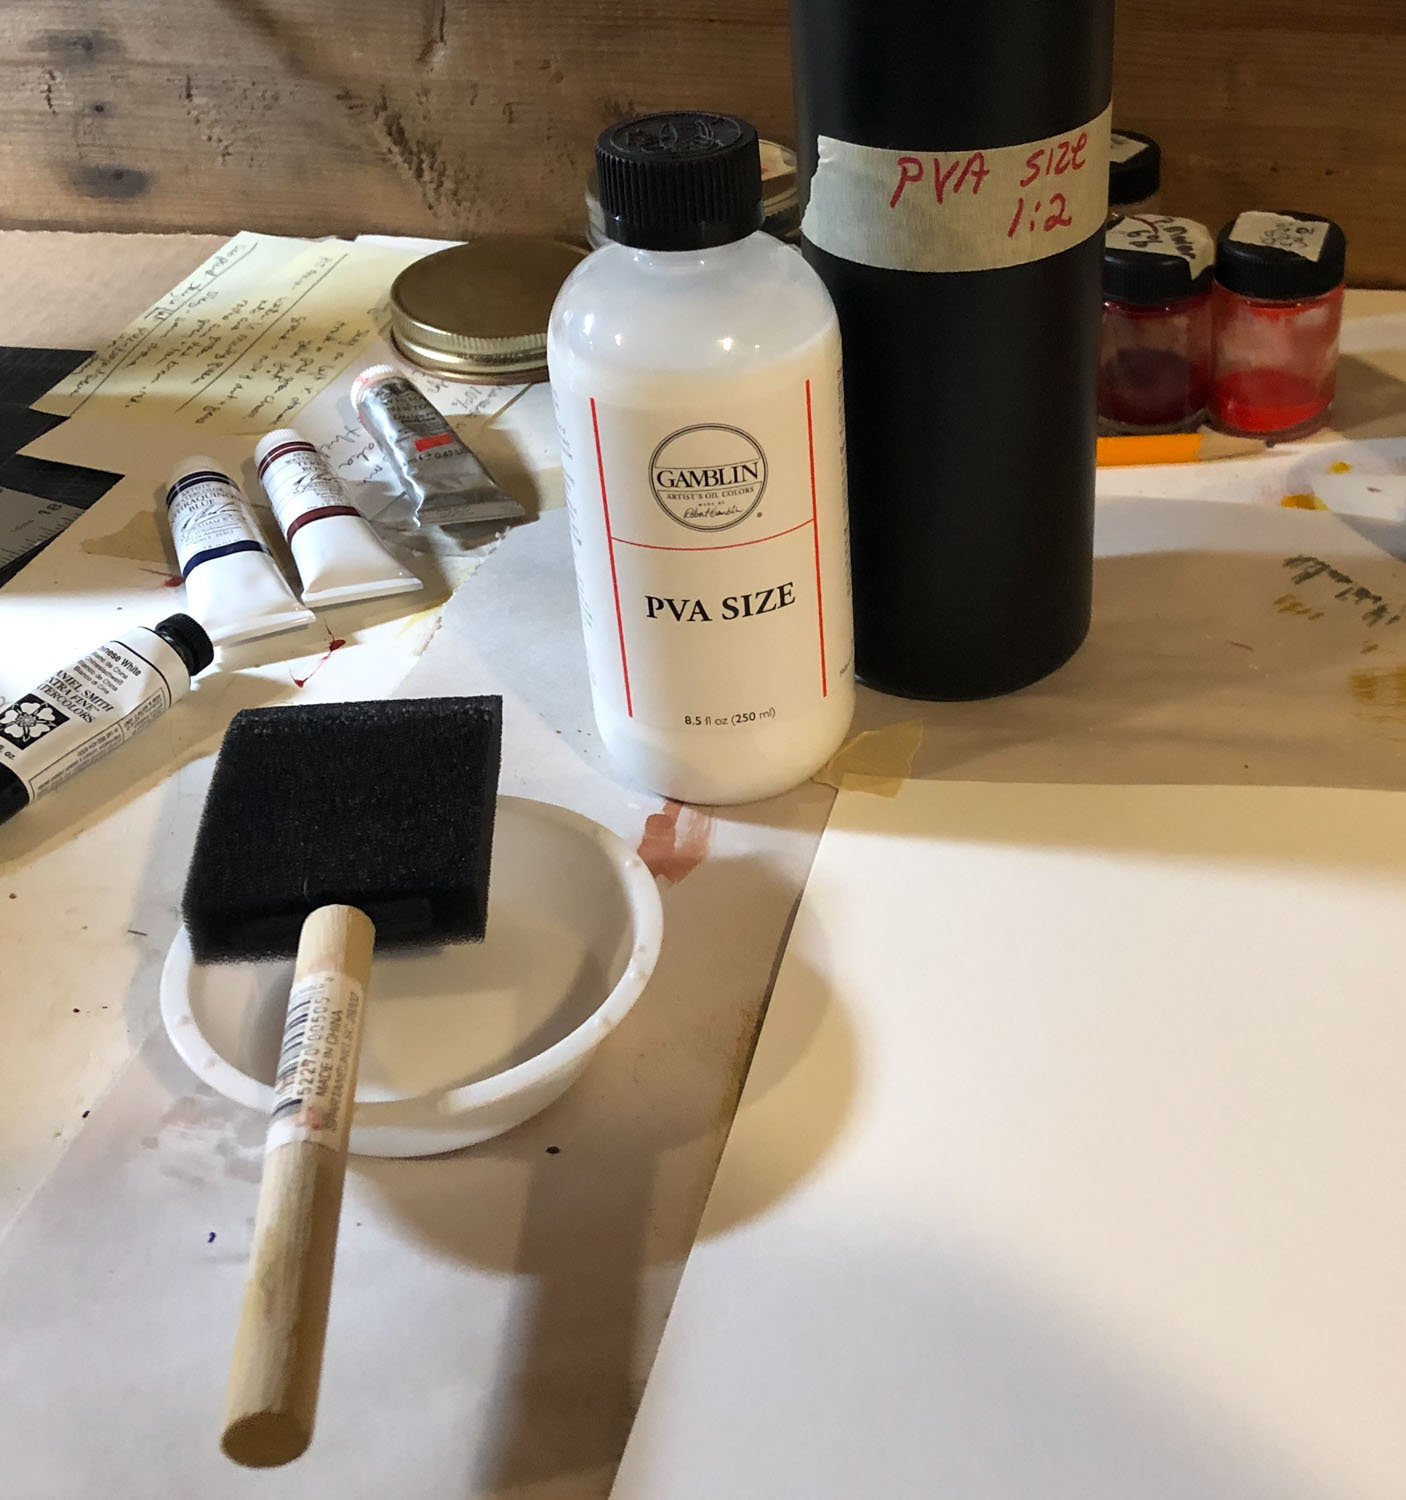
External sizing (priming) for the paper: I use Gamblin PVA size, diluted 1:2. Gum printing kits usually come with gelatin. Liquid starch, spray starch and arrowroot starch also work.
Watercolor pigment: I used Sennelier Ivory Black for this print, it is a warm black.
Gum Arabic: You can buy this premixed, or mix your own from powder or chunks. Look for 14 Baume (a measure of density) in premixed gum. Mix powdered gum or gum bits at about 30 grams per 100 mls of distilled water.
Potassium dichromate: …in a 12 percent solution, or ammonium dichromate in 10 percent solution. If you are mixing your dichromate from powder wear gloves and eye protection. Regular tap water is fine.
Brushes for coating: I use a 2” hake brush, but have also used soft synthetic brushes and foam rollers with good results.
Masking tape: I also use push pins. Multi-coat gum requires pins or some other method for making sure the negative rests in exactly the same place for each exposure.
A UV exposure unit: …or a sunny day.
A contact print frame: or two pieces of plate glass.
Two trays large enough for your paper: these should be filled at least three inches deep with tap water. Room temperature is fine. Slightly warmer water will speed development.
Water: Plain old H2O.
Tongs or gloves: for handling the print in development.
It is fine to work in dim room light. You need a box or drawer or other dark space where the coated paper can dry before exposure.
Your workspace
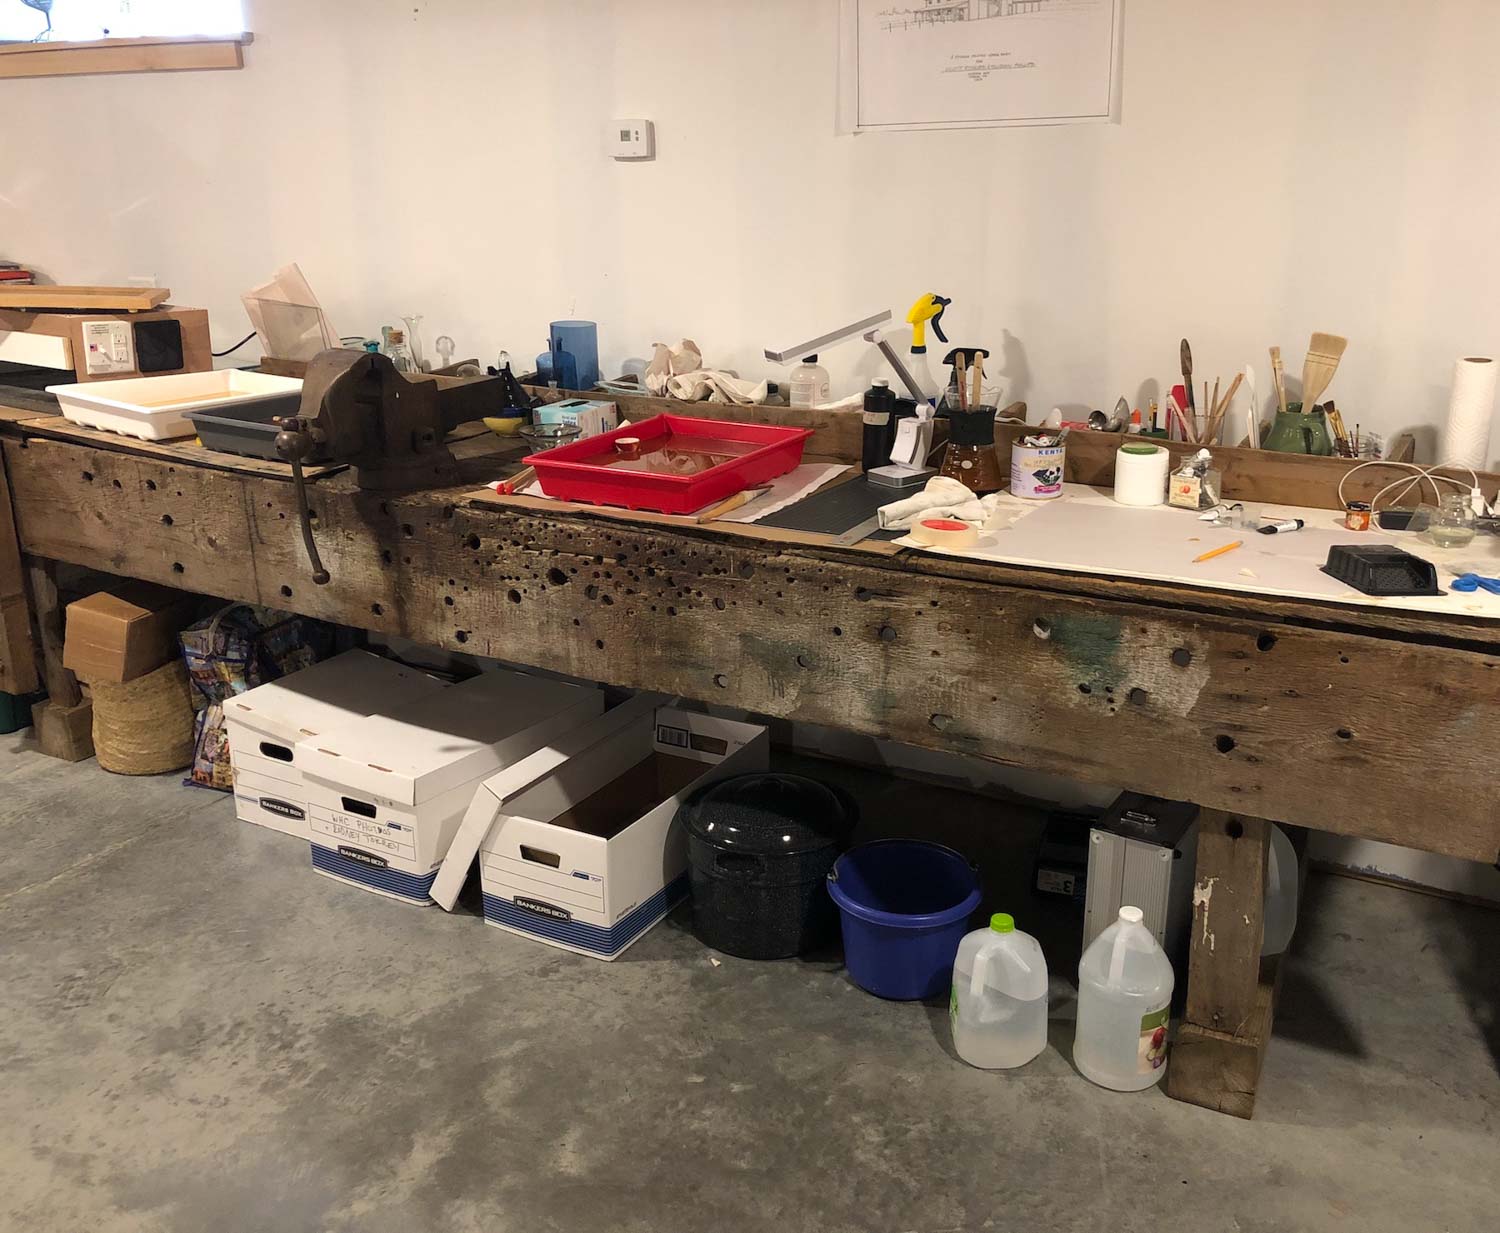


You will need a clean, dry area large enough for your paper, a dish of pigment, tape, etc. For developing the print, you will need a space where you can fit both trays of water, preferably side by side.
To dry the print, you will need clothesline, screen or other place where you can place exposed and developed prints.
The image and the negative
After selecting the image, I converted it to black and white in Photoshop and pushed the sliders around until I liked the way it looked. I then reduced the contrast in the image quite a lot. This is because a negative made from a “normal” appearing digital image will produce a very high contrast print with blown-out highlights and blocked shadows.
My advice is to reduce the contrast MORE than seems right. The first image below is what the picture looked like on my monitor before adjusting contrast. The second is with the contrast lowered.
Here is a screengrab of original image I used for this article:

And now converted to BW, then with its contrast lowered to an appropriate level and finally inverted.


With the image selected and contrast set, I then inverted the image to a negative and flipped it horizontally so that it would be correctly oriented in the printing process. I set the image size to and 7×10.5” at 360 dpi because I was going to print my negative on 8.5×11″ overhead projector film. It’s important to have a border around the image.
I also set the image mode to RGB color and 16 bits per channel as this is what works best with my Epson printer. I printed the image on Pictorico OHP film, using printer settings for glossy paper and maximum ink.
If you aren’t set up to print negatives, see if your local print shop will do this. I used to get mine printed very cheaply at a nearby office supply store. Once printed, I set it aside to dry for about an hour.

Preparing to Print
Some pre-preparation preparation notes for you:
Because I do this a lot, I keep a supply of paper on hand that I have pre-shrunk and sized. I soak paper in trays of warm water for about 20 minutes. Then I dry them on a clothesline and put the dried sheets under a piece of heavy plate glass to flatten. The reason for this is that: gum prints develop in water, sometimes for hours.
Pre-shrinking means that the finished print, when it dries, is less likely to buckle, curl and shrink. This becomes more important when printing multiple layers of gum, which I’ll talk about at the end of the article. For a single-coat gum like the example in this article, it’s not critical.
Later, I coat my paper on the printing side with Gamblin PVA size mixed 1:2 with tap water using a foam brush. This helps reduce pigment stains in the highlights. Sizing (priming) is more important than pre-shrinking for single-coat gum.
The good news is that liquid laundry starch diluted about 1:4 also works. Spray starch works but is tricky. Matte gel medium can also be used as an alternative. This is available at any art store and should be used diluted about 1:3. Food-grade gelatin is another classic option, but must be hardened with glyoxal.
Coating and drying
Before coating, I set up my work space. I lay out a dish for the pigment, a jar of water, a hake brush for coating, a small brush or spoon for mixing and a roll of masking tape.
For the coating mixture, I have a tube of Sennelier Ivory Black pigment, a jar of liquid gum Arabic, and a jar of potassium dichromate 12%.
Under my workbench I have a cardboard file box with a lid, where I will put the coated sheet to dry.
In dim room light, I put 1/2 tsp of watercolor pigment and 2 1/2 tsp of liquid gum Arabic in a small glass jar, and mix very thoroughly to avoid streaks. Note this is a very high proportion of pigment to gum, about 20 percent, because I am planning to print only a single layer. For multiple layers, I would reduce the amount of pigment by half or more.
The proportion of pigment to gum is one of the interesting variables in this process — pigments vary dramatically in their transparency, which affects how UV light passes through the coating. A useful starting point for many pigments is 1 unit pigment per 15 units of gum, compared to the 1:5 ratio I am using here. Flaking and staining of the highlights are the biggest dangers with such a saturated mixture.
Next, I combine equal amounts of the gum-pigment mixture and potassium dichromate solution. I need about 1 tsp for a print this size (7×10.5”), so I mix ½ tsp of gum/pigment and ½ tsp of dichromate in a shallow dish.
This mixture is now photosensitive. It will keep for a few days but must be stored in the dark, if you make more than you need.
I put my paper on the work surface, and I write notes on the back in pencil:
- The pigment I am using.
- The proportion of pigment to gum.
- The proportion of gum to dichromate.
- The planned exposure time.
This information will give me guidance for adjustments if the finished print isn’t satisfactory, allow me to repeat the process if I like the result and longer term, allows me to keep a direct archive.
I turn the paper over to the print side, and tape the corners down. I place the negative on the paper where I want the image to go, and make light pencil marks to show the corners of the negative. The next step is not absolutely necessary for a single-coat print but I recommend it anyway, for reasons I’ll explain later: I put a pushpin through both the negative and the paper, pinning the negative in place. Then I take out the pins, remove the tape from the corners, and put the negative away.
I wet my brush in the jar of water then blot most of the water out with a rag, then I dip the brush in the dichromated pigment mixture and coat the image area. At first the coating looks very uneven and streaky, and sometimes small bubbles will appear where the pigment won’t seem to stick. I keep brushing until the gum starts setting up and getting sticky. I can never get it to look completely smooth, I’ve learned to live with that.


I put the coated paper in the dark to dry. And then I go have lunch. I could darken the room and use a hairdryer on its cool setting to speed up the drying process. But I’d rather have lunch.
In my climate it takes about 30-40 minutes for freshly coated paper to dry.
Tip: touch the back of the paper when checking the drying process. If it feels cool, it is not dry enough.
Exposing and developing
When the coated paper is dry, I lay it on the work surface, pin the negative in place using the pinholes I created before coating and then tape the negative to the paper on at least three sides and remove the pins. I put the coated paper in my contact printing frame, and then into UV light box to expose for 15 minutes.
Black generally takes longer to expose than other colors, particularly in a strongly pigmented gum mix like the one I am using. Normal exposure times run from 3 to 7 minutes with my set-up.
After exposing, I take the paper and negative out of the frame, remove the negative and put it away. I slide the paper face up into the first tray of water and submerge it without touching the image area. It’s particularly important to wear gloves or use tongs for this to avoid getting dichromate on your skin.
I gently rock the water tray to keep water moving over the surface of the image for about three minutes. The unfixed dichromate releases from the print during this wash. I do not see much of the image when this step is over, which is not unusual when printing single-layer gum.

The next development step is to place the print face down in the second tray of water. I sometimes place a brush or similar light object across the back to make sure the entire print stays submerged. Because I’ve used a heavy pigment load and a long exposure, I know that this image will develop slowly. So I just leave it and go do other things. While I’m gone, the dichromate gum will swell up, unexposed gum will fall to the bottom of the tray, and the image will start to emerge.
How long development will take varies dramatically. But if you are not seeing your image within an hour or two, it is overexposed. If this happens, it’s a great opportunity to grab a brush or a water sprayer and see if you can remove enough pigment that way to get an interesting result. On occasion, I have left prints in the water overnight. As I said, this is a flexible process, you can push it in a lot of different ways. Leaving the print in “too long” is hard to do.
In the case of this print, I had a lot of outdoor chores, so I was gone for two hours. When I turned the print over, I could see my image pretty well, but the shadows were too dark and lacked detail.

So I took a small glass and — with the print still submerged — gently poured water over the image area from a couple of inches above the water surface. This is a fairly gentle way to speed development — the key is to be very careful not to touch the surface of the print, which is quite soft. For my example print, this worked to a degree, but some of the darkest parts of the print still lacked detail. So I took my softest hake brush and gently brushed the entire surface of the print while still underwater.
These options for mechanically encouraging development are a little scary but fun and provide an opening for some creative decisions about the image. It is a big part of why I love working with gum.
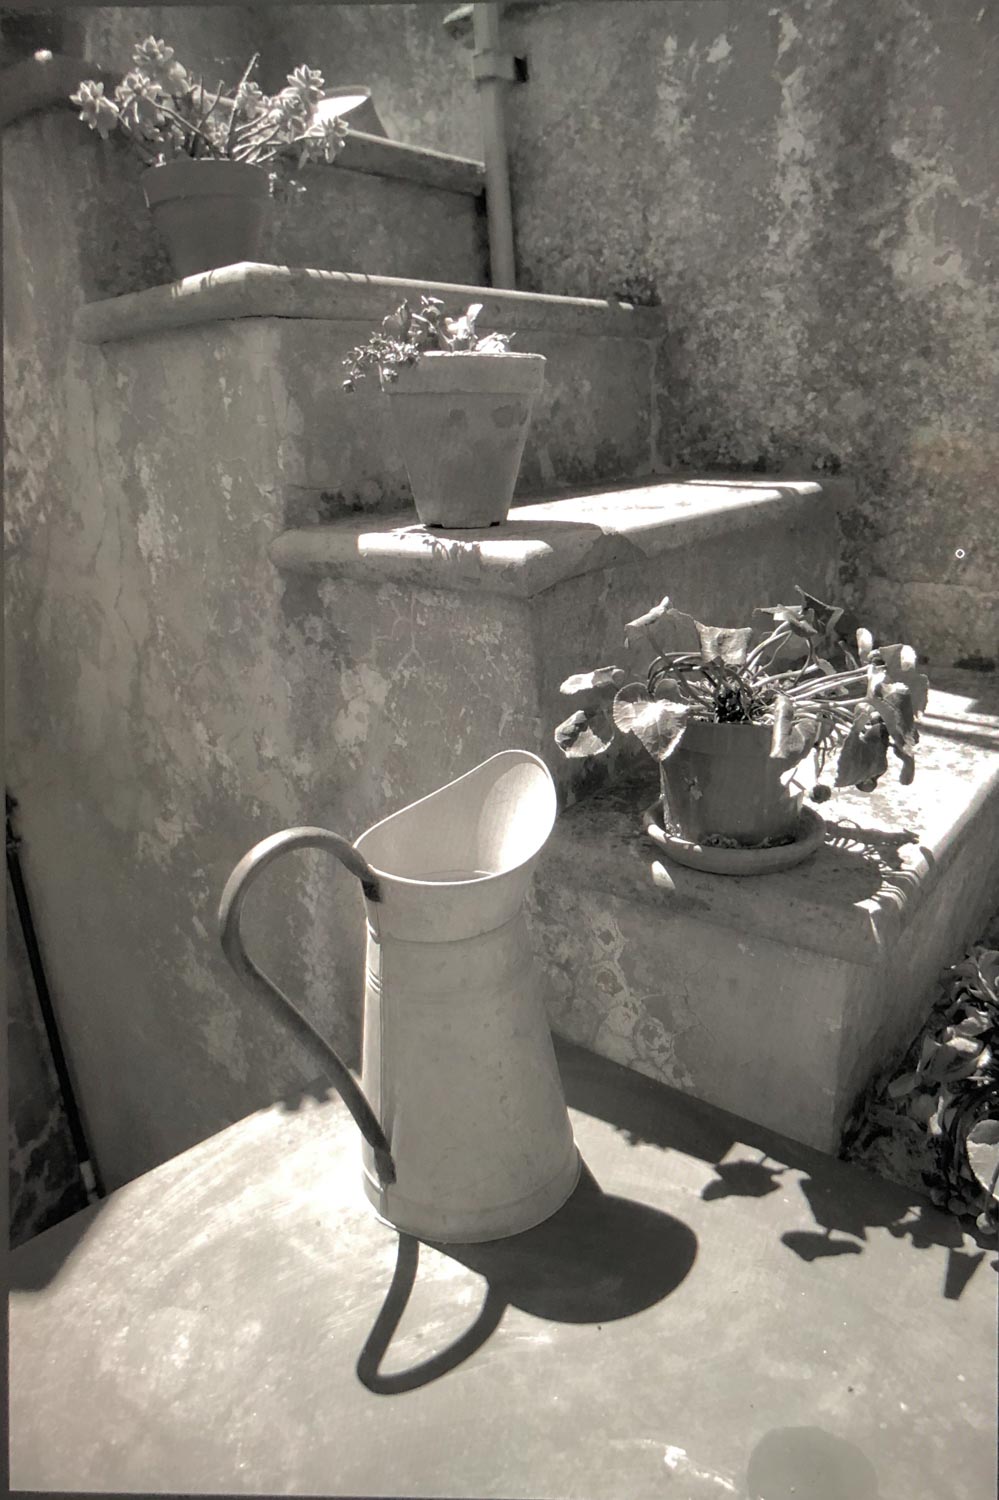
At that point, it looked done. So I took the print out of the water and hung it to dry, very carefully. The image is quite soft until it dries, but a dry gum print is sturdy and thoroughly archival.
About making those pinholes
So, why do I recommend pinning the negative to the paper before coating and exposing? Second chances. This print came out pretty well, but what if I had underexposed it and ended up with a thin, wimpy image? With pinhole registration, I can easily print another layer to add detail, depth, or tone.
I did a second print with this same negative and deliberately under-exposed it a bit, then brushed off more pigment than I would for a single-layer print. Once it was dry, it was easy to re-coat. I used an earth red pigment, Terra Rossa. This time, I used half as much pigment for the same amount of gum. The pinholes I had made for the first print made it easy to place the negative in exact registration with the image. I exposed for 3 minutes and developed as described. It now begins to have some of the depth of tone I love in gum prints.

So there you have it, gum printing in a hurry, relatively speaking! There’s a lot more to explore with gum, such as three-color gum using color separation negatives, three-color gum over cyanotype, and so on and so on.
Check out these contemporary gum artists to see some of gum printing’s capacity for beauty: Diana H. Bloomfield, Sandra C. Davis, Tony Gonzalez, Peter Liepke and Christina Z. Anderson.
Please let me know how you get on, and if you have questions, ask in the comments!
~ Susan
Share your knowledge, story or project
The transfer of knowledge across the film photography community is the heart of EMULSIVE. You can add your support by contributing your thoughts, work, experiences and ideas to inspire the hundreds of thousands of people who read these pages each month. Check out the submission guide here.
If you like what you’re reading you can also help this passion project by heading over to the EMULSIVE Patreon page and contributing as little as a dollar a month. There’s also print and apparel over at Society 6, currently showcasing over two dozen t-shirt designs and over a dozen unique photographs available for purchase.


4 responses to “Results WILL vary: An introduction to the endless creative expression of gum printing”
Hi Susan,
Thanks a lot for your introduction to gum printing!
Do you have any printer suggestion for the digital negatives ? I heard that epson printers were quite good but it is very hard to find the right printer in term of price and quality when you’re a beginner in alternative processes. Thanks! : )
Thank you very much Susan for this great introduction to gum printing. It was very inspiring. I have to try this process.
I hope you do, and if you run into any problems or questions please ask. Would love to see your results!
Thank you so much Susan. Great article !